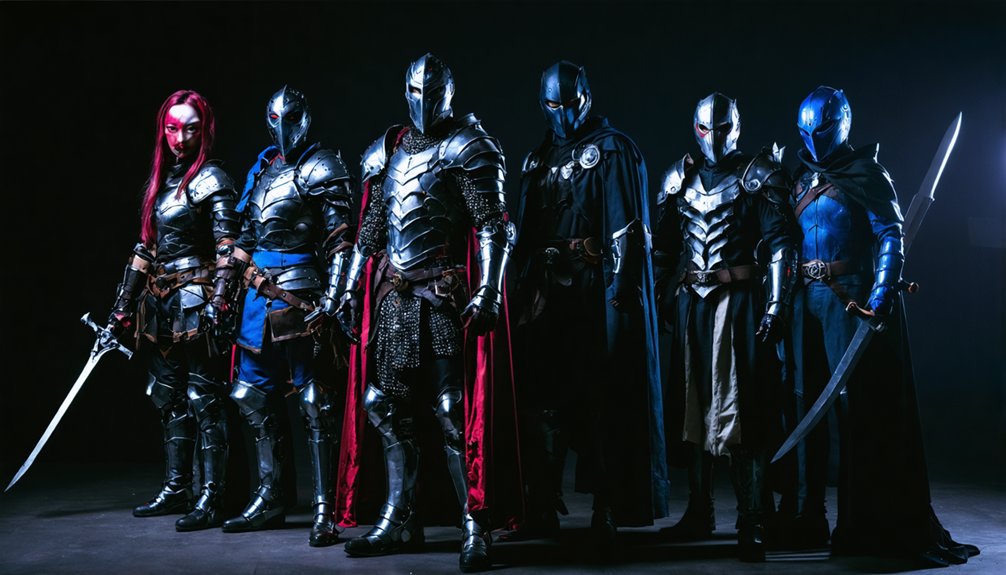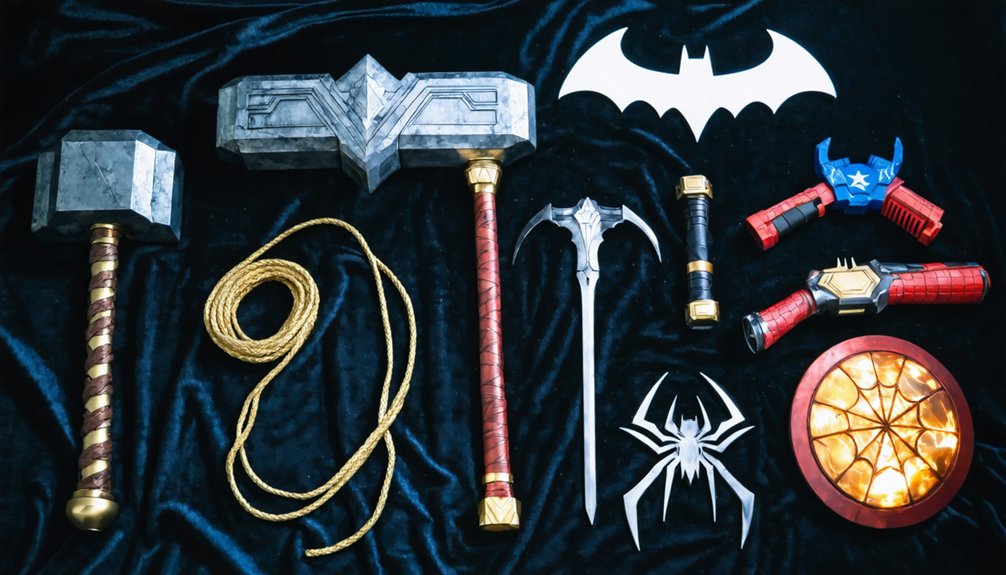
You’ll find Captain America’s vibranium shield, Wonder Woman’s LED-lit Lasso of Truth with bracelets, and Thor’s foam-core Mjolnir among the top cosplay props. Batman’s batarangs and grappling hook deliver iconic utility, while Green Lantern’s motion-activated power ring paired with its battery creates authentic Corps aesthetics. Deadpool’s dual katanas, Black Panther’s retractable claws, Iron Man’s arc reactor with repulsor gauntlets, and Hawkeye’s collapsible bow round out essential builds. Each prop demands specific materials—from EVA foam to thermoplastics—with construction techniques that guarantee convention compliance while maximizing screen accuracy.
Key Takeaways
- Captain America’s 26-inch Vibranium shield uses lightweight materials, concavo-convex geometry, and weathering techniques for screen-accurate construction weighing approximately 12 pounds.
- Wonder Woman’s 150-foot Lasso features LED-lit braided cord with paracord cores, while vacuum-formed bracelets include interior padding for comfort.
- Thor’s Mjolnir combines foam core construction, Arduino-controlled LED lightning effects, wrapped leather handles, and metallic dry-brushing for battle-worn appearance.
- Batman’s Batarangs utilize zinc alloy or AZ-70 plastic with waterjet cutting, while grappling hooks use toy gun bases with three-pronged paper clip hooks.
- Black Panther’s retractable claws employ 3D-printed mechanisms, pen-based deployment systems, or fingerless glove integration with Wakandan-inspired amber accent painting.
Captain America’s Vibranium Shield
Captain America’s vibranium shield stands as the most iconic prop in superhero cosplay, demanding precise attention to its 2.5-foot diameter and concavo-convex disc geometry. You’ll need to balance shield weight and mobility—the canonical 12-pound specification guarantees authentic handling while enabling dynamic throws and blocks.
For serious fabricators, spun metal from vendors like Accurate Metal Spinning delivers superior shield material durability and cost efficiency compared to foam alternatives. The vibranium-steel alloy can’t be replicated, but aluminum constructions at one-third steel’s weight mirror the original’s physics.
You’re targeting that 26-inch diameter sweet spot most cosplayers prefer, with a 9.5-inch center star field. Consider how Chris Evans’ screen version prioritized maneuverability—your prop should ricochet convincingly while remaining stage-combat safe.
Wonder Woman’s Lasso of Truth and Indestructible Bracelets
While Captain America’s shield demands metalworking expertise, Wonder Woman’s signature props require mastery of flexible materials and illumination techniques. You’ll need to engineer the Lasso of Truth using flexible LED rope lighting embedded within braided golden cord, achieving the mythological fire effect from Hephaestus’s forge. The 150-foot length requires lightweight materials like paracord cores wrapped in metallic fabric, maintaining both durability and the Amazons’ spiritual connection to Gaea’s energies.
For the Indestructible Bracelets, vacuum-form thermoplastics over custom molds, then apply metallic finishes with weathering techniques that suggest ancient craftsmanship. Incorporating interior padding guarantees comfort during extended wear. These creative mythological details—from the Golden Girdle origins to Hestia’s empowerment—should inform your material choices, transforming basic components into artifacts worthy of Themyscira’s greatest warrior.
Thor’s Mjolnir Hammer
You’ll need to choose between foam core construction with EVA reinforcement or thermoplastic forming for your Mjolnir build, as each material affects weight distribution and structural integrity differently.
Integrating LED strips along the hammer’s edges requires routing channels during initial construction, with Arduino-controlled patterns creating authentic lightning effects that replicate the MCU’s visual signature.
Your handle demands wrapped leather or faux-leather strips over a textured base layer, while strategic acrylic weathering with metallic dry-brushing techniques establishes the battle-worn patina seen in screen-accurate props.
Foam and Thermoplastic Construction
How do you transform basic foam sheets into a screen-accurate replica of Thor’s legendary hammer? You’ll start with 5mm Profoam H as your structural foundation, creating precise geometric cuts with beveled edges for seamless bonding. Layered foam techniques elevate surface complexity—stack 2mm craft foam pieces to build dimensional details while carving V-pattern trenches ¼ inch deep for authentic weathering lines.
Your construction workflow includes:
- Score and bend foam discs around the handle core for organic curvature
- Fill end caps with expanding foam before sealing for structural integrity
- Reinforce vulnerable areas with barbecue sticks and thermoplastic molding processes
Contact adhesive creates permanent bonds when edges are compressed firmly. Prime surfaces with wood glue, then achieve battle-worn metallics through dry-brushed acrylics over aluminum silver base coats mixed with black pigments.
LED Lightning Effects Integration
Bringing Thor’s hammer to life requires strategic placement of LED components and power systems within your foam or 3D-printed structure. You’ll need to integrate LED control circuits with a handle-mounted button that triggers multi-color lights and sound effects simultaneously.
For advanced builds, Tesla coils generate authentic electrical arcs from the hammerhead, though Tesla coil safety considerations demand electroplating with nickel conductive paint and fire extinguisher proximity during testing.
Wire your LED eyes through the helmet using hot glue stabilization, masking integration points with painter’s tape before applying finish coats. The 3D-printed Mjolnir remix accommodates coils secured with 2x7mm magnets. Connect power after assembly, ensuring proper circuit completion.
This configuration delivers movie-accurate lightning effects while maintaining structural integrity across your 4.5-pound prop.
Handle Grip and Weathering
- Apply woodglue primer followed by Lascaux silver-black mixture on metal surfaces
- Dry brush rusty details using brown, red, and black acrylics in irregular patterns
- Sand through 9 coats of spray silver to 400 grit for authentic wear marks
Carve imprecise vine patterns with a Dremel for natural organic texture.
Batman’s Batarangs and Grappling Hook

You’ll need to select appropriate materials for your batarang based on convention safety requirements—zinc alloy or AZ-70 grade plastic for permitted props, while reserving stainless steel constructions for display-only replicas. Trace your chosen design onto your material, cut using strong scissors for plastic or waterjet cutting for metal plates, then sand all edges smooth with progressively finer grits.
For grappling hooks, prioritize lightweight construction with secure adhesive bonding rather than functional mechanisms, as most conventions prohibit projectile components or tensioned cables.
Batarang Construction and Materials
Consider these construction pathways:
- Metal fabrication: Waterjet-cut stainless steel, titanium, or brass with angle grinder beveling
- Thermoplastic forming: Heat-bent 3-inch PVC pipe flattened and scroll-sawed into shape
- Rapid cardboard prototyping: Layered box material reinforced with black duct tape
Material Weathering Applications elevate finished pieces—apply Plasti Dip base coats before strategic spray painting. Bench sanders smooth PVC surfaces, while deliberate grinding creates battle-worn authenticity on metal variants.
Grappling Hook Assembly Techniques
Transforming a plastic toy gun into Batman’s signature grappling launcher demands methodical material layering and structural reinforcement. You’ll construct the barrel using pen tubes or marker caps hot-glued to your base gun, reinforcing with duplicate cardboard layers for dual support. Form your three-pronged hook by bending paper clips around wooden dowels, securing with super glue and cardboard wrapping.
EVA foam panels in 5mm and 1-inch thicknesses provide authentic contouring when beveled and layered.
Your firing mechanism integrates a clothespin trigger that releases rubber band tension, propelling the hook forward. Thread 350-pound test monofilament through the barrel as your reusable grappling line, connected to a motorized retraction system mounted on your utility belt harness. This configuration enables authentic deployment while maintaining structural integrity through spray-painted finishing.
Safety Compliance for Conventions
Before entering any convention floor with your Batman grappling hook or batarangs, you must verify your props meet facility-specific safety standards that distinguish display pieces from prohibited weaponry. Your grappling hook can’t feature functional projectile mechanisms—strings, springs, or launching capabilities immediately disqualify it. Batarangs require dulled edges without throwing capability.
Navigate weapons inspection protocols efficiently:
- Locate the Prop Check Table immediately upon arrival for mandatory tagging
- Maintain visible placement of issued tags throughout the event
- Return daily for prop tagging procedure at security stations near entrances
Construct replicas from foam, cardboard, or lightweight materials exclusively. Security evaluates each piece case-by-case, reserving revocation rights for misuse. Multi-day events demand daily re-inspection—no permanent markings suffice. Your compliance guarantees both floor access and community safety standards.
Green Lantern’s Power Ring and Battery
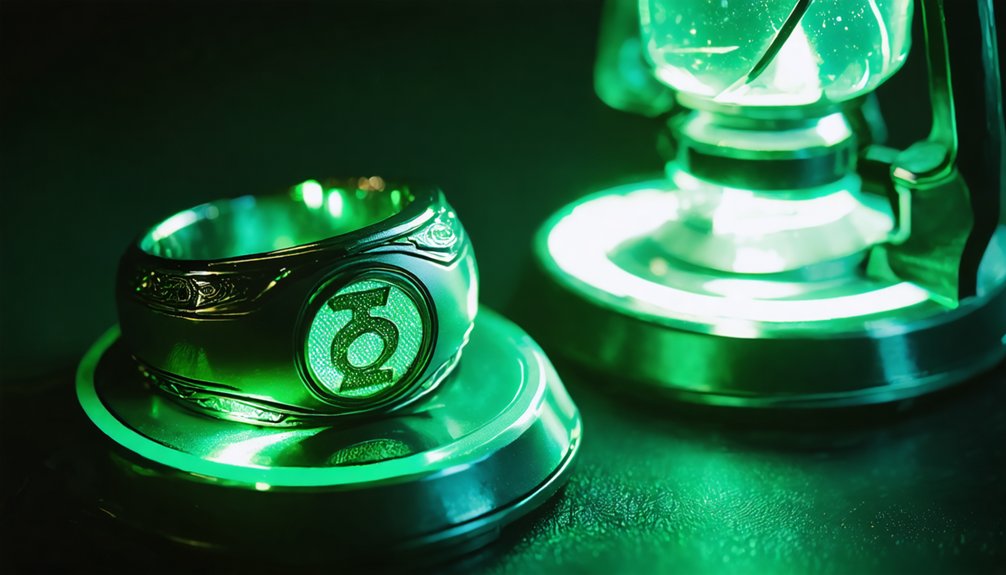
Since Green Lantern‘s power ring draws its charge from the iconic battery, you’ll need both components to achieve an authentic Corps member appearance. Licensed replicas incorporate motion-activated illumination technology—position the adjustable ring near the 11.5-inch battery to trigger LED sequences, creating a dynamic universal power source that responds to proximity.
The DC Collectibles version requires three batteries installed through a streamlined hatch mechanism. Each component includes dedicated display stands, allowing you to configure your visual display design independently or as an integrated charging station. The battery features precision-engraved Corps symbols, while the ring’s adjustable backing accommodates various finger sizes.
Budget options start at $39.99, though premium 1:1 scale versions deliver superior material construction and enhanced interactive features for serious collectors.
Harley Quinn’s Mallet and Baseball Bat
When constructing Harley Quinn’s signature weapons, you’ll need to master foam core techniques using EVA or polyurethane foam to achieve the proper dimensions—80cm length for the bat with a 3cm handle diameter and oversized proportions for the mallet.
Your paint application must replicate the distressed aesthetic through layered acrylics, incorporating “Good Night” lettering, Joker faces, and strategic weathering with black washes and dry-brushing techniques.
You’ll want to balance screen accuracy with convention logistics, keeping your props under 1kg and ensuring they’re collapsible or sectioned for transport through venue security checkpoints.
Foam Construction Techniques
Harley Quinn’s oversized mallet and baseball bat demand precise foam construction techniques that balance visual impact with practical portability. Foam patterning development begins with digital image editing to establish accurate dimensions, followed by paper prototypes that transfer onto 10mm black EVA foam using markers or awls.
Thermal shaping techniques require heat guns—not hairdryers—to soften the material for curved surfaces and dimensional details.
Essential Construction Elements:
- Core Reinforcement: Insert PVC pipes through foam layers for structural rigidity while maintaining lightweight handling
- Beveled Edge Assembly: Layer foam with angled cuts, bonding with contact cement or hot glue for seamless joints
- Surface Refinement: Employ Dremel tools and sandpaper to eliminate rough edges before applying foam clay sculptural details
This methodology produces convention-safe props that withstand repeated use.
Paint and Weathering Details
Achieving authentic comic book aesthetics requires strategic paint layering that transforms raw foam into convincing replicas of Harley Quinn’s signature weapons. You’ll start with Plastidip reinforcement, followed by beige primer for wooden elements and brown spray paint for metallic components.
Apply contact adhesive-backed diamonds cut into precise red and black patterns on your mallet head. Create depth through weathered paint techniques—brush dark brown over beige bases, then reapply lighter tones to define cracks and wear.
Chrome finishes demand 50-centimeter spray distances for even metallic coverage on PVC or steel components. Incorporate latex sealant application between layers for durability.
Execute wood grain effects through airbrushing and stenciling, while rusted brown and black sprays deliver authentic barbed wire aesthetics. Sand between coats for professional-grade surface adhesion.
Size and Portability Considerations
Selecting the right dimensions for Harley Quinn’s iconic props directly impacts your mobility throughout convention venues and photo sessions. The standard 31.5-inch (80 cm) baseball bat offers authentic character accuracy while maintaining manageable transport logistics. Consider these critical specifications:
- Material selection affects weight balance—wooden construction provides authentic heft but causes fatigue during 8+ hour events, while foam alternatives reduce strain
- Convention compliance requires measuring props against venue restrictions before attendance
- TSA regulations prohibit carry-on transport, necessitating protective boxing for checked luggage
Choose dimensions based on your height proportions and endurance requirements. The 72 cm variant delivers easier handling without sacrificing visual impact. Strategic material choices between wood, foam, and rubber constructions optimize the weight balance between authenticity and all-day wearability during extended cosplay sessions.
Deadpool’s Dual Katanas
Among Deadpool’s most recognizable accessories, his dual katanas represent a cornerstone prop for accurate cosplay construction. You’ll find replicas spanning 28-41 inches overall length, crafted from materials ranging from 3D-printed ABS plastic to high-quality forged steel with polished blade finish and detailing including fullers, habaki, and seppa elements.
Premium options feature 440 stainless steel anodized black blades, while budget-conscious builders can utilize foam board or cardboard with basic tools. Standard specifications include 25-inch blade lengths paired with 9.5-inch handles.
For sheath attachment and positioning, crossback harness systems provide X-shaped diagonal mounting across your back. Adjustable leather or nylon straps accommodate various body types, though conventional back-mounted dual katanas remain decorative-only due to practical drawing limitations. Licensed sets range $60-$130, with DIY alternatives available under $20.
Black Panther’s Retractable Claws
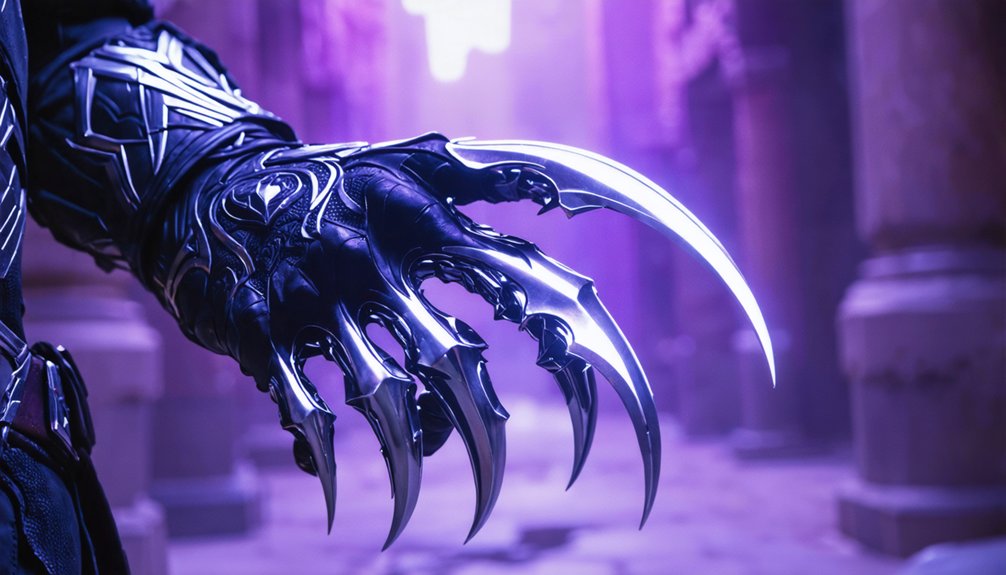
Black Panther’s retractable claws offer cosplayers a mechanically complex prop that demands precision engineering whether you’re building from scratch or modifying commercial options. Your material composition choices directly impact deployment reliability—3D-printed mechanisms cost approximately $5 but require performance testing to validate spring tension and slide tolerances.
Construction approaches include:
- Pen-based mechanisms using X-acto blades with carved channels and string-actuated locking systems
- Fingerless glove integration enabling finger-bend deployment through notch-catching tension control
- Commercial Hasbro alternatives featuring strike-motion activation for simplified functionality
The DIY route demands Dremel precision when grinding blade channels to the halfway mark, ensuring friction-free extension. Performance testing verifies your knot displacement triggers properly while maintaining secure retraction. Vibranium aesthetics emerge through strategic paint application and Wakandan-inspired amber accents, transforming functional mechanics into character-authentic weaponry.
Iron Man’s Arc Reactor and Repulsor Gauntlets
Iron Man’s Arc Reactor combines precision engineering with integrated LED systems, demanding material-specific decisions that balance screen accuracy against wearability constraints. You’ll construct your reactor through 3D-printed multi-piece assemblies featuring steel casings, resin coils, and transparent acrylic cores spanning 3-4 inches diameter.
LED array variations accommodate 5V-20V configurations using coin cells, 9V clips, or rechargeable lithium-ion packs with touch-sensitive activation circuits. Magnetic mounting approaches utilize embedded neodymium magnets for snap-to-costume integration, eliminating adhesives while enabling quick-release functionality during extended convention wear.
Pre-made replicas start at $27.50 on platforms like Etsy, while custom builds incorporate copper wire detailing, orange-painted coils, and flex-voltage regulators for power efficiency. Advanced designs feature external power connections for continuous operation without battery concerns.
Hawkeye’s Collapsible Bow and Trick Arrows
While Hawkeye’s collapsible bow lacks the technological flash of arc reactors, its engineering demands sophisticated material selection and mechanical precision. You’ll need carbon fiber limbs with strategically positioned breaking points that enable deployment in a single motion.
The 135 cm functional replica incorporates:
- Mechanized quiver integration with dual bundle quiver design separating arrow shafts from payload cassettes
- Remote detonation capability controlling explosive, grappling, and burst shot arrowheads post-firing
- Adjustable sight systems featuring red laser targeting and counterweight balancing for accuracy
The bow’s transformation potential extends beyond archery—converting to a bo staff for melee combat or incorporating grappling modifications. For cosplay applications, detachable limbs provide portability while maintaining structural integrity during draws, making this prop both display-worthy and functionally capable.
Frequently Asked Questions
What Materials Work Best for Lightweight Armor Construction at Conventions?
You’ll achieve ideal lightweight armor using molded EVA foam for flexible pieces and thermoformed plastic sheets for rigid components. These materials offer exceptional strength-to-weight ratios, heat-shaping versatility, and convention-compliant construction that won’t compromise your mobility or comfort.
How Do I Make Prop Weapons Comply With Convention Safety Standards?
You’ll meet convention safety requirements by using approved lightweight materials, adding orange tips to prop guns, zip-tying moving parts, and following prop modification guidelines. Submit weapons for daily inspection, ensuring they’re non-functional and clearly marked as replicas.
What Tools Are Essential for Beginner Cosplay Prop Fabrication?
Starting your prop journey? You’ll need utility knives, heat guns, and rotary tools for proper cosplay material selection. Master basic prop sculpting techniques with hot glue guns, sanders, and craft scissors to transform foam into professional-grade weapons.
How Can I Add LED Lighting Effects to Costume Props?
You’ll achieve ideal LED strip placement by creating channels within your prop’s structure, securing battery pack integration through magnetic panels for easy access. Use foam cores for wire routing, and apply diffusion materials to eliminate visible hotspots.
What Finishing Techniques Make Props Look Weathered and Realistic?
You’ll achieve authentic weathering through distressing paint techniques like dry brushing, washes, and pigment application, while replicating surface damage using sandpaper, strategic tears, and targeted wear placement. Layer effects gradually, focusing on natural stress points for maximum realism.