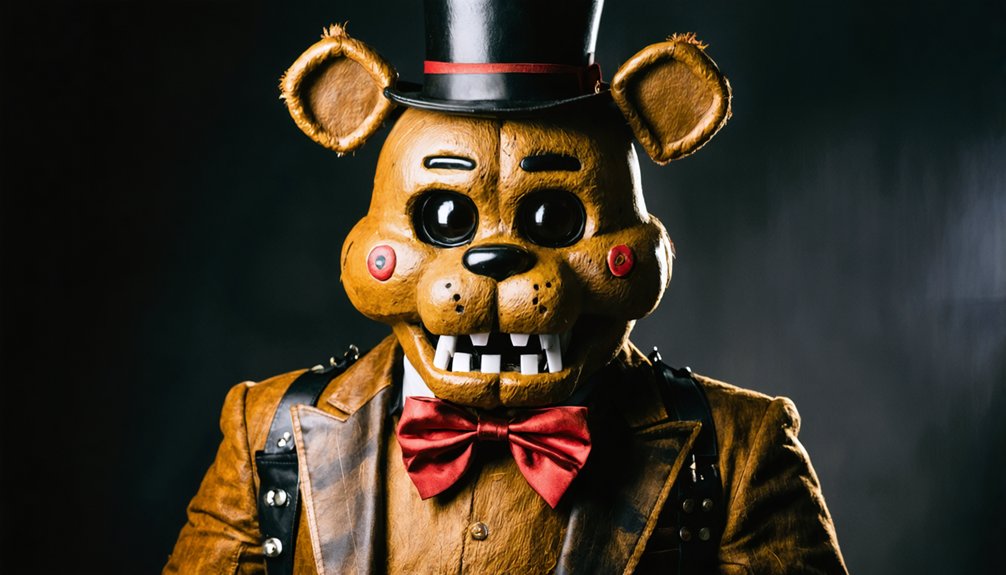
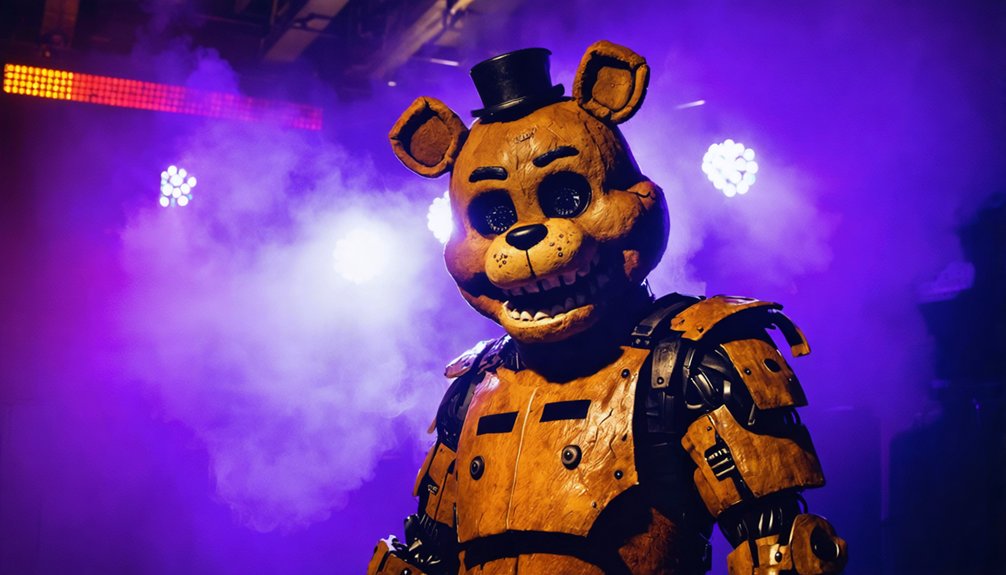
You’ll need project foam (24in x 72in x 1in) and 10mm EVA foam for your Freddy Fazbear build. Start by layering foam strategically on the head’s sides, forehead, and cheeks, then construct your jaw base with reinforcement slits. For visibility, install black theatrical mesh (70-80 denier) behind 3D-printed eye structures with LED backlighting. Use 4 yards of purple fabric for the body with integrated suspenders, and secure your headpiece to a reinforced cap using brad pins. The techniques below reveal advanced weathering and electronics integration methods.
Key Takeaways
- Layer 10mm EVA foam on polyfoam base for the head, reinforcing the jaw with foam board and creating eye sockets for visibility.
- Install black theatrical mesh (70-80 denier) behind eye openings with Velcro attachment for one-way visibility and removable printed iris overlays.
- Use brown felt or fleece for the body costume with adjustable suspenders and elastic bands for comfort during extended wear.
- Secure the headpiece to a reinforced headband or cap base using brad pins and hot glue for stable attachment.
- Add optional LED NeoPixels or components behind 3D printed translucent eye structures for authentic illuminated effects.
Essential Materials and Tools for Your Freddy Fazbear Build
Before you begin fabricating your Freddy Fazbear cosplay, you’ll need to source the correct materials for both structural integrity and surface finishing. Project foam (24in x 72in x 1in) from Joann’s forms your primary structure, while EVA foam handles mask components and stress points.
You’ll require 4 yards of purple material for minimal-seam body construction, plus light brown fabric for head covering. Texture variation techniques demand both craft foam and upholstery foam options. Polyform Sculpey III white clay sculpts teeth details with coat hanger wire reinforcement.
Secure contact cement, hot glue, and duct tape for assembly phases. Box cutters and Exacto knives enable precise shaping. Fillable plastic ornaments create eye structures when paired with printed iris sheets. Black nylons conceal facial features. Protective finger caps prevent burns during extended hot glue gun sessions. Integrated LED lighting components require early planning for proper wiring channels within foam layers. Consider playing background music during your build sessions to maintain energy and focus throughout the construction process.
Constructing the Signature Freddy Head and Face Structure
You’ll begin the head structure by layering 10mm EVA foam strategically on the sides, forehead, and cheeks to build dimensional volume while eyeballing symmetrical proportions.
Form the jaw base by gluing multiple foam pieces together, cutting slits in the top section for foam board reinforcement that prevents structural collapse.
For visibility during wear, you’ll construct two eye sets—decorative show eyes with printed irises attached via Velcro, and mesh-covered versions that allow see-through sightlines while maintaining the character’s appearance. Create eye plates by cutting rectangular sections that align with the eyeball centers, then attach these plates to the main head structure using contact cement for a secure bond.
Instead of EVA foam, consider using polyfoam as the base material since it’s commonly recommended for beginners and can be easily glued and carved to shape.
Foam Base Assembly Steps
Creating Freddy Fazbear’s distinctive head structure starts with project foam sheets measuring 24in x 72in x 1in thick as your primary construction material. Begin by cutting foam to half size for the muzzle, preventing oversized proportions. Draw the face outline directly onto foam for accurate shape visualization.
Layer three additional sheets to build volume using advanced foam layer adhesion methods with two-part epoxy glue. Sand all edges to eliminate sharp surfaces that compromise finishing quality. After assembly, sand parts progressively using low to high grit sandpaper for optimal surface preparation.
For foam fabrication techniques, form the muzzle from a large foam cube with additional layers. Bevel extra pieces before gluing them onto cube edges. After initial assembly, carve the cube for refined contours.
Construct the jaw base by gluing multiple foam pieces together, then cut slits in the top to accommodate foam board supports for structural integrity. Cut black leather for the nose and glue it over a foam piece to create the character’s distinctive snout feature.
Eye Visibility Solutions
How can you maintain clear sightlines while preserving Freddy’s iconic staring blue eyes? Strategic eye hole placement guarantees unobstructed vision while maintaining character authenticity. Position openings discreetly around the blue eye areas, integrating them seamlessly with hand painted details.
Four Critical Visibility Solutions:
- Discreet Eye Apertures – Cut small holes within the animatronic’s eye sockets, camouflaging them beneath the pupils or irises
- LED Eye Integration – Install illuminated eyes that provide ambient light while concealing viewing ports behind translucent components
- 3D Printed Eye Structures – Design printed elements with built-in sightlines that accommodate various head sizes
- Mesh Screen Inserts – Apply black theatrical mesh behind eye openings for one-way visibility
These techniques work alongside movable jaw mechanisms, ensuring your entire facial structure remains functional. Professional overhead latex masks incorporate discreet eye holes positioned around the blue staring eyes, offering wearers reliable visibility while maintaining the character’s menacing appearance. Large custom 3D printed masks can be engineered with integrated visibility solutions that provide clear vision through the mask while maintaining the authentic animatronic aesthetic. Test visibility before finalizing construction to guarantee peak performance during extended wear.
Creating See-Through Eyes With Maximum Visibility
You’ll achieve ideal visibility through Freddy’s eyes by implementing a three-layer approach: black mesh fabric as the vision barrier, velcro strips for removable attachment, and printed iris overlays that maintain the character’s aesthetic.
The mesh selection requires a fine weave that blocks external viewers while maximizing your interior sightlines—typically 70-80 denier theatrical scrim or millinery netting.
Position industrial-strength velcro around the interior eye socket perimeter, allowing you to swap iris designs printed on transparency film or acetate sheets that layer over the mesh foundation. Using transparent PLA filament for 3D-printed eye components creates a translucent effect that allows ambient light to pass through while maintaining structural integrity.
For enhanced lighting effects, install wired NeoPixels behind the eye assembly, which come with a 3-prong connector and can be powered by a portable USB power bank for mobility during wear.
Black Mesh Material Selection
The foundation of convincing animatronic eye concealment relies on vinyl-coated polyester mesh, which outperforms standard window screening through its superior light-blocking density and structural integrity. This material quality comparison reveals why professional cosplayers avoid pantyhose alternatives—camera flash penetration compromises character immersion.
Your customization considerations should include:
- Thickness specifications: Professional-grade mesh exceeds standard screening density for ideal darkness
- Paint compatibility: Acrylic applications enhance aesthetic without clogging perforations
- Waterproof construction: Vinyl coating prevents moisture degradation during extended convention wear
- Flexible cutting properties: Standard scissors enable precise aperture matching
You’ll find pre-cut 8.5″ x 11″ sheets ($5.30-$9.78) through specialized costume suppliers. The interior darkness creates optical asymmetry—observers see blackness while you maintain unobstructed outward vision, achieving authentic animatronic concealment.
Velcro Eye Attachment System
Strategic velcro placement transforms Freddy Fazbear’s signature eyelids into functional, removable components that preserve your outward visibility while maintaining character accuracy. Begin by creating clear tape patterns around the fursuit eyes, marking eyeliner shapes with Sharpie for precise transfer. Trim excess fur to optimize adhesion surfaces before attachment.
Clip felt backing to velcro tape strips, then sew matching thread to secure the bond—flip orientation for symmetrical left-right applications. Trace glitter fabric shapes slightly downward to maintain sightlines while achieving character authenticity. Apply variable velcro tension by attaching outer corners first, progressing inward for balanced symmetry.
Mark inner eyelid positions using chalk markers on the fursuit head. Custom velcro configurations guarantee exact eyelash contours fit precisely, creating removable assemblies that facilitate easy access without compromising structural integrity or visual appeal.
Iris Overlay Print Techniques
Once eyelid assemblies secure properly to your mask base, focus shifts to engineering functional eye components that balance character accuracy with performer sightlines. Source high-resolution iris images from official animatronic references matching your specific variant. Print quality control determines how effectively light transmits through acrylic spheres during LED activation.
Iris construction sequence:
- Print and seal – Apply two-part epoxy coating application over printed pupils to create protective barriers before paint stages
- White base layers – Build five opacity coats across acrylic surfaces while masking iris regions
- Black light barriers – Add five interior coats directing LED illumination exclusively through pupils
- LED integration – Position inexpensive Christmas lights behind spheres for authentic animatronic glow effects
This dual-layer paint system prevents external light bleeding while maximizing internal projection clarity.
Building the Complete Body Costume and Accessories
When constructing Freddy Fazbear’s body costume, you’ll need to establish a solid foundation using brown felt or fleece as your primary fabric material. Select a simple brown shirt as your base garment, then integrate adjustable suspenders for authentic character replication.
Prioritize wearability considerations by incorporating elastic bands and breathable fabrics for extended convention wear.
Secure your headpiece to a reinforced headband or cap base using brad pins and hot glue for structural integrity. Position the signature mini top hat atop the head assembly, ensuring proper weight distribution.
For enhanced visual impact, install optional LED components within the eye cavities to create an eerie luminescent effect.
Source eco-friendly materials from thrift stores to reduce production costs while maintaining quality standards. Employ Velcro attachments for removable display elements, allowing seamless shifts between show-accurate presentation and functional visibility modes.
Adding Professional Details With Foam and Paint Techniques
Professional foam detailing begins with strategic layer application—you’ll need approximately three foam sheets stacked and bonded to create adequate facial dimension and structural depth. Texture variation comes from combining EVA foam elements with heat-sealed edges, creating seamless foam blending between facial components.
Advanced Finishing Techniques:
- Metallic FX Application – Apply silver metallic paint using cross-hatch strokes for professional-grade surface treatment that catches stage lighting effectively.
- Sculptable Clay Integration – Oven-bake Sculpey modeling clay at manufacturer specifications before integrating painted elements into foam assemblies.
- Strategic Adhesive Selection – Reserve contact cement for high-stress joints while using hot glue for fabric-to-foam bonds; avoid contact cement on plastics to prevent thermal degradation.
- Vision System Installation – Integrate mesh panels with Velcro fasteners, allowing show-eye swaps while maintaining see-through functionality through mouth-directed sightlines.
Performance Tips and Advanced Lighting Effects
Your completed Freddy Fazbear mask requires performance planning to maximize its visual impact at conventions and events. Integrate moving jaw mechanics by installing string-actuated levers inside your mask, synchronizing jaw movement with your speech patterns for authentic animatronic behavior.
Test mechanism durability during full performance runs and adjust tension for smooth operation. For lighting integration effects, position LED strips strategically inside the mask to create glowing eye sockets that pulse with Freddy’s signature music cues. Battery-powered systems guarantee portable functionality across venues.
Layer colored gels over LEDs to match FNAF’s atmospheric aesthetics, testing effects in low-light conditions for optimal visibility. Practice character-specific mannerisms including stiff movements, deliberate head tilts, and subtle twitches. Utilize venue lighting and spatial positioning to showcase costume details while maintaining slow, jerky pacing that replicates robotic behavior authentically.
Frequently Asked Questions
How Do I Clean and Maintain My Freddy Fazbear Costume Between Conventions?
Like preserving a masterpiece, you’ll maintain your costume’s integrity through proper storage considerations in climate-controlled environments. Use gentle surface cleaners on fur layers, guarantee temperature control between 60-70°F, and store components separately to prevent compression damage.
What’s the Average Total Cost to Complete a Full Freddy Cosplay?
Your budget breakdown ranges from $40 for cardboard builds to $4,000+ for 3D-printed versions. Cost estimation depends on material choice: foam averages $275, pre-made suits $226-$350, balancing accuracy with your construction method preference.
How Long Does It Typically Take to Finish the Entire Costume?
You’ll need 24 hours construction time for a complete foam-based Freddy build, though fitting challenges during head assembly may extend timelines. Advanced builders complete core structures in 5-7 hours using accelerated drying techniques and templated components.
Can the Mask Be Modified to Fit Different Head Sizes Comfortably?
You’ll achieve custom sizing adjustments through elastic strap modifications, internal foam compression, and slicer-based 3D file scaling. Don’t forget proper ventilation considerations—integrate breathable mesh panels and strategic airflow gaps for extended wear comfort.
Where Can I Find Accurate Freddy Fazbear Reference Images for Details?
Like blueprints guiding an architect, you’ll find accurate reference photos on Five Nights at Freddy’s Wiki galleries and DeviantArt sheets by Tayaknight57. These detail Freddy’s proportions, component materials, color specs, and dimensional measurements essential for precision fabrication.
References
- https://www.oreateai.com/blog/freddy-fazbear-costume-how-to-make/67890ffdd736c6aea3d47cfecfc374ad
- https://www.youtube.com/watch?v=HCl3hkW7gv0
- https://www.njplaygrounds.com/10233/making-freddy-fazbear-and-withered-bonnie/
- https://www.etsy.com/market/freddy_fazbear_costume_template
- https://www.youtube.com/watch?v=IxeqKzcHh2E
- https://shop.tiktok.com/us/k/fnaf-mask-tutorial?p=1731043806870344411&i=0
- https://www.etsy.com/listing/1661851340/freddy-1-furry-wearable-armor-and-helmet
- https://www.youtube.com/watch?v=mr8LoBdGN4Y
- https://www.youtube.com/watch?v=vEXyTeEwYro
- https://www.youtube.com/watch?v=KtrgOcOFRXU