Your superhero mask lives or dies by the material you choose, the way you cut it, and the small structural hacks that keep it locked to your face without ruining the look. Start with craft foam or cardboard if you’re a beginner—both are forgiving, customizable, and easy to shape. Thread elastic through punched side slits, double-knot internally, and apply spirit gum along inner edges for a flush, secure fit. Stick around to uncover every technique that separates an amateur mask from a professional one.
Key Takeaways
- Craft foam is beginner-friendly, lightweight, and easily customizable with stickers, glitter glue, and gemstones for a polished superhero look.
- Cut eye-holes last to ensure proper alignment with your actual field of vision for accurate sightlines.
- Thread elastic through punched side slits and double-knot internally to create a secure, comfortable fit.
- Layer glitter tape sticky-side together and stack contrasting colors to quickly achieve bold, visually striking designs.
- Neoprene offers superior durability, molds to facial contours, and withstands pressure, making it ideal for long-term mask wear.
Why Your Superhero Mask Material Determines Everything
The material you choose for your superhero mask isn’t just a preference — it’s a decision that controls every outcome, from structural durability to comfort against your skin. Each material carries distinct material properties that directly shape your build’s success.
Neoprene delivers superior durability factors and weight distribution, but breathability issues can emerge during extended wear.
Craft foam wins on cost considerations and flexibility, though it sacrifices longevity.
Liquid latex excels in aesthetic appeal, conforming seamlessly to your face, yet demands careful application for mask comfort.
Duck tape fabric offers surprising sturdiness with bold visual payoff.
Ultimately, user preference must align with functional demands — you’re not just crafting a costume piece, you’re engineering wearable performance.
Choose deliberately, because your material foundation dictates every creative and structural decision that follows.
Which Material Makes the Easiest Superhero Mask for Beginners?
If you’re just starting out, craft foam is your best bet — you trace your face shape onto the foam, punch out eye-holes, decorate with stickers or glitter glue, and thread elastic through side holes in under an hour.
Cardboard runs a close second, requiring nothing more than sketching an outline on white card, cutting precise eye-holes, and securing a string for a snug fit.
Both materials demand zero advanced skills, minimal tools, and cost almost nothing, making either a practical launch point before you tackle trickier builds like liquid latex or neoprene.
Craft Foam Wins Easily
Craft foam dominates as the go-to material for beginner superhero mask-making, and it’s easy to see why once you get your hands on it. The craft foam advantages are immediately obvious: it’s lightweight, flexible, and forgiving when you make cutting errors. You simply trace your face shape directly onto the foam, then punch or cut eye-holes centrally for accurate placement.
The mask customization tips that elevate craft foam above other materials include layering stickers, glitter glue, and gemstones without weighing down the structure. You’ll punch side holes carefully to prevent tearing, then thread elastic string through, adjusting the knot for a precise fit.
Unlike cardboard or neoprene, craft foam bends naturally against your face, eliminating pressure points while maintaining structural integrity throughout extended wear.
Cardboard Offers Simple Steps
While craft foam earns its reputation for flexibility and forgiveness, cardboard pulls ahead in one key area: near-zero material cost with even simpler construction steps.
For cardboard masks, you’ll sketch your outline directly onto white card stock sized to fit your face. Cut your design cleanly, then punch precise eye-holes for clear sightlines.
Easy crafting continues as you decorate using colored felt-tips, transforming plain card into a striking superhero identity. Secure embellishments with glue or sticky tape, building layers of visual detail without structural compromise.
Finally, thread string through side holes and knot it snugly behind your head. You’re working with a material that’s instantly available, recyclable, and endlessly customizable — making cardboard the smartest low-barrier entry point for any beginner building their first mask.
How to Build a Superhero Mask From Craft Foam
To build your craft foam superhero mask, trace your face shape directly onto the foam sheet.
Then punch or carefully cut eye-holes centered for your sight line, and punch small side holes without tearing the material.
Once your base is shaped, you can personalize it with stickers, glitter glue, or adhesive gemstones to nail your hero’s signature look.
Thread elastic through the side holes, knot it securely, and you’ve got a lightweight, custom-fit mask ready for action.
Crafting Foam Mask Basics
Building a superhero mask from craft foam takes just five straightforward steps, and you’ll have a custom piece ready faster than most other methods. Among the foam mask benefits, its lightweight flexibility makes it comfortable for extended wear without skin irritation.
Start by tracing your face shape directly onto the foam sheet, ensuring accurate proportions. Next, punch or cut eye-holes centrally, positioning them precisely for clear sightlines.
Apply stickers, glitter glue, or gemstones to personalize your design with sharp visual impact. Carefully punch side holes without tearing the material — a common pitfall beginners overlook.
Finally, measure and tie elastic string to achieve a secure, comfortable fit. These crafting tips streamline production considerably, letting you prototype multiple mask variations quickly using minimal materials and tools.
Decorating Your Foam Mask
Once your eye-holes and side holes are punched clean, the real creative work begins — decorating transforms your foam blank into a recognizable superhero identity. Your color choices set the tone immediately, so select bold, contrasting hues aligned with your theme inspiration.
Use stickers, glitter glue, and gemstones as core embellishment techniques that adhere cleanly to foam surfaces. Experiment with layering effects by cutting additional foam shapes and stacking them for dimensional depth.
Introduce texture contrast by combining matte foam with metallic or glossy accents from DIY materials you likely already own. For seasonal decor, swap gemstone colors or add thematic symbols like snowflakes or flames.
Personalization tips include tracing initials or logos directly onto the surface before painting, ensuring your mask stays uniquely yours every time.
How to Build a Duck Tape Superhero Mask That Stays Together
Three layers of Duck Tape are what stand between you and a mask that falls apart mid-battle. Start by building a 4×9 inch fabric panel, layering strips face-to-face until you’ve achieved genuine Duck Tape Durability.
That triple-layer foundation resists bending, tearing, and costume disasters.
Triple-layer Duck Tape construction means your mask survives every bend, pull, and unexpected costume emergency.
Once your panel is solid, trace your mask pattern directly onto it and cut cleanly.
Now comes Mask Customization — layer glitter tape sticky-side together, then cut stars, lightning bolts, or geometric shapes. Attach them using small rolled tape cylinders as adhesive anchors.
Finally, cut slits along each side, thread elastic through, and knot it securely.
Your finished mask won’t buckle, peel, or disappoint when the action actually starts.
How to Make a Liquid Latex Superhero Mask That Looks Professional
Liquid latex transforms a basic eye-cover into a mask that genuinely looks pulled from a comic panel. Start with a Robin-style base, then apply paint mixing precision — combine three parts liquid latex with one part black paint for rich, consistent color.
Your layering methods determine durability factors; sponge up to 15 coats, letting each dry completely before adding another. This application technique builds structural integrity without sacrificing flexibility.
Skin safety matters greatly — powder each finished layer to prevent tearing during removal tips execution. Never skip powdering between sessions.
To adhere it, use spirit gum for a professional finish that won’t shift mid-adventure. You’re not just wearing a mask — you’re engineering one.
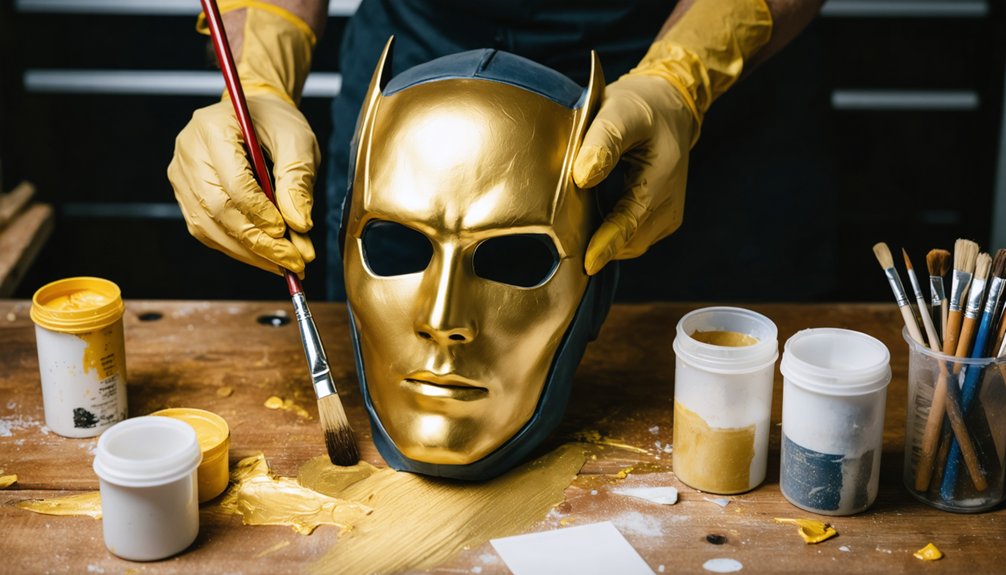
What Makes Neoprene the Best Material for a Durable Superhero Mask?
Neoprene earns its reputation as the gold standard for superhero masks through a combination of structural resilience and wearability that few materials can match. When you’re building a mask meant to endure repeated use, neoprene‘s durability factors become immediately apparent — it resists compression, stretches without deforming, and maintains its shape under pressure.
The neoprene advantages extend beyond toughness. At 5mm thickness, you’re working with a material that molds naturally to facial contours while blocking wind and minor abrasion.
Unlike craft foam or cardboard alternatives, neoprene won’t buckle when wet or crack under temperature shifts.
You’ll also find it remarkably cutter-friendly — precise eye-hole slits stay clean without fraying. For mask-makers prioritizing longevity and technical precision, neoprene delivers performance that outclasses virtually every competing material.
How to Cut Perfect Eye-Holes in Any Superhero Mask
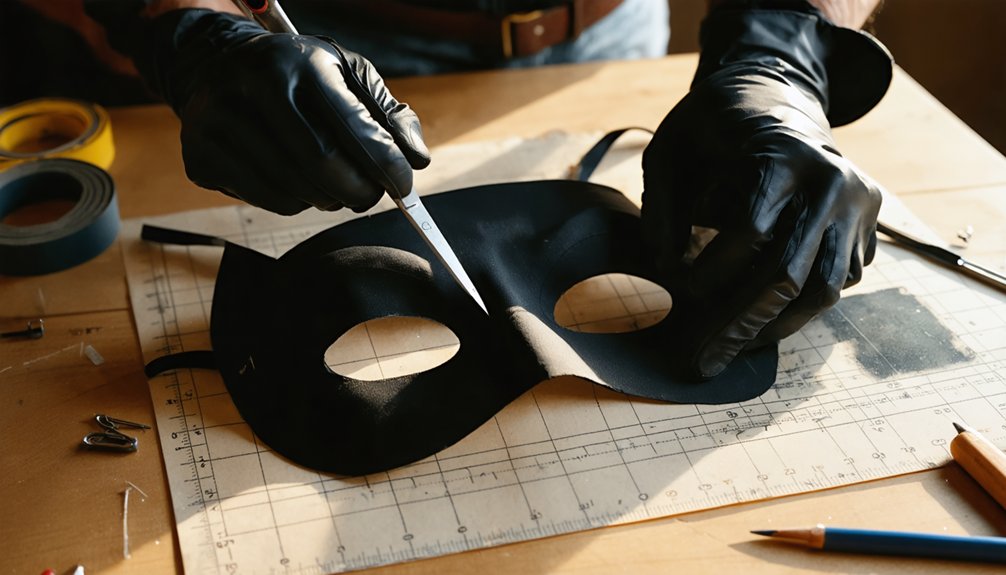
Whether you’re slicing through neoprene, craft foam, or layered Duck Tape fabric, cutting clean eye-holes comes down to one non-negotiable principle: measure twice, cut once.
Master eye hole techniques by marking your center points first, then working symmetrically outward. For neoprene, slit the center before cutting outward for controlled removal.
Craft foam responds best to a sharp hole punch, reducing tear risk near the edges. Duck Tape fabric demands a steady blade — trace your eye shape before committing the cut.
Masking precision means holding your template flush against the material, securing it with tape to prevent shifting.
Always cut eye-holes last, after fitting the mask to your face, ensuring the openings align perfectly with your actual field of vision.
Secure Your Superhero Mask Without Ruining the Look
Once your eye-holes sit exactly where they need to, the next challenge is keeping the whole mask locked in place without elastic lines cutting across your forehead or string loops bunching awkwardly at the back.
Smart mask attachment techniques eliminate discomfort while preserving your hero aesthetic. These secure fitting methods work across neoprene, craft foam, and Duck Tape builds:
- Thread elastic through punched side slits, then double-knot internally so hardware stays hidden.
- Use spirit gum along the mask’s inner edge for skin-contact adhesion without visible straps.
- Sew rather than staple neoprene straps to distribute tension evenly across the back.
- Layer rolled tape behind decorative elements to anchor embellishments without adding bulk.
Each method keeps your mask flush, functional, and visually clean throughout wear.
Fast Decoration Techniques That Make Any Superhero Mask Look Finished
Decoration separates a finished mask from a flat cutout, and the right techniques deliver that polished result in minutes.
For fast decoration, layer glitter tape sticky-side together before cutting geometric shapes like stars or lightning bolts, then secure them with rolled tape segments. This approach adds superhero flair without messy adhesives.
On craft foam builds, glitter glue creates textured detail along edges, while adhesive gemstones add focal points around eye-holes in seconds.
For cardboard masks, colored felt-tips let you shade contours precisely, giving the surface dimensional depth without paint drying time.
Duck Tape fabric naturally holds embellishments without extra bonding agents, making it your fastest canvas.
Stack contrasting tape colors strategically to build visual hierarchy, transforming a basic cutout into a character-specific design that reads as intentional and complete.
Frequently Asked Questions
Can Superhero Masks Be Safely Worn by Children With Sensitive Skin?
Like a gentle breeze on delicate petals, yes, you can safely use skin-friendly materials like craft foam. Always perform allergy testing first, avoiding latex or neoprene, ensuring your child’s sensitive skin stays protected and comfortable.
How Do You Store a Superhero Mask to Prevent It From Warping?
Store your superhero mask flat or on a rounded form to preserve its shape. You’ll protect mask materials by avoiding humid spaces, using breathable storage solutions like mesh bags to prevent warping, mildew, and unwanted deformation effectively.
Are Superhero Masks Reusable After Wearing Them Multiple Times?
With proper “extended care,” your masks absolutely endure repeated adventures! You’ll maximize longevity by following mask durability tips like gentle spot-cleaning and air-drying. Apply smart mask cleaning methods—mild soap works wonders—keeping your creative armor performance-ready indefinitely.
Can You Resize a Superhero Mask Pattern for Different Head Sizes?
You can absolutely resize a superhero mask pattern by scaling measurements up or down proportionally. Master mask resizing techniques by adjusting template percentages, then choose suitable fabric choices like neoprene or craft foam that’ll accommodate your unique head dimensions perfectly.
What Is the Average Cost of Making a Superhero Mask at Home?
You don’t need a big budget! Using DIY materials like craft foam, cardboard, or Duck Tape, you’ll spend just $2–$10 per mask. These cost effective options deliver impressive, innovative results without draining your wallet.
References
- https://www.instructables.com/Make-a-Superhero-Mask/
- https://thecreationstation.co.uk/how-to-make-a-superhero-mask-2/
- https://www.youtube.com/watch?v=2fbOyWBPNUc
- https://www.youtube.com/watch?v=TETSsxXoFBg
- https://www.youtube.com/watch?v=4ux8nBeqDNs
- https://www.redtedart.com/superhero-mask-template-party-activity/
- https://www.twinkl.com/resource/t-t-9305-design-a-superhero-mask