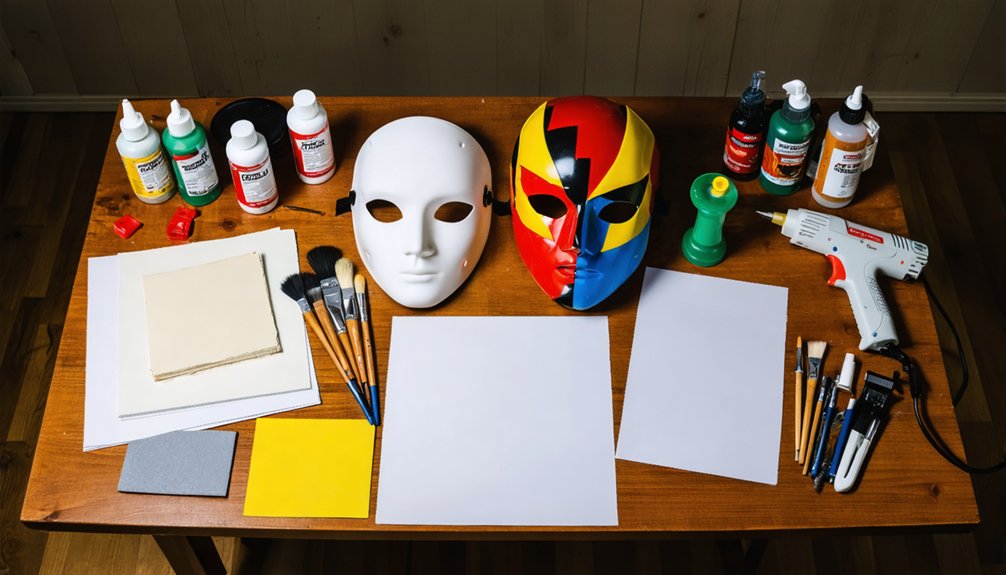
To craft a stunning cosplay mask, you’ll want to start by choosing the right material, whether it’s heat-friendly EVA foam, self-sculpting Worbla, or precision-driven 3D printing. Next, you’ll design accurate patterns, shape your material, and build solid structure. Then you’ll prep surfaces, apply layered paint, seal everything for durability, and secure straps that actually hold. Each step transforms raw materials into jaw-dropping artistry, and there’s so much more to uncover ahead.
Key Takeaways
- EVA foam and Worbla are top material choices for cosplay masks, offering durability and easy heat shaping for all skill levels.
- Gather reference photos from multiple angles and use symmetry checks with tracing paper to ensure accurate, balanced mask patterns.
- Heat EVA foam at 150–200°C for 30–60 seconds, then hold the shape for 5–10 minutes to stabilize contours.
- Apply 3–5 thin spray paint coats with 10-minute drying intervals, then seal with Mod Podge for lasting protection.
- Secure mask straps using braided elastic bands, hot glue with proper edge clearance, or fabric glue for a heat-free alternative.
Pick the Right Cosplay Mask Material for Your Build
Choosing the right material can make or break your cosplay mask build before you’ve even picked up a heat gun. EVA foam durability makes it the go-to choice for beginners and veterans alike, responding beautifully to heat shaping and paint application.
If you crave Worbla advantages, its self-sculpting properties eliminate pre-cutting hassles entirely. Push boundaries further with 3D printing for razor-sharp pattern accuracy that manual methods can’t match.
High density urethane delivers professional-grade results but demands specialized tools. Each material influences your texture techniques, fabric overlays, surface preparation, and assembly methods differently, so don’t choose blindly.
Think about your final design’s complexity, your skill level, and your deadline. Your material choice sets every subsequent creative decision in motion.
Design and Pattern Your Cosplay Mask Before You Cut
Before you score a single line into your material, you need to saturate yourself in reference photos — front, side, and 45-degree angles — so every contour of your character’s face burns into your muscle memory.
Pull those images up on multiple screens if you can, because complex facial features reveal themselves differently from each angle, and missing even one perspective can throw off your entire build.
Once you’ve sketched your pattern onto tracing paper, fold it precisely along the central axis and hold it up to the light, because symmetry checked early saves you from the heartbreak of a lopsided mask after hours of cutting.
Gather Reference Photos First
Getting your reference photos together is the most critical step you’ll take before drawing a single pattern line—because no matter how skilled you’re with foam or heat guns, you can’t replicate what you can’t clearly see.
Pull from diverse reference photo sources—official game renders, cinematic stills, collector figurines, and fan-captured convention photography. Each source reveals details others miss.
Angle variations are equally non-negotiable; front shots define symmetry, side profiles expose depth, and 45-degree views expose how facial planes shift between surfaces.
Screenshot everything, organize by angle, and study how shadows reveal contours you’d otherwise flatten.
You’re not just collecting images—you’re building a three-dimensional mental blueprint that transforms your eventual cuts and heat-shaping sessions from guesswork into precision-driven, character-accurate craftsmanship.
Verify Pattern Symmetry Early
Once your reference photos are organized, your next move is folding your tracing paper pattern along the central axis—this single fold exposes every asymmetry hiding in your design before a single piece of foam gets cut.
Hold it against light and you’ll immediately spot misaligned curves, uneven eye openings, or lopsided jaw contours screaming for pattern adjustments.
Don’t skip mirror checks. Flip your pattern against a reflective surface to simulate how the finished mask reads three-dimensionally.
Use rulers and alignment techniques like grid overlays to systematically correct contour discrepancies rather than eyeballing corrections.
Symmetry tools, including transparent graph paper layered beneath your tracing sheet, give you measurable reference points for precision.
Catching these flaws now saves you from scrapping expensive foam later—early verification is your smartest creative investment.
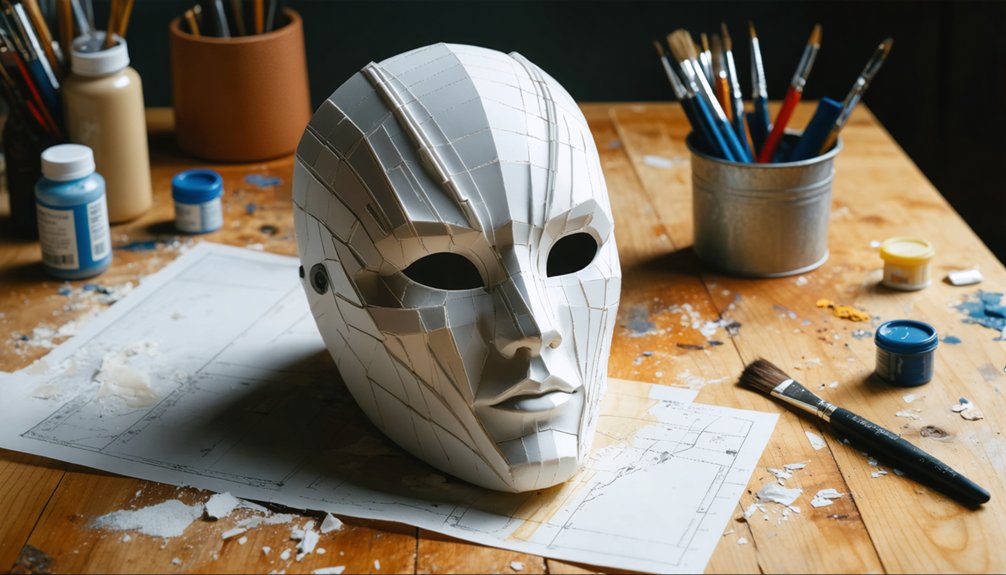
Heat-Shape EVA Foam Into a Precise Mask Contour
Now that your pattern’s ready, it’s time to transform flat EVA foam into a living, curved mask shell that hugs every contour of a face.
Set your heat gun between 150–200°C, hold it 3–4 inches from the foam’s surface, and apply steady heat for 30–60 seconds until the material softens and yields to pressure.
Press the heated foam firmly against a plastic wrap-covered mannequin head, hold it there for 5–10 minutes, and watch it cool into a precise, character-perfect curve that’ll hold its shape through every convention hour ahead.
Optimal Heat Gun Temperatures
When heat-shaping EVA foam, you’ll want your heat gun dialed between 150–200°C — the sweet spot where the foam softens pliably without blistering or degrading.
Apply heat for 30–60 seconds, sweeping the gun in controlled passes to distribute warmth evenly across the surface.
Heat gun safety is non-negotiable here: exceeding 250°C triggers irreversible foam degradation, so keep your sessions under two minutes.
Work in a ventilated space and maintain a consistent 15–20 cm distance from the foam’s surface.
Once shaped against your mannequin head, ideal cooling requires holding the contoured foam firmly for 5–10 minutes until it stabilizes at room temperature.
Rushing this phase compromises the mask’s structural integrity, undoing every precise curve you’ve worked to achieve.
Mannequin Head Shaping Techniques
With your heat gun dialed in and your foam softened to that perfect pliable state, the mannequin becomes your most valuable shaping partner.
Wrap your chosen mannequin head materials—plastic or fiberglass—with plastic wrap first; this prevents adhesive transfer while preserving every realistic facial curve you need.
Press your softened EVA firmly against the contours, working outward from the nose bridge to the cheeks and brow.
Your heat shaping tools have done the preparation work—now your hands do the sculpting.
Maintain steady pressure for 5–10 minutes as the foam cools and locks into its final form.
Rushing this stage destroys precision.
Patience here translates directly into a mask that fits flawlessly, moves naturally, and authentically captures your character’s identity.
Build a Cosplay Mask With Cardboard and Paper Mache
Building a cosplay mask with cardboard and paper mache is one of the most rewarding low-cost crafting methods you’ll ever try, transforming humble materials into a striking character piece.
Start by cutting your cardboard base using traced reference patterns, leveraging cardboard durability to create a surprisingly rigid foundation. Fold along the central axis to verify symmetry before assembling your panels with hot glue.
Next, apply paper mache techniques by layering 1–2 cm strips soaked in a 1:1 glue-water mixture directly over your base. Each layer adds structural reinforcement while building dimensional texture for raised facial features.
Let every layer dry completely before adding the next. Once hardened, prime the surface with Mod Podge, then paint with acrylics to bring your character’s identity vividly to life.
Print and Assemble a 3D-Printed Cosplay Mask
Mastering the art of 3D-printed cosplay masks reveals a level of precision that no hand-cut foam or cardboard technique can match, letting you replicate a character’s exact facial geometry down to the millimeter.
Start in design software like Blender or ZBrush, sculpting your STL file with sharp detail before exporting it for printing. Prioritize printing resolution—higher DPI settings capture fine surface textures that define character accuracy. Choose PLA for material durability during extended wear.
Sculpt your STL file with precision in Blender or ZBrush, then prioritize print resolution for character-accurate surface detail.
Run test prints of isolated facial sections first, catching fit errors before committing full filament loads.
Assembly techniques matter: sand seam lines methodically during post-processing tips application, then prime surfaces for paint adhesion.
Make fitting adjustments by trimming edges carefully, ensuring comfortable wear without sacrificing structural integrity.
Paint and Seal Your Cosplay Mask for a Clean Finish
Achieving a clean, professional finish demands 3 critical phases: sealing, painting, and protecting your mask’s surface.
Start by applying Mod Podge or foam-specific primer, eliminating porous texture that swallows paint unevenly. Once sealed, you’re ready to layer spray paint in 3–5 thin coats, allowing 10-minute drying intervals between each pass.
Here’s where color mixing transforms your mask from basic to breathtaking — blend white with brown tones to engineer custom opacity levels, adding dimensional depth across raised surfaces.
Fine brushes let you sculpt shadows and highlights with surgical precision.
Finally, protective coatings are non-negotiable. A final Mod Podge sealant layer locks everything in, shielding your painted masterpiece from scratches, moisture, and UV exposure during intense convention wear.
Attach Straps and Embellishments That Actually Hold

3 critical decisions determine whether your straps and embellishments survive a full convention day or fail spectacularly mid-panel: material choice, attachment method, and placement precision.
Choose strap materials wisely — braided elastic bands (0.5–1 cm width) deliver flexibility without sacrificing hold. Punch 3–5 mm side holes using map tacks for clean ribbon or elastic insertion.
For embellishment techniques, tissue paper rolled into 3–5 mm strips creates striking decorative elements when bonded with 1:1 glue-adhesive mixtures.
Master these secure attachments:
- Hot glue straps with 1/4–1/2 inch edge clearance, holding firm for 10–15 seconds
- Fabric glue as a heat-free alternative, curing within 15–20 minutes
- Paper mache layers reinforcing raised decorative elements structurally
Precision placement transforms good masks into convention-conquering masterpieces.
Frequently Asked Questions
How Do I Make My Cosplay Mask Comfortable for All-Day Wear?
Imagine cool foam padding cradling your face like a gentle cloud! You’ll achieve all-day comfort by lining your mask’s interior with EVA foam padding and securing it with adjustable straps that flex naturally with every movement.
Can I Weatherproof My Cosplay Mask for Outdoor Convention Use?
You can absolutely weatherproof your mask materials for outdoor conventions! Apply multiple Mod Podge sealant coats, use UV-resistant spray paint, and embrace moisture-blocking primers—transforming your creation into a durable, weather-defying masterpiece that’ll shine all day!
How Do I Store My Finished Cosplay Mask Without Damaging It?
Like a medieval relic deserving reverence, store your finished mask in a protective casing away from heat and sunlight. Your mask storage solution should rest it on slim objects, preventing curvature flattening while preserving every meticulously crafted detail.
What Safety Precautions Should I Take When Using a Heat Gun?
Keep your heat gun safety game strong during mask crafting! You’ll want to work in ventilated spaces, wear heat-resistant gloves, maintain 150–200°C max, and never exceed two minutes—protecting both your masterpiece and yourself!
How Do I Repair a Cracked or Damaged Cosplay Mask Quickly?
80% of mask damage is fixable fast! You’ll love these quick repair techniques: apply hot glue to cracks within seconds, then repaint seamlessly. Your mask material choices — EVA or Worbla — determine the perfect adhesive approach!
References
- https://www.instructables.com/Fitted-Costume-Masks-No-Face-Mold/
- https://www.instructables.com/Quick-Costume-Mask/
- https://www.crazecosplay.com/blogs/questions/how-to-make-a-cosplay-mask
- https://www.youtube.com/watch?v=jFDQ-8O_hBo
- https://www.youtube.com/watch?v=CpM8zSFlNiQ
- https://ofhsvedas.com/1813/features/a-tutorial-on-cosplay-mask-making/
- https://www.instructables.com/Ultimate-Mask-Accessories-Helmet-Making-Resource/
- https://www.youtube.com/watch?v=MafpDWQZKWo
- https://thecosplaysite.com/how-to-make-a-cosplay-mask/
- https://www.youtube.com/watch?v=7qEt3DhILTA