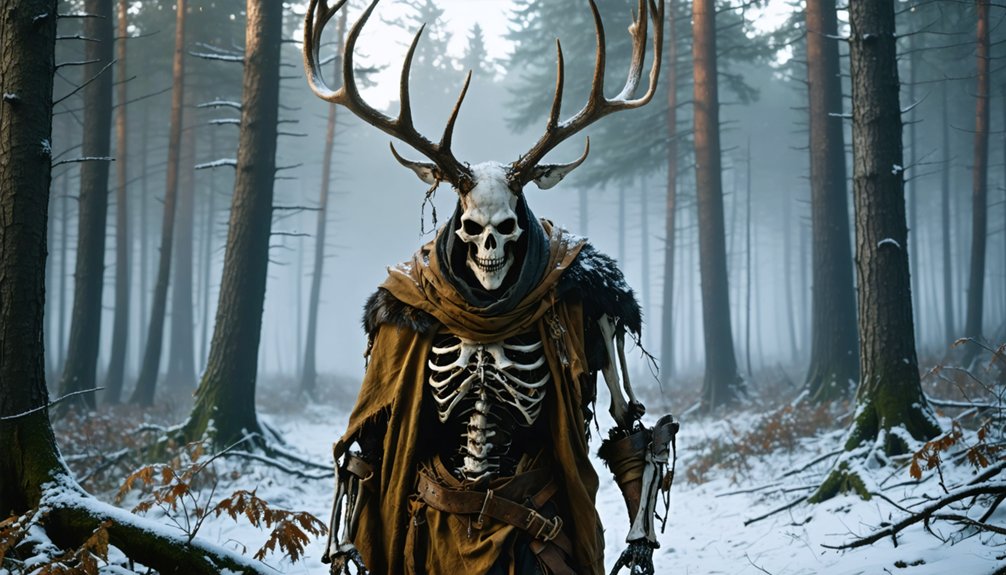
To create an authentic wendigo costume, you’ll need 18-gauge galvanized steel wire for your mask base, layered EVA foam for gaunt facial features, and heat-bent PVC pipes for the skeletal frame. Build hollow eye sockets with 6mm foam, sculpt sunken cheeks, and add bloody lip details using theatrical makeup. Construct digitigrade stilts from 24-inch PVC extensions to achieve the creature’s towering height, then layer bone-white paint with shadow gradients for that emaciated, corpse-like appearance that captures the spirit’s insatiable hunger and transformation.
Key Takeaways
- Build the mask foundation with 18-gauge steel wire, poster board, and EVA foam layers for a hollow-eyed skeletal skull structure.
- Construct an elevated frame using PVC pipe stilts, wireframe ribcage, and stretched fabric to create an emaciated, towering silhouette.
- Heat-sculpt detailed claws from EVA foam floor mats and reinforce limb extensions with pool noodles for organic movement.
- Apply bone-white base paint with shadow gradients, using cream makeup and stippling techniques for realistic starvation texture effects.
- Add bloody details around mouth and fingers using theatrical blood and latex, maintaining matte finishes for authentic corpse-like appearance.
Understanding Traditional Wendigo Appearance From Folklore
The wendigo originates from Algonquian-speaking tribes across the Great Lakes region, northeastern United States, and Canada, including the Ojibwe, Cree, Saulteaux, Naskapi, and Innu peoples. Ancient Algonquian spirituality defines this entity as a towering, emaciated giant—sometimes reaching 15 feet tall—with ashen skin stretched tight over protruding bones.
You’ll find descriptions emphasizing corpse like decomposition: sunken or glowing eyes, bloody chewed lips, gnawed fingers, and yellowed fangs. The creature’s gaunt frame paradoxically grows larger with each victim consumed, yet remains perpetually starved.
Traditional accounts describe hairless, taut flesh over skeletal features, lacking the antlers modern interpretations add. This malevolent spirit embodies winter’s harshest elements—famine, isolation, and insatiable greed—transforming humans through starvation-induced cannibalism or spiritual possession.
Essential Materials For Creating An Authentic Wendigo Costume
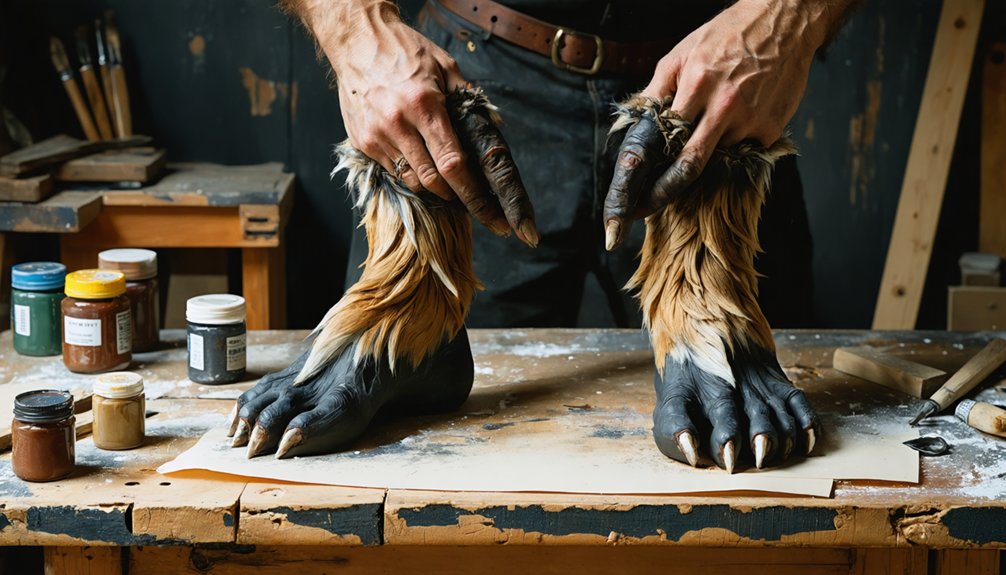
Bringing folkloric descriptions to life requires selecting materials that balance structural integrity with visual impact. Your foundation starts with 3/4-inch PVC pipe, heat-bent into organic skeletal shapes and reinforced with pool noodles for emaciated limb volume. The mask base demands 18-gauge galvanized steel wire to support heavy antler attachments, while poster board and paper mache create the skull structure.
For dimensionality, you’ll need EVA foam (6mm and 4mm) to build facial contours and detailed claws heat-sculpted from floor mats. Loctite expanding foam adds texture over paper structures, while paper clay integrates smaller elements and smooths progression.
Complete your material palette with faux fur for animalistic coverage, a latex body suit for exposed musculature, and acrylic paints for weathering. Hot glue, masking tape, and felt guarantee secure assembly and comfortable wear.
Crafting Your Wendigo Mask: Gaunt Features And Skeletal Structure
While authentic wendigo mythology emphasizes starvation and decay, your mask construction begins with establishing pronounced skeletal architecture through layered EVA foam techniques. You’ll build hollow eye sockets using 6mm foam pieces, then refine them with rotary tool smoothing to create predatory depth.
For realistic bone detailing, hand-sculpt nostril sections from 2mm foam and strategically layer cheekbone protrusions directly onto your substructure.
Secure galvanized steel wire (18 gauge) along the jaw for articulation without sacrificing structural integrity. Install protective mesh behind eye openings to maintain skeletal aesthetics while preserving limited visibility. You can enhance gaunt facial contours through latex skin appliances featuring intricate texturing and sunken characteristics.
Apply bone-white coloring with double varnish coating, then add hand-painted shadows that emphasize death-like hollows and anatomically accurate skeletal definition.
Building The Emaciated Body Frame And Towering Height
You’ll need to engineer a frame that achieves both the wendigo’s skeletal emaciation and its intimidating 12-to-30-foot height through strategic layering. Start with stilts or platform boots as your elevation base, then construct extended limbs using lightweight PVC pipes or foam tubes that maintain proportional thinness while adding reach.
Build the gaunt torso by stretching thin fabric or latex over a wireframe ribcage, securing it tightly to create visible bone protrusions and hollow recesses that mimic severe starvation.
Stilts And Platform Boots
Creating the wendigo’s imposing height and skeletal frame starts with digitigrade stilts—specialized leg extensions that transform your natural stance into the creature’s distinctive backward-bent legs. You’ll need 24-inch PVC extensions paired with lightweight construction materials: half-inch T-fittings, elbow joints, and adjustable length stilts secured by set screws preventing component separation during movement.
Heat Sintra plastic in three stages—middle first, then sides—to form custom toe clips shaped over your shoes. Cut 16-inch thigh straps and 10-inch lower leg straps from measurements exceeding half your leg length.
Skin the framework with foam, then layer pipe insulation tubing (halved and pinned) for dimensional texture. Apply plaster primer before building bone-like surfaces with spray paint and Model Magic details, creating the supernatural creature’s towering, emaciated appearance through strategic construction.
Foam Padding Skeletal Structure
Since the wendigo’s terrifying presence depends on its unnaturally thin, skeletal proportions, you’ll build the torso framework with 8mm EVA foam as your structural foundation. Trace rib cage patterns onto the foam base, then cut and layer 4mm foam strips to create pronounced bone structures.
Apply heat gun techniques four inches from the surface, waving evenly to shape protruding ribs and spine details. Score striation lines before heating—they’ll open during the shaping process, enhancing skeletal depth. Stack multiple foam thicknesses where dimensional bone structures emerge, using contact cement between layers.
The layered foam textures create authentic emaciation when combined with strategic heat application. Finish by sealing with two Plasti Dip coats, ensuring foam shaping techniques remain flexible throughout wear while maintaining the gaunt, haunting silhouette.
Gaunt Skin Texture Techniques
After building your skeletal framework, transform exposed skin areas into the wendigo’s signature emaciated appearance through layered makeup techniques. Start with cream based eye makeup techniques using neutral bases like creme brulee on cheeks and temples, then deepen hollows with mocha java pencils under cheekbones and jawline. Blend seamlessly using Real Techniques sponges to avoid harsh lines.
Layer BH Cosmetics palette grays for realistic shadow gradients, extending coverage to neck and collarbone areas. Create uneven, dehydrated patches with stippling sponges for authentic starvation textures. Secure your work by layering translucent powders, specifically Physician’s Formula formulas that withstand stage lights.
Apply Elf Shadow Lock primer beforehand for 8+ hour durability, and maintain intensity by reapplying contour layers every two hours during extended performances.
Adding Realistic Details: Bloody Lips, Gnawed Fingers, And Pale Skin
When you’re building a wendigo costume, the unsettling details separate amateur attempts from genuinely disturbing creations. Start with foundation from your nose outward, covering eyelids, ears, and neck—extend down exposed shoulders and chest for seamless pallor. Mix white face paint with moisturizing cream on your sponge for lightweight coverage, then set with matching pressed powder using tapping motions.
Don’t exceed two shades lighter than your natural tone to avoid artificial appearance. For bloody teeth effects, apply deep reds around your mouth edges. Enhance painted eyes with matte white eyeshadow dabbed over foundation. Create gnawed finger illusions using latex tears and dark theatrical blood.
Layer BB cream beneath lighter foundation without mixing for natural ghostly depth. Always use matte products—shiny finishes destroy the corpse-like authenticity you’re engineering.
Creating The Icy Heart Centerpiece For Your Costume

The frozen heart centerpiece transforms your wendigo costume from folklore reference into visceral nightmare. Start by preparing your 6-8 inch silicone mold with release agent and silver powder dusting. Master resin layering techniques by alternating clear and blue-tinted pours, curing each 24 hours between applications. Embed LED lights in the initial layer, wiring them to a concealed battery pack.
White paint veins and cracked plastic shards create authentic frost texture when suspended in subsequent layers. For enhancing icy heart appearance, dust iridescent glitter throughout and seal with UV-protectant topcoat. Mount your finished piece using embedded magnets on your chest plate, positioning it center-mass with foam padding reinforcement.
Add dangling icicle chains and cool white LED strings for dimensional impact. The 10% body proportion rule guarantees commanding presence without costume imbalance.
Wendigo Makeup Techniques For Exposed Skin Areas
To complete your Wendigo transformation beyond the mask, you’ll need to address any exposed skin with makeup that mirrors the creature’s emaciated, supernatural appearance.
Your primary goals are creating gaunt skeletal features through strategic shading and texture work, and achieving the distinctive frostbitten pale complexion that defines the Wendigo’s undead aesthetic.
These techniques transform human skin into the stretched, desiccated flesh of a forest demon.
Creating Gaunt Skeletal Features
Achieving authentic gaunt skeletal features requires careful layering of materials that transform exposed skin into emaciated, bone-stretched surfaces. Begin with pale grey body paint, then apply liquid latex in raised ridges to mimic exposed bones. Layer thin latex sheets over this base, allowing partial drying to create natural wrinkling effects. These latex manipulations form the foundation of convincing skeletal protrusion.
Build emaciated skin texture by mixing latex with tissue paper fragments, applying the compound in facial creases and joint areas. Pinch drying latex to form fine wrinkles, then dust with cornstarch for fold definition. Shadow latex edges with black paint to create hollow contours, while highlighting raised areas with white and peach tones. Texture surfaces using stipple sponges for weathered bone exposure, finishing with translucent powder for seamless blending.
Achieving Frostbitten Pale Skin
While skeletal structure defines the wendigo’s underlying form, exposed skin areas demand their own specialized treatment to capture the creature’s frozen, desiccated appearance. Start with oil-free cleansing and primer application before mixing white greasepaint with gray tones for authentic undead pallor. Apply using stipple sponges in thin layers, building translucency with pearl powder additions.
Layering color effects requires strategic veining—draw blue-purple lines with fine brushes, then overlay diluted black for necrotic spreading. Add white highlights along vein edges to simulate frost accumulation.
For texture, apply irregular liquid latex patches while dusting with white powder to create frosty residue. Tear edges deliberately for natural peeling effects. Complete by blending translucent powders throughout, sealing with matte fixative and setting spray. This multi-stage approach guarantees durable, professional-grade frostbitten skin transformation.
Styling Tips To Capture The Spirit Of Starvation And Greed

Since the Wendigo’s horror stems from its perpetual emaciation despite endless consumption, your costume must emphasize a skeletal, gaunt silhouette that defies natural proportions. Layer strategically distressed fabrics over foam bone structures to create protruding ribs and vertebrae. Wrap dark elastic bands around your torso and limbs to simulate hollowed muscle tissue clinging to bone, reflecting the creature’s mythical origins in famine-stricken communities.
Incorporate asymmetrical tears in your garments to suggest violent transformation and decay. Attach synthetic sinew or frayed rope at joints to evoke deterioration. Stain fabrics with earth tones and charcoal to convey perpetual filth. Consider adding strategically placed LED elements beneath ribcage foam to suggest unnatural hunger radiating from within. This biomechanical approach transforms your silhouette into starvation personified.
Frequently Asked Questions
Is It Culturally Appropriate to Cosplay as a Wendigo From Algonquian Folklore?
You’d think wearing a monster costume is harmless, but ethical considerations matter here. Cultural appropriation concerns are real—Algonquian peoples view wendigos as sacred warnings, not cosplay material. You’re better off choosing fictional alternatives that respect indigenous beliefs.
What Conventions or Events Allow Wendigo Costumes Given Cultural Sensitivities?
Most conventions lack specific wendigo policies, but you’ll navigate sensitivity considerations by contacting organizers directly. Consider cultural appropriation risks when submitting costume proposals, or pivot toward fictional alternatives like Witcher leshens for innovative, ethically-constructed creature designs.
How Do I Portray Wendigo Psychosis Behavior Respectfully While in Costume?
Don’t portray Wendigo psychosis behaviors—respectful cultural considerations demand you avoid mimicking sacred Indigenous trauma. Focus your costume on creative craftsmanship and visual design instead. Ethical costume guidelines prioritize honoring Algonquian traditions without appropriating their culturally significant spiritual beliefs.
Should I Credit Algonquian Tribes When Sharing My Wendigo Cosplay Online?
Yes, you should credit Algonquian tribes when sharing your wendigo cosplay. Research cultural appropriation concerns thoroughly, and consult Algonquian communities for guidance. This acknowledgment respects indigenous intellectual property and counters historical erasure of Native voices.
Are There Alternative Winter Monster Cosplays Less Tied to Indigenous Spirituality?
You’ll find abundant winter mythology creatures like Krampus, Yuki-onna, or Gryla offering rich icy cryptid cosplay potential. These figures provide equally dramatic visual elements—horns, frost effects, tattered fabrics—without appropriating sacred Algonquian beliefs, respecting cultural boundaries while showcasing craftsmanship.