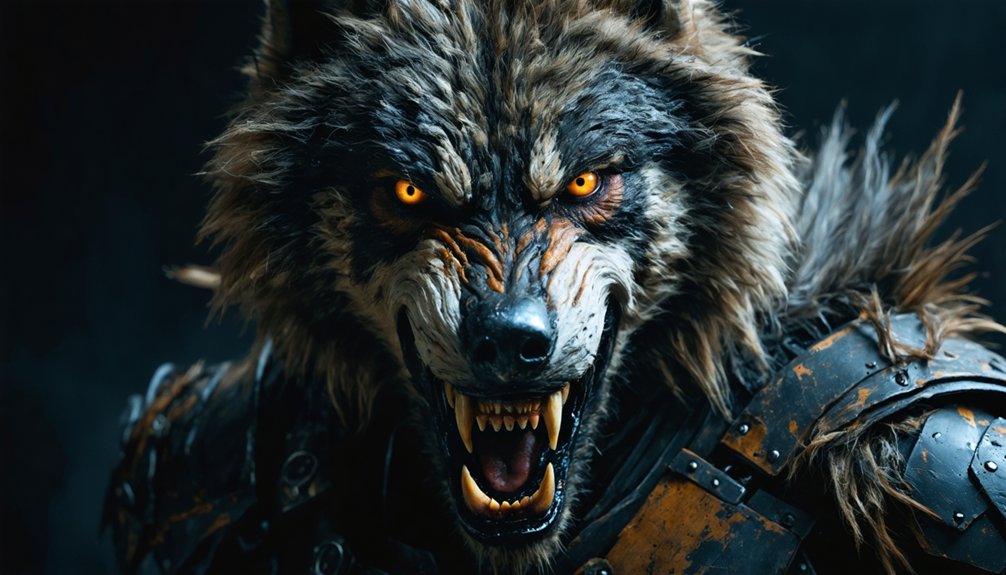
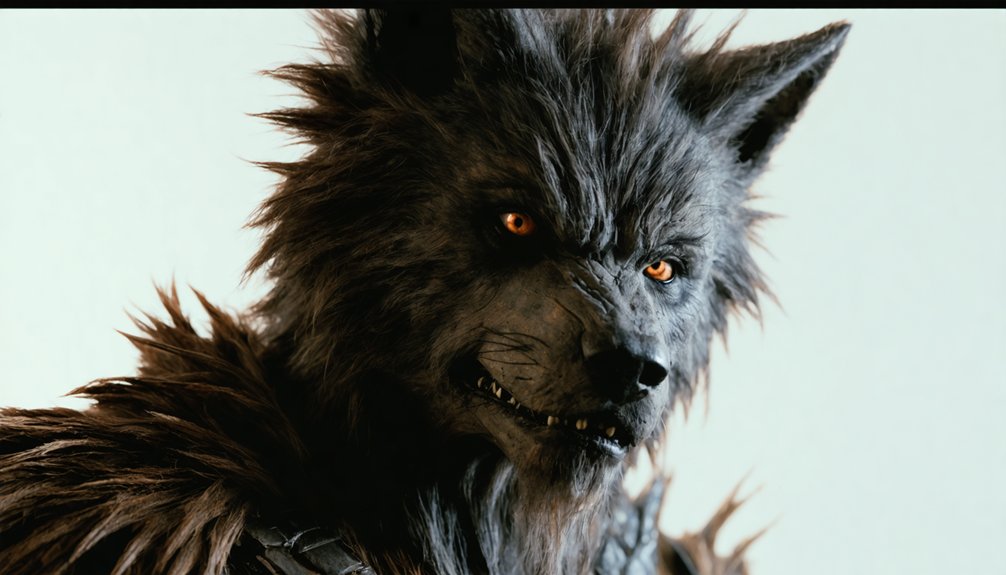
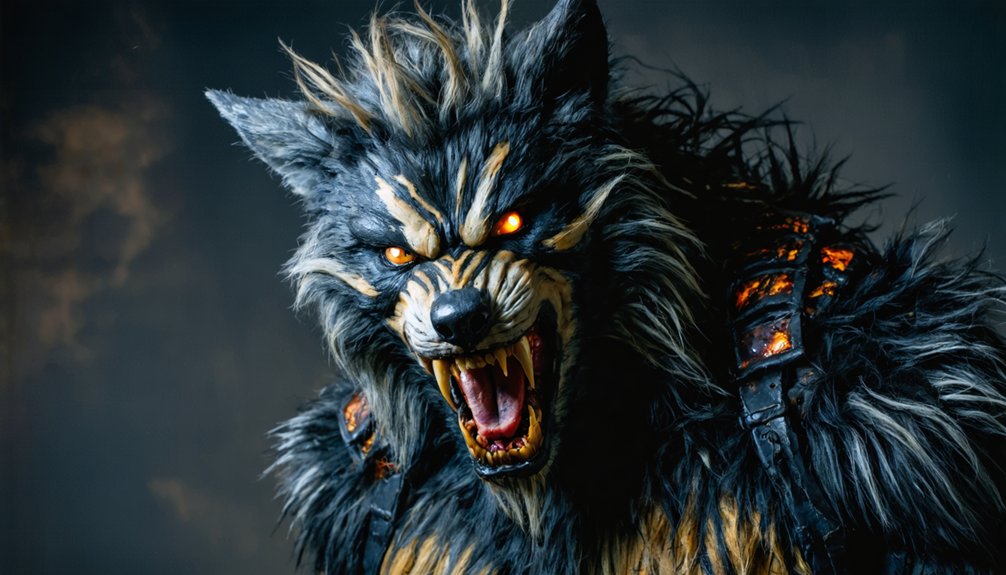
To build a convincing werewolf transformation, you’ll need brown cream makeup, black face paint, dark eyeshadow, primer, and concealer. Start by prepping your skin and applying a full-coverage foundation. Layer brown contour across your jaw, cheekbones, and brow ridge, then deepen shadows with black face paint for dimensionality. Simulate fur using short, jagged brushstrokes in layered brown, gray, and black tones. Set everything with powder and finishing spray. The techniques ahead will sharpen every detail of your transformation.
Key Takeaways
- Start with primer and medium-coverage foundation to create a stable base for layering cream and powder makeup products.
- Contour jaw, cheekbones, and brow ridges using brown cream, then deepen shadows with black face paint for dimension.
- Simulate fur texture using a narrow brush with short, jagged brown, gray, and black strokes flicked at the ends.
- Create a snout illusion by shading the nose sides, darkening the philtrum, and extending shadows past the nostrils.
- Finish with black lips, amber contact lenses, voluminous hair, setting powder, and finishing spray for a complete werewolf look.
Gather These Makeup Products Before You Start
Before you apply a single stroke of contour, you’ll need six core products to execute a convincing werewolf transformation: brown cream makeup, black face paint, dark eyeshadow, primer, concealer, and setting powder.
These makeup essentials aren’t interchangeable — each serves a distinct structural function.
These products aren’t suggestions — each one plays a specific, irreplaceable role in building a believable transformation.
Primer creates adhesion and extends wear. Concealer neutralizes your natural skin tone, giving contour colors accurate payoff. Brown cream makeup builds your first shadow layer across the jaw, cheekbones, and temples. Black face paint deepens those shadows for a gray-black dimensional shift.
Dark eyeshadow adds fur-like texture through fine brushwork. Setting powder locks each layer before you build the next, preventing muddy blending.
These product recommendations prioritize cream-based formulas over airbrush alternatives, making the technique accessible without sacrificing precision or professional-level results.
How to Build the Right Base for Werewolf Makeup
Once your products are staged, the base layer determines how cleanly everything above it performs.
Start with skin prep — cleanse and moisturize according to your skin type, since dry or oily surfaces both compromise adhesion.
Apply a primer that matches your texture goals: pore-filling formulas work for smooth blending, while mattifying primers control shine under heavy color.
Select foundation options with medium-to-full coverage levels, as sheer formulas won’t anchor the contour layers above them.
Color matching here matters less than usual since you’ll heavily contour over it, but staying within one shade of your natural tone prevents patchiness.
Blend everything with a damp sponge or buffing brush for seamless integration.
Lock the base using setting sprays before moving into shadow work — skipping this step causes texture products and contour to slip.
Contour the Face Into a Wolf-Like Structure
With your base locked and set, it’s time to reshape your facial structure using shadow and depth.
Apply brown cream contour along the jawline definition points first, fading upward toward the cheekbones for cheekbone enhancement. Deepen the brow ridge emphasis using dark shadow pressed firmly into the orbital bone.
Start at the jaw, fade upward—let shadow carve your cheekbones and deepen the brow ridge into something defined.
For nose contouring, drag a narrow brush down the nose bridge sides and angle outward toward the upper lip, building your snout illusion. Temple shadowing tightens the face width while forehead shaping through hairline adjustment darkens the perimeter, pulling your silhouette toward something feral.
Layer black over brown gradually to achieve smooth gray-black shifts. Each shadow placement compounds into a cohesive animalistic expression, making your contour do structural work that transforms human geometry into something distinctly wolf-like.
Fake a Snout With Nose and Upper Lip Shading
The snout illusion starts at the nose bridge and radiates outward. So load a narrow brush with dark brown cream and drag two parallel lines down each side of the nose, stopping just before the nostrils flare. Extend those lines outward toward your upper lip shading zone, curving slightly onto the philtrum. Apply black over the brown center to deepen projection.
Effective snout illusion techniques include:
- Flaring the shadow past the nostril edges to visually widen the muzzle
- Darkening the philtrum to separate human lip anatomy from animal structure
- Highlighting the upper lip’s center ridge to push the snout forward dimensionally
Set each layer before building the next to maintain sharp, clean shifts.
Shape the Brows and Deepen the Eye Sockets
Brows define the aggression of the entire look, so reshape yours into thicker, more arched forms using a brown or black brow product before adding any shadow work.
Apply fine, hair-like strokes with a narrow brush to simulate fur texture along the arch and tail. These brow shaping techniques establish the feral character before any shadow hits the skin.
Fine, hair-like strokes mimic real fur, anchoring the feral character before a single shadow touches the skin.
For eye socket definition, press a dark brown eyeshadow into the crease and blend it upward toward the brow bone using a cut-crease approach.
Layer black over brown to create dimensional depth without harsh shifts. This deepens the socket, pulling the eyes further back into the face and producing a more predatory, hollow gaze.
Set each layer before building the next.
Create Fur Texture With a Brush and Face Paint
With a narrow artist brush and black or dark brown face paint, you’ll apply short, jagged strokes across the brow ridge, cheek contours, snout edges, and jawline to simulate individual fur strands.
Build the texture in layers, starting with brown as your base tone, then adding gray mid-tones, and finishing with black to create realistic depth and mixed fur coloration.
Set each layer before adding the next to keep the strokes crisp and prevent the colors from muddying together.
Brush Stroke Fur Technique
Brush strokes are what separate a flat, painted face from a convincing fur texture, and getting this right comes down to tool choice and stroke direction. Use a narrow artist brush loaded with dark brown or black face paint. Pull short, jagged strokes outward from the cheekbones, brow edges, and snout line.
These fur brush techniques create individual strand illusions rather than smeared color masses. Layer gray over brown using the same directional strokes for depth.
Key fur texture tips to execute precisely:
- Flick your wrist at the stroke’s end to taper each line naturally
- Work in sections, setting each layer before adding darker tones
- Vary stroke length to avoid mechanical, uniform patterns that destroy realism
Layering Colors For Depth
Once your brush stroke fur lines are locked in place, color layering is what gives that texture actual dimension. Start with a mid-tone brown as your base fur color, then build shadow dynamics by pressing darker brown into the recessed areas between strokes. This depth separates individual hair clusters and prevents the surface from reading flat.
Next, layer black selectively along the deepest shadow zones — jaw edges, brow creases, and snout sides. Don’t blend it fully; letting edges stay semi-defined strengthens the illusion.
Finally, introduce a light gray or cream highlight along raised fur strokes to complete your color harmony across the full texture field. This three-tone system — brown, black, and highlight — creates believable mixed-coat coloration that transforms painted lines into convincing fur.
Add Layered Shading to Make Werewolf Makeup Look Real
Start your shading with a brown cream product, applying it along the jawline, cheekbones, temples, and nose bridge to establish the foundational shadow structure.
Once you’ve set that layer, build depth by layering black face paint over the brown in the same zones, concentrating the darkest coverage where shadows fall hardest — under the jaw and around the eye sockets.
Blend the shift between brown and black using short, directional brush strokes that mimic fur grain, creating a naturalistic gray-black gradient rather than a flat, uniform shadow.
Starting With Brown Base
Layering your shading in two distinct passes — brown first, black second — is what separates a flat, unconvincing werewolf look from one that reads as genuinely feral.
Start with a cream-based brown, targeting the jaw, cheekbones, and nose edges. Brown undertones anchor the depth without immediately going harsh, giving your blending techniques room to build gradual shifts.
- Blend brown upward from the jaw so the shadow fades naturally — not abruptly — into your foundation.
- Work the brown into the brow ridge and temple hollows to establish structural darkness before black ever touches your face.
- Keep edges soft at this stage; the brown layer exists to serve the black layer that follows.
Set this pass before moving forward.
Layering Black For Depth
Black goes on second, and where you place it determines whether the werewolf reads as dimensional or flat. Apply black face paint or dark shadow directly over your brown contour layer, concentrating it at the jaw’s lowest edge, deep within the eye sockets, and along the outer nose bridge.
Don’t blend it fully into the brown—you want a visible color shift that moves from warm brown into cooler gray-black, mimicking natural fur gradation.
Shadow intensity peaks at these anchor points: the temples, under the cheekbones, and beneath the brow ridge. Use a narrow brush for precision, then feather the edges outward with a dry blending brush.
This layering approach prevents harsh lines and makes the face structure appear genuinely sculpted rather than painted.
Blending For Fur Texture
Blending for fur texture requires a different mindset than standard contour blending—instead of smoothing everything out, you’re deliberately preserving directional strokes that mimic the growth pattern of animal hair.
These fur blending techniques rely on controlled, short flicking motions using a narrow artist brush. Your brush selection guide should prioritize stiff-bristled detailing brushes over soft fluffy ones.
Apply color mixing strategies by combining dark brown, gray, and black in overlapping layers. Your layering approaches should follow natural fur growth direction—downward on cheeks, outward from the snout.
These shading nuances and realism enhancements transform a flat look into something visceral:
- Jagged stroke edges create biological irregularity
- Texture creation tips favor deliberate imperfection over polish
- Detailing methods using highlighted fur edges trigger an instinctive, unsettling recognition
Finish With Lips, Lenses, and Hair That Seal the Look
Once the contour and fur texture are locked in, three finishing elements bring the entire transformation together: lips, contact lenses, and hair.
For lip color, apply black face paint or deep matte lipstick to complete the feral aesthetic. Pair this with amber or yellow lens options to shift your gaze from human to predatory instantly.
Your eye shadow layering should already frame the socket aggressively, so lenses amplify what expression techniques have built beneath them.
For hair styling, add volume and intentional disorder—messy texture reads as beast-like without requiring costume accessories.
Before stepping into your final look, confirm your makeup setting is solid throughout every layer. Press powder over cream products and mist with a finishing spray to lock everything through extended wear.
Beginner Werewolf Makeup Shortcuts That Actually Work
The full werewolf transformation outlined above is impressive, but it’s not the only path to a convincing look.
Beginner tips prove that makeup myths about needing professional-grade tools are simply wrong. With essential tools like a contour brush, brown cream, and black eyeshadow, you’ll achieve strong results grounded in smart color theory.
Let your character inspiration and costume choices guide your intensity level:
- Reshape your brows with dark strokes and jagged fur lines — facial expressions do the rest.
- Contour your nose bridge and jaw using brown-to-black layering for instant feral depth.
- Apply festival makeup techniques — bold, fast, strategic — skipping unnecessary steps entirely.
Start minimal. Build only what your face actually needs. Precision beats complexity every time.
Frequently Asked Questions
How Long Does Werewolf Transformation Makeup Typically Take to Apply?
Depending on your skill level and makeup techniques, you’ll typically spend 45 minutes to 2 hours. Advanced application tips like setting each layer cut time, while intricate fur detailing extends it considerably.
Can Werewolf Makeup Damage or Irritate Sensitive Skin Types?
Yes, it can. You’ll want to prioritize hypoallergenic products and follow sensitive skin precautions by patch-testing cream-based face paints and black pigments 24 hours before full application to prevent irritation or allergic reactions.
How Do You Safely Remove Werewolf Makeup After Wearing It?
Congrats, you’ve terrified everyone! Now, for makeup removal, use a gentle oil-based cleanser to dissolve cream and face paint layers. Follow with your usual skin care routine to restore hydration and prevent irritation.
Does Werewolf Makeup Work on Darker Skin Tones Effectively?
Yes, it works effectively. You’ll need darker pigments with higher contrast ratios to define contours on deeper skin tones. Embrace cultural representation by selecting charcoal, espresso, and ash tones that authentically complement your complexion’s natural depth.
Can Werewolf Makeup Survive Sweating During Outdoor Halloween Events?
Yes, you can maximize outdoor durability by setting each layer with powder and using sweat proof products like waterproof face paint and primer, which actively lock your werewolf contours and fur textures in place throughout extended outdoor Halloween events.
References
- https://www.youtube.com/watch?v=7N-NN1BFZDM
- https://www.tricociuniversity.edu/beauty-blog/werewolf-makeup-step-by-step-halloween-tutorial/
- https://www.youtube.com/watch?v=GNNW5WaaP3E
- https://www.youtube.com/watch?v=9WkKqdQM9Dc
- https://www.youtube.com/watch?v=moe2tLprCMY
- https://www.youtube.com/watch?v=xPiH6AgGxrg
- https://www.tiktok.com/@bobbijanecarr/video/7561149234116955414
- https://www.tiktok.com/@kaylee.marina/video/7566440104806370574
- https://www.lemon8-app.com/@cearasky011/7556421598681514551?region=us
- https://www.pinterest.com/ideas/werewolf-makeup-female-easy/932160567374/