You can craft a mermaid tail using four methods: paper, fabric, silicone, or clay. For paper tails, you’ll fold, cut, and layer scales downward from the quarter-waist line. Fabric tails require sewing skills and pattern pieces cut with seam allowances. Silicone tails use Dragon Skin silicone applied in precise layered coats for swimming. Clay miniatures suit jewelry and small-scale projects. Each method has unique material needs, decorative techniques, and finishing steps worth exploring further.
Key Takeaways
- Choose from four mermaid tail methods: paper, fabric, silicone hybrid, or clay, depending on your skill level and intended use.
- Build a paper tail by folding, sketching a half silhouette, cutting scales, and finishing with an aluminum foil concertina fin.
- Sew fabric tails by cutting two pieces with seam allowances, sewing with right sides facing, clipping curves, and pressing seams flat.
- Create silicone hybrid tails using Dragon Skin silicone, applying multiple measured layers totaling 3,650ml for durability and swimming suitability.
- Finish and store tails properly: cover edges with tape, hand-wash fabric versions, rinse silicone after swimming, and store rolled in breathable bags.
Choose Your Mermaid Tail Method: Paper, Fabric, Silicone, or Clay?
Four distinct methods exist for crafting a mermaid tail, each suited to different skill levels, budgets, and intended uses. You’ll choose between paper, fabric, silicone hybrid, or clay constructions depending on your goals.
Paper tail designs deliver quick, decorative results using basic crafting techniques like folding, cutting, and layering scales.
Fabric tails require sewing skills but offer wearable, durable material choices with structured body pieces and elastic waistbands.
Silicone hybrid builds demand precision and chemical familiarity, producing professional-grade, swim-functional tails incorporating monofins.
Clay miniatures suit small-scale sculptural applications like jewelry or cake toppers.
Each method incorporates distinct finishing touches — sequins, pigments, foil fins, or painted patterns — that elevate your final piece.
Matching your technical capacity to the correct method guarantees the best crafting outcome.
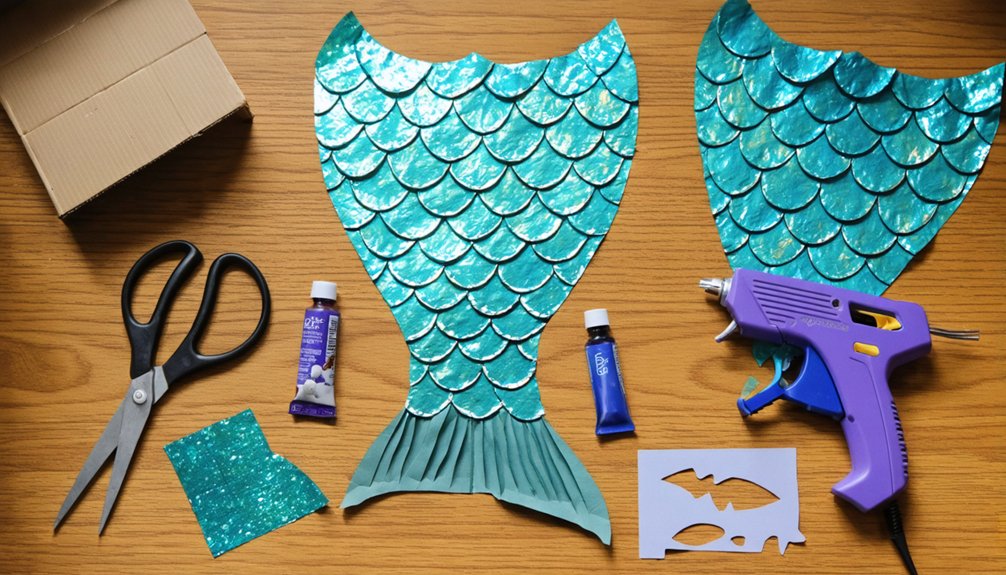
Build a Paper Mermaid Tail With Basic Supplies
Building a paper mermaid tail takes just three core measurements to get started: your waist circumference, half that waist value, and your waist-to-ankle height.
Fold your paper in half, mark the height along the crease, then plot the quarter-waist measurement at the top edge. Sketch half the tail silhouette against that fold, cut it out, and you’ll unfold a perfectly symmetrical shape — your foundation for layered paper patterns.
Fold, mark, sketch, and cut — one simple crease is all it takes to unlock perfect symmetry.
Now comes the creative part: tail decorations. Starting at the quarter-waist line, layer cut scales downward, overlapping each row to conceal the base sheet beneath.
Finish by folding the top edge over elastic or ribbon to form a waistband, then staple it secure. Add an aluminum foil concertina fin at the bottom for dynamic, dimensional flair.
Turn Cereal Boxes and Household Items Into a Mermaid Tail
Raid your recycling bin and you’ve got the raw materials for a surprisingly sturdy mermaid tail. Cereal box designs offer rigid, workable cardboard that holds shape beautifully during household item transformations.
Follow these precise steps:
- Extract the largest panel from your cereal box, giving you a clean, blank working surface.
- Sketch your mermaid tail outline directly onto the unprinted cardboard side.
- Cut the shape with sharp scissors, maintaining clean, deliberate edges throughout.
- Establish a dedicated painting station before applying any decorative elements.
- Finish by layering painted scales or geometric patterns across the entire surface.
You’ll achieve maximum visual impact by alternating two complementary colors across your scale pattern, creating dimensional depth without additional materials.
Sew a Fabric Mermaid Tail That Fits Your Body
To start your fabric mermaid tail, print and cut your pattern pieces, then fold your interfacing on the fold line and cut one tail piece.
Next, cut two fabric tail pieces approximately 1 inch larger around the entire pattern edge to account for seam allowances.
With your pieces ready, sew the tail sections together with right sides facing, leaving the top open so you can turn it right side out for a clean, finished look.
Cutting Fabric Pattern Pieces
Start by printing and cutting out your pattern pieces, then fold your interfacing on the fold line and cut a single tail piece from it. Next, cut two fabric tails approximately 1 inch larger around the edges for seam allowances. Precise fabric cutting techniques uphold your final tail fits flawlessly.
- Pin pattern pieces securely before cutting to prevent shifting
- Follow pattern alignment tips by matching grain lines carefully
- Use sharp fabric scissors for clean, accurate edges
- Mark seam allowances clearly with fabric chalk
- Double-check measurements against your body dimensions before cutting
Keeping your cuts precise eliminates fitting issues later.
Accurate pattern alignment tips assure symmetrical results, so don’t rush this foundational step—it directly impacts your tail’s professional appearance and comfortable fit.
Sewing Tail Body Together
Once your fabric pieces are cut, you’ll place the two tail pieces with their right sides facing each other, aligning the edges evenly before pinning them together.
Using a standard straight stitch, sew along the pinned edges, leaving the top completely open for the waistband assembly later.
Your fabric choices directly influence which sewing techniques you’ll apply — scuba knit requires a stretch stitch or twin needle, while woven fabrics work with a conventional straight seam.
Maintain consistent 1-inch seam allowances throughout for structural integrity.
After sewing, clip curves along the fin section to reduce bulk and tension.
Then carefully turn the entire tail right side out, pushing the fin edges fully outward.
Press seams flat using a pressing cloth to achieve clean, professional-looking results.
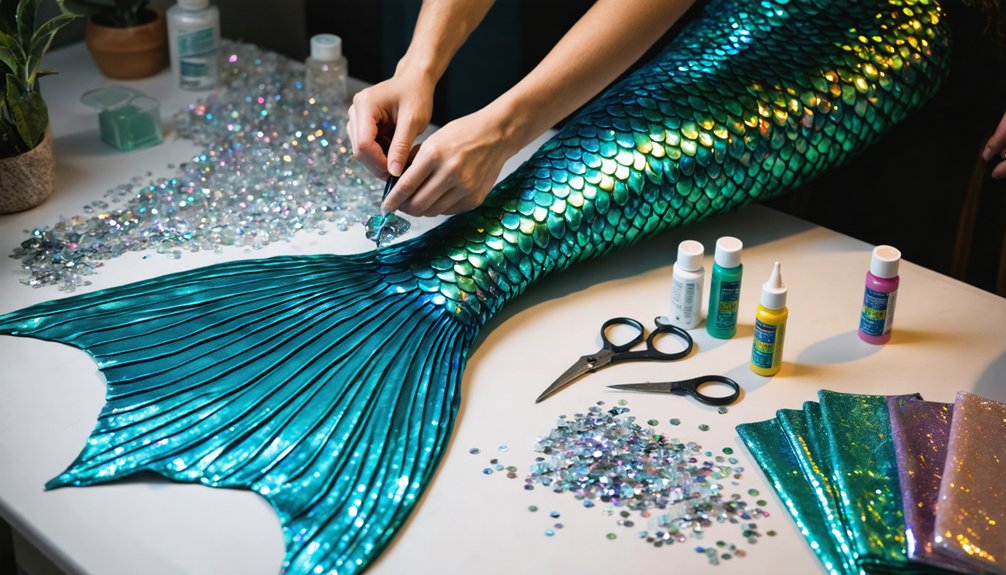
Make a Silicone Mermaid Tail You Can Actually Swim In
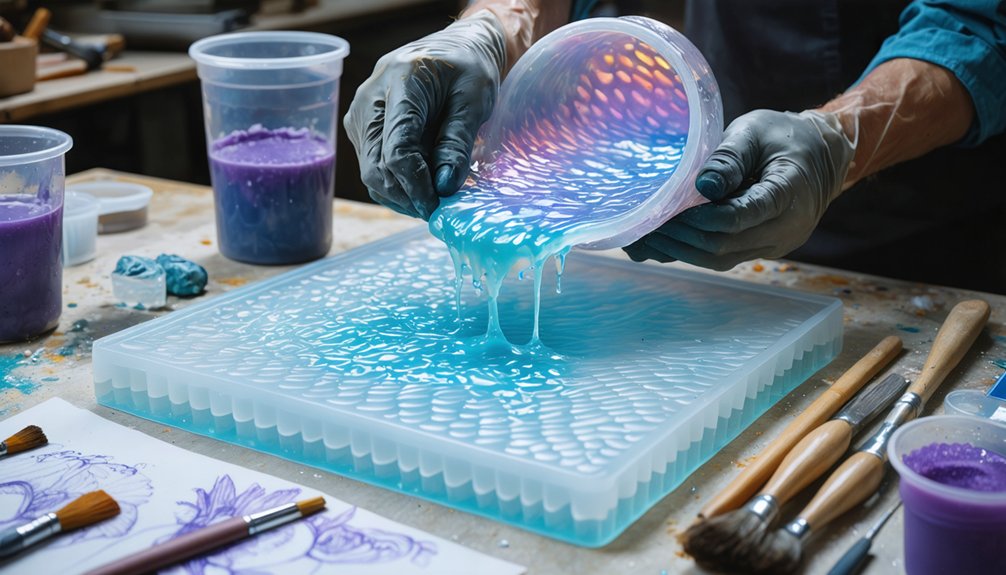
For a silicone mermaid tail you can actually swim in, you’ll need Smooth-On Dragon Skin 10 Medium silicone, totaling 3,650ml across all layers.
Start by applying 750ml to both the front and back sides as your first layer, then follow with a 650ml second layer on each side.
You’ll use the remaining silicone to glue the front and back pieces together with the monofin inside, then finish with a 200ml top coat on both sides.
Silicone Materials And Quantities
Creating a wearable silicone mermaid tail requires precise material quantities, so you’ll want to work with Smooth-On Dragon Skin 10 medium silicone, totaling 3,650ml across all application layers. This silicone type delivers exceptional durability factors while accommodating color additives and texture options seamlessly.
- Apply 750ml per side for the first layer (front and back)
- Add 650ml per side for the second application layer
- Use 75ml specifically for bonding the two pieces together
- Incorporate 300ml when securing front/back sections with the monofin inside
- Finish with 200ml top coat distributed across front and back
Follow manufacturer mixing ratios carefully, respect curing times between layers, and observe safety precautions—including ventilation and gloves—when applying each coat using proper application techniques.
Layering And Assembly Steps
Layering your silicone hybrid tail correctly determines whether it holds together under real swimming conditions, so work methodically through each stage without skipping curing time.
Apply 750ml of Dragon Skin 10 Medium to both front and back sides as your foundational layer, letting your tail design guide edge placement.
Once cured, add 650ml to each side for material durability. Your color choices and decoration ideas integrate through pigments at this stage.
Use 75ml to bond individual pieces, then pour 300ml to permanently glue front and back sections together with the monofin seated inside — this delivers functional features for actual swimming.
Finish with 200ml top coat across both surfaces.
These crafting techniques allow fitting adjustments before full cure, giving you tail inspiration that evolves beautifully from visual art to underwater performance.
Sculpt a Miniature Mermaid Tail From Clay
Sculpting a miniature mermaid tail from clay opens up 3 distinct creative paths: polymer clay, plastilina, or air-dry clay, each offering unique workability and finish.
These miniature tail techniques let you craft precision details that larger projects can’t achieve.
- Model individual scales using a stylus tool for realistic texture depth.
- Shape fins by thinning clay edges gradually, preventing cracking during drying.
- Apply clay sculpting tips like blending seams smoothly with rubbing alcohol.
- Bake polymer clay per manufacturer specifications; typically 275°F for 15 minutes.
- Sand and seal finished pieces for jewelry, keychains, or cake toppers.
You’ll find air-dry clay ideal for beginners, while polymer clay suits advanced sculptors demanding professional-grade durability.
Each medium rewards patience with stunning, functional miniatures perfect for party favors or school projects.
Add Scales, Sequins, and Fins to Any Mermaid Tail
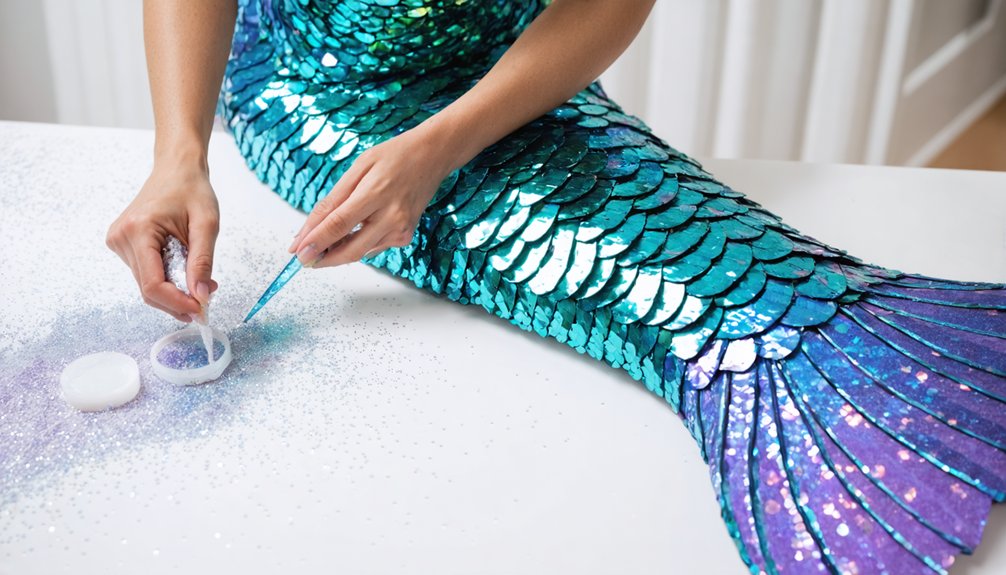
Transforming any mermaid tail into a dazzling, realistic piece requires mastering three distinct decorative techniques: scale layering, sequin application, and fin construction.
For scales application, start at the quarter-waist point, overlapping each layer downward to create dimensional depth. You’ll achieve maximum impact by combining contrasting color combinations—iridescent blues against deep purples or metallic golds against emerald greens.
For sequins placement, use reversible sequins on scuba knit fabric, positioning them strategically along curved edges where light catches naturally. Layer pigments beneath sequins for added luminosity.
Your fin design becomes structurally sound by crafting an aluminum foil concertina fan, then stapling it beneath the final scale layer. This technique creates realistic movement while maintaining durability.
Cover all folded edges with tape to guarantee professional, polished finishing throughout your completed tail.
Make Your Mermaid Tail Last: Care and Storage Tips
Once your mermaid tail is complete, proper care separates a lasting showpiece from a deteriorating craft. Tail maintenance varies by material, so apply these targeted storage solutions accordingly:
- Paper/cardboard tails: Store flat in acid-free folders, away from humidity and direct sunlight.
- Fabric tails: Hand-wash cold, air-dry completely before folding; avoid machine drying to preserve seam integrity.
- Silicone hybrid tails: Rinse with fresh water post-swim, dust lightly with cornstarch to prevent surface tackiness.
- Sequined surfaces: Brush scales in one direction before storing to maintain alignment and reflectivity.
- All tail types: Roll rather than fold when possible; store vertically in breathable garment bags to prevent creasing and shape distortion.
Consistent care extends your tail’s lifespan considerably across every material type.
Frequently Asked Questions
Can Children Safely Wear and Swim in a Silicone Mermaid Tail?
Children can safely wear a silicone mermaid tail if you follow proper safety precautions and teach essential swimming techniques first. You’ll need adult supervision, ensuring your child’s comfort and mobility before attempting deeper water adventures.
What Is the Average Cost of Making Each Mermaid Tail Type?
Crafting costs can considerably vary: paper tails use minimal tail materials (~$5), fabric designs run ~$20, household options stay ~$3, clay miniatures cost ~$10, while silicone hybrid tails, with advanced design techniques, you’ll spend ~$150+.
Are Mermaid Tails Legal to Wear in Public Swimming Pools?
Mermaid tail regulations vary by location—you’ll need to check your facility’s public pool policies directly. Many pools restrict them for safety reasons, but some allow monofin-equipped tails under supervised, designated swim sessions.
How Long Does It Take to Complete Each Mermaid Tail Method?
Imagine you’re crafting for a weekend festival! Tail making techniques vary: paper takes 1-2 hours, fabric needs 3-4 hours, silicone requires days due to drying times, cardboard takes 30 minutes, and clay demands 24-hour curing.
Can Mermaid Tails Be Resized or Altered After They Are Completed?
Yes, you can apply tail resizing and alteration techniques depending on your method. Adjust fabric tails by re-sewing seams, expand paper versions by adding panels, or rework silicone layers using additional Dragon Skin coats for seamless modifications.
References
- https://merimeri.com/blogs/stories/make-a-mermaid-s-tail
- https://crazylittleprojects.com/mermaid-towel-sewing-tutorial/
- https://www.youtube.com/watch?v=DZBvSgjXF7s
- https://www.momtrends.com/kids/how-to-make-a-mermaid-tail-using-household-items/
- https://www.youtube.com/watch?v=z_qnGQHnd9c
- https://www.youtube.com/playlist?list=PLc7yHYEmAzimhmQ8XfX68QWJ23Uc0ywyz
- https://www.youtube.com/shorts/hGyE6cUIXrA