To cosplay Jinx from Arcane, you’ll start with a 150cm blue lacefront wig that you’ll crimp, tease, and French braid into her signature style. Construct an asymmetrical crop top using mirrored pattern pieces with horizontal stretch, then modify dark pants with golden leather straps and custom belt accessories featuring worbla rivets. Transform thrifted boots with heat-shaped EVA foam armor, craft layered fingerless gloves from quilted faux leather, and finish with her iconic cloud tattoos—each element building toward Zaun’s most unpredictable sharpshooter through techniques that’ll bring her chaotic energy to life.
Key Takeaways
- Create a 150 cm blue lacefront wig by teasing and crimping sections for volume, then French braiding into two equal pigtails.
- Construct an asymmetrical crop top using mirror-image pattern pieces with horizontal stretch, adding adjustable straps and velcro closures.
- Build a custom belt system with interlocking pieces, rivet details, and modify dark pants with golden leather straps.
- Modify thrifted boots by cutting uneven tongue heights, adding heat-shaped EVA foam armor, and replacing laces with pink.
- Layer fingerless gloves with faux leather strips and create foam-padded arm sleeves wrapped with bandage-style foam strips.
Creating Jinx’s Signature Blue Braided Wig
How do you transform a standard wig into Jinx’s iconic waist-length braids? Start with a 150 cm blue wig combined with a lacefront for superior wig ventilation and realistic hairline integration. Prep your base by folding wefts back over the ear holes, securing a clean foundation.
Begin with a 150 cm blue lacefront wig, then fold wefts over ear holes for a secure, realistic foundation.
Section hair strategically, then tease and crimp each portion to build volume without creating knots. Brush from bottom upward to detangle post-texturizing.
Divide the wig into two equal sections for French braiding. Take new hair from the right, combine with your right section, and pass center. Mirror this technique on the left, continuing until complete. Secure with clear elastics and fabric covers.
Style bangs separately using hair dryer heat for cohesive texture. Implement proper wig storage techniques post-completion to maintain braid integrity.
Building the Asymmetrical Crop Top With Weathering Details
Because Jinx’s crop top features deliberate asymmetry and punk-inspired hardware, you’ll need to approach pattern preparation with meticulous attention to mirror-image construction. Label all mirrored pattern pieces for correct orientation, aligning stretch direction horizontally around your body. Cut underbust bands with extra allowance for velcro closure.
Sew top front to left and right pieces using overlock stitches, then iron seams flat and topstitch for stability. Attach underbust bands right sides together, turn, and attach to the asymmetrical silhouette design. Position straps asymmetrically, adding connection pieces for adjustability.
Split the back center for dramatic asymmetry, hemming to 7.5 inches depth. Weather the piece with rivet patterns—three for arrow designs, six at clip positions—mirroring hardware across both sides. Add black leather straps where trim ends for authentic punk detailing.
Crafting Custom Pants, Shorts, and Belt Accessories
You’ll need to source dark-colored pants as your base garment, then modify them to match Jinx’s asymmetrical silhouette through strategic cutting and hemming.
The belt system requires constructing a main belt with a buckle closure and velcro end point, reinforced with worbla rivets at designated sections. Two connecting belts must interlock and slide freely along the main belt, featuring their own rivet details and the X-shaped Zapper holder at the lowest point.
Modifying Thrifted Pants
When transforming thrifted pants into Jinx’s signature look, you’ll need approximately 107 x 200 cm of Petal Signature Cotton for your main fabric pieces, plus secondary sections measuring 107 x 100 cm each.
Before beginning flap modifications, establish your base pattern by sewing front and back pieces as mirrored sets. Apply golden 6mm leather straps placement sequentially using top stitching, inserting piping tape between layers for dimensional effect.
Cut flap components twice to create front-back panels, finishing edges with piping tape for professional quality. Secure flap modifications using strategically positioned velcro strips on interior pants sections and wrap-around elements.
Integrate rivet details throughout belt components, adding worbla arrow-shaped accents on upper sections and X-shaped details for lower zapper storage positioning.
Adding Belt Details
With your pants construction complete, the belt system requires EVA foam fabrication to replicate Jinx’s layered waist accessories. Cut foam following digital pattern templates, then heat-shape each piece to guarantee dimensional authenticity. Apply faux leather finishes through paint and sealant combinations that mimic worn texture.
Grommet placement patterns demand precision—mark positions before punching holes to certify symmetrical arrow formations. Hammer grommets from both sides using proper setting tools, alternating between bronze, chrome, and gold finishes for visual accuracy.
Riveting techniques for realism involve securing black fabric straps through pre-punched holes, creating functional loops for belt attachment. Thread suspender straps through completed grommets, finishing with wound twine details.
Consider pre-made options from Etsy or AliExpress if fabrication time constrains your build schedule, though custom crafting offers superior fit customization.
Modifying Thrifted Boots With Armor and Animated Flaps
Before diving into armor construction, select inexpensive base boots from Amazon that feature side zippers—you’ll need to permanently tie the laces since the zippers provide entry and exit. Replicate Jinx’s uneven tongue heights by marking desired lengths with Sharpie, then cutting accordingly. Replace original laces with pink or purple for color accuracy.
Create your armor templates through pattern prototyping: wrap boots in Saran wrap, then layer masking tape over toe and heel sections. Mark centerlines and sole junctions with red Sharpie for precise boot measurements. Transfer these patterns to 2mm EVA foam using Cos-Tools hole drills on a cutting mat.
Cut armor pieces, then heat-shape them to boot contours using a heat gun. Secure with contact cement, apply Plasti Dip for paint adhesion, and finish with vibrant acrylics and metallic accents.
Constructing Layered Gloves, Bracelets, and Arm Sleeves
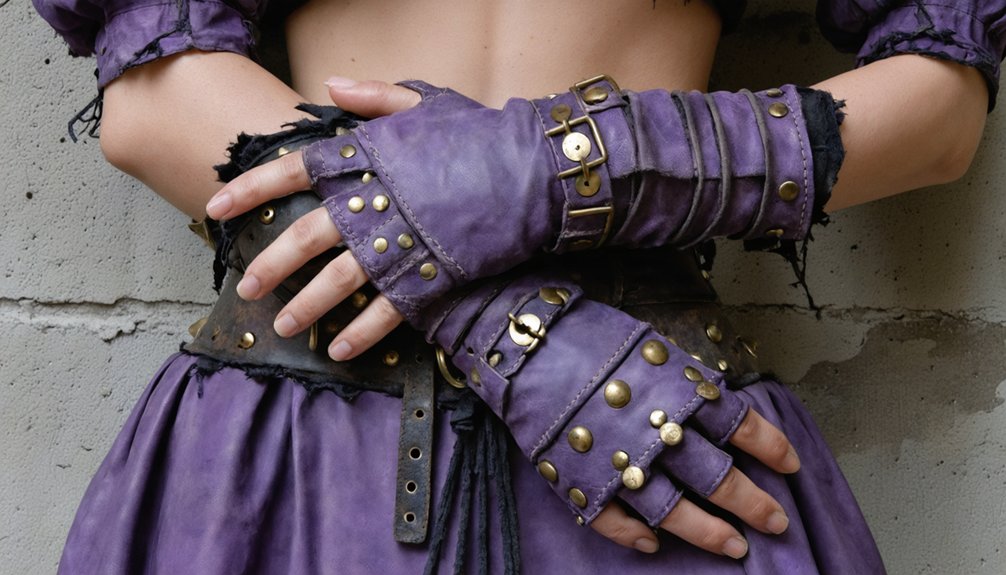
Start your fingerless glove base by cutting black faux leather quilted fabric using patterns from Kinpatsu tutorial Book 4, which provides step-by-step sewing instructions specifically for Jinx’s gloves.
Layer faux leather strips traced, cut, and glued together with hot glue to create extra-long decorative strips that maintain stretch across the hand and fingers. Secure the layered strips to your sewn glove base using fabric glue and additional hot glue points, ensuring the assembly remains flexible enough for hand movement while achieving Jinx’s signature textured aesthetic.
Sewing Fingerless Glove Base
Creating a fingerless glove base for Jinx’s costume requires constructing the wrist-length foundation before modifying it for exposed fingers. Start with fabric selection appropriate for your measurements—trace your hand outline using the turkey hand method, extending to wrist length. Sew around the chalk line with generous seam allowance, allowing fit adjustments.
Construction techniques involve creating the full glove first, then cutting fingers post-sewing for easier fitting control. Turn the glove inside out to trim excess fabric after initial assembly. Once you’ve achieved proper fit, cut the finger sections while the glove remains right-side out for precision. This approach prevents the trapped feeling fingerless designs aim to eliminate.
Always test fit iteratively, cutting conservatively—you can always trim shorter, but can’t reverse overzealous cuts.
Layering Foam and Fabric
Jinx’s iconic arm accessories demand strategic foam-and-fabric combinations that balance structural integrity with movement flexibility. Stack thicker craft foam cylinders inside fabric sleeves to create structural foundations, then wrap 2mm foam strips like bandages over these bases for authentic layered appearances.
For texturing foam surfaces, sand beveled edges with rotary tools before applying fabric coverings. Construct glove extensions by gluing foam frames, covering them with fabric, then sewing edges for seamless integration with fingerless bases.
When attaching foam pieces securely, hot glue provides immediate adhesion for bracelet elements, while Velcro dots allow removable configurations. Layer faux leather strips over foam foundations for extended bands, gluing each strip incrementally.
Add dimensional depth by positioning foam pieces under fabric sashes before covering entirely. Prime completed assemblies with Plasti-Dip before painting, ensuring both foam and fabric surfaces accept weathering treatments uniformly.
Applying Jinx’s Iconic Cloud Tattoos and Body Art
The distinctive cloud tattoos adorning Jinx’s left shoulder and upper arm serve as one of her most recognizable design elements, requiring careful attention to placement and execution in any accurate cosplay.
Jinx’s signature cloud tattoos demand precise placement and meticulous execution to achieve authentic character representation in cosplay.
You’ll achieve ideal results through temporary tattoo transfers specifically designed for cosplay makeup application, ensuring proper adhesion throughout your convention day. Position the cloud effect details precisely by referencing high-resolution screenshots from Arcane, marking placement points with washable makeup pencil before application.
Consider airbrush techniques for gradient changes within each cloud formation, creating dimensional depth that photographs exceptionally well. Professional body paint sealers protect your work from smudging and environmental factors.
Test all products forty-eight hours beforehand to verify skin compatibility and color accuracy under various lighting conditions, guaranteeing your body art maintains character authenticity.
Final Assembly and Weathering Techniques for an Animated Look
Achieving Arcane’s signature hand-painted aesthetic requires strategic weathering across every costume component, transforming pristine materials into Jinx’s battle-worn appearance.
Begin by applying matte finishes to all metallic surfaces—gold and silver spray paint needs dulling to replicate 2D animation. Layer painting techniques using black fabric paint mixed with acrylics and Hexlex, starting with dark base tones and gradually building toward highlights. Distress foam accessories, faux leather harnesses, and painted armor pieces using this mud concoction method.
Weathering applications should concentrate on natural wear points: belt edges, strap connections, and boot soles. Apply gesso and Mod Podge to boot bases before final distressing. Hand-paint detail work with flexi paint for dimensional accents, then seal everything with matte topcoats. This systematic approach guarantees cohesive aging across fabrics, foam, and painted elements.
Frequently Asked Questions
What Makeup Products Best Recreate Jinx’s Pink Eye and Purple Smokey Eye Look?
You’ll achieve Jinx’s signature eyes using NYX Epic Wear pink liner, Sugarpill “Kiki” shadow, and Huda Electric Purple palette. Master color mixing methods by layering pigments wet, then secure with makeup setting techniques like Ben Nye Final Seal spray for cosplay durability.
How Do You Safely Store and Transport Long Braided Wigs to Conventions?
Braid before bagging: proper wig storage techniques require detangling, then braiding synthetic fibers flat. Use wig transportation cases like snug hat boxes with foam heads, securing braids with rubber bands. You’ll prevent tangles while maintaining fiber integrity during convention travel.
What Body Type Modifications Are Needed for Different Measurements Than Provided?
You’ll need custom pattern grading for your measurements, strategic muscle padding placement at shoulders and arms for Jinx’s lean build, and properly fitted wig cap techniques using adjustable straps to secure those iconic long braids during movement.
Which Photography Angles Best Capture Jinx’s Asymmetrical Costume Details?
You’ll capture Jinx’s asymmetry best using 45-degree angles with off-center focal points emphasizing mismatched sleeves and braids. Dynamic action poses from three-quarter views showcase patched fabric textures, uneven belt details, and prosthetic arm components most effectively.
How Long Does a Complete Jinx Cosplay Typically Take From Start to Finish?
You’ll need approximately 130 hours across eight months for a complete Jinx cosplay, accounting for clothing construction, prop assembly process, wig styling techniques, fabric modifications, and detailed finishing work—though your schedule may extend the timeline further.