Start by layering EVA foam mats around comfortable shoes secured with duct tape, building up the hoof volume with template-based cuts. Carve a central channel down to shoe level, creating the distinctive cloven split while maintaining heel stability. Heat-shape Wonderflex sheets over your foam base, reinforcing high-contact areas with triple-layer thermoplastic at the tips. Sand surface variations for realistic texture, then apply charcoal gray base coats with translucent layering that mimics keratin’s natural striations. Proper attachment systems and paint techniques transform these sculptural foundations into performance-ready costume pieces.
Key Takeaways
- Build the foundation by layering EVA foam sheets around secured shoes, then carve a central channel to create the distinctive cloven split.
- Reinforce the foam base with heat-shaped thermoplastic shells, adding triple layers at hoof tips for durability during ground contact.
- Create secure attachment using 1-inch nylon webbing straps across instep, ankle, and calf with side-release buckles for adjustability.
- Add realistic texture through varied sanding patterns, then apply mid-tone base coat with translucent layers mimicking natural keratin appearance.
- Test weight distribution during extended wear to identify pressure points and add flexible inner liners where needed for comfort.
Understanding Satyr Hoof Anatomy and Structure
The pedal bone anchors everything in a hoof’s architecture, serving as the primary framework that dictates the hoof capsule‘s shape while providing critical strength and stability. This dense, vascular structure lacks marrow but connects to the hoof wall through collagen suspension nearly 360 degrees around.
The pedal bone’s dense, marrow-free architecture creates the hoof’s foundational framework through nearly 360 degrees of collagen suspension.
Behind it, the navicular bone structure prevents over-articulation while maintaining the deep flexor tendon’s angle—essential for digitigrade locomotion.
For satyr cosplay, you’ll adapt this pedal bone articulation into a cloven configuration. Your design splits the structure into two distinct parts, mimicking caprine ungulates. The shortened tibia connects to an elongated toe bone that butts against smaller toe bones, terminating in split hoof nails.
Understanding how muscles attach from tibia over heel to hoof tip lets you engineer authentic movement mechanics.
Gathering Materials and Tools for Hoof Construction
You’ll need three material categories to transform footwear into convincing cloven hooves: structural foam and thermoplastics for the base form, adhesives strong enough to bond dissimilar materials under stress, and finishing products that seal and protect your work.
Your foam core—whether craft foam, floral foam, or Styrofoam—shapes the bulk of each hoof, while Wonderflex thermoplastic wraps the shoe front for structural integrity. Power-tac glue, hot glue sticks, and resin adhesive create layered bonding strength, and black glossy paint with optional acrylic sealer delivers the hard, horn-like surface appearance satyrs require.
Essential Foam and Plastics
Craft foam sheets form your primary building block for satyr hooves, available in multiple thicknesses at Joann Fabrics, Michaels, and AC Moore. You’ll layer these essential foam materials to achieve dimensional depth, while floral foam from arrangements adds sculptable density for organic contours. Repurposed sofa cushion foam accelerates rough builds when time’s limited.
For essential plastic materials, Wonderflex thermoplastic sheets revolutionize structural integrity—order from wonderflexworld.com and cut half-moon shapes for cloven splits. Heat activation lets you mold anatomically accurate curves around shoe bases. Wrap 2-inch-larger Wonderflex pieces around footwear fronts, creating rigid shells that support weight distribution.
Styrofoam blocks salvaged from packaging provide lightweight cores, though they’re harder to shape precisely. Consider 3D-printed paw or hoof bases from Etsy vendors for plug-and-play foundations with pre-engineered geometries.
Adhesives and Fastening Systems
How does one transform separate foam and plastic components into structurally sound cloven hooves? Your adhesive selection determines structural integrity and assembly efficiency.
Fast drying adhesives accelerate your workflow:
- Hot glue systems (60W-100W) enable rapid component assembly with medium-strength bonds across foam, fabric, and cardboard
- Two-part epoxy delivers quick cure times for 3D-printed filaments, metals, and thermoplastics
- CosBond Attach & Build sheets eliminate dry time entirely through instant-bond technology
For maximum durability, E-6000 provides industrial-strength bonding across material combinations, though respiratory protection is mandatory. Barge Contact Cement excels at layered construction requiring flexible bonds.
Multipurpose sealants like Mod Podge serve dual functions—bonding components while simultaneously sealing foam surfaces. Match your adhesive to material pairings: rubber cement for EVA foam, superglue for metal accents, wood glue for structural elements.
Finishing Paints and Sealants
After adhesive bonds cure, surface finishing transforms raw construction materials into authentic-looking hooves. You’ll need black glossy paint as your primary coating—it works brilliantly over foam, Wonderflex, and high-heeled shoe bases.
Apply spray paint in base tones (black, brown, tan) before layering acrylic craft paint for realistic detailing. Water based clay smoothing prepares sculpted surfaces before painting, creating natural hoof grain texture.
Professional results require proper acrylic paint sealing with specialized glazes or sealers. These protective layers withstand cosplay wear while delivering glossy finishes that mimic authentic keratin.
Sand all surfaces beforehand, then paint over plastered areas to even slopes. Add horizontal growth lines with detail brushes for anatomical accuracy. Seal everything with resin adhesive post-painting to lock components and surfaces permanently.
Your finishing technique determines whether hooves appear handmade or hauntingly realistic.
Creating the Base Hoof Shape With EVA Foam
EVA foam mats form the structural foundation of your satyr hooves, transforming flat material into dimensional, wearable art through strategic cutting and layering. Your foam density selection determines both structural integrity and carving precision—denser foam supports weight distribution while maintaining sculptable flexibility. Template-based foam cutting eliminates proportion errors, ensuring anatomically convincing results that align with your shoe size measurements.
Begin construction by securing comfortable shoes with duct tape, creating your attachment surface. Layer foam sheets around this foundation, establishing your basic hoof volume:
- Cut foam to extend beyond shoe edges, accommodating natural hoof width
- Shape initial slopes with curved angles directing downward toward the foot
- Hand-carve the silhouette using reference images of cloven hooves
This structural phase establishes proportions before detailed sculpting begins.
Carving and Defining the Cloven Split Detail
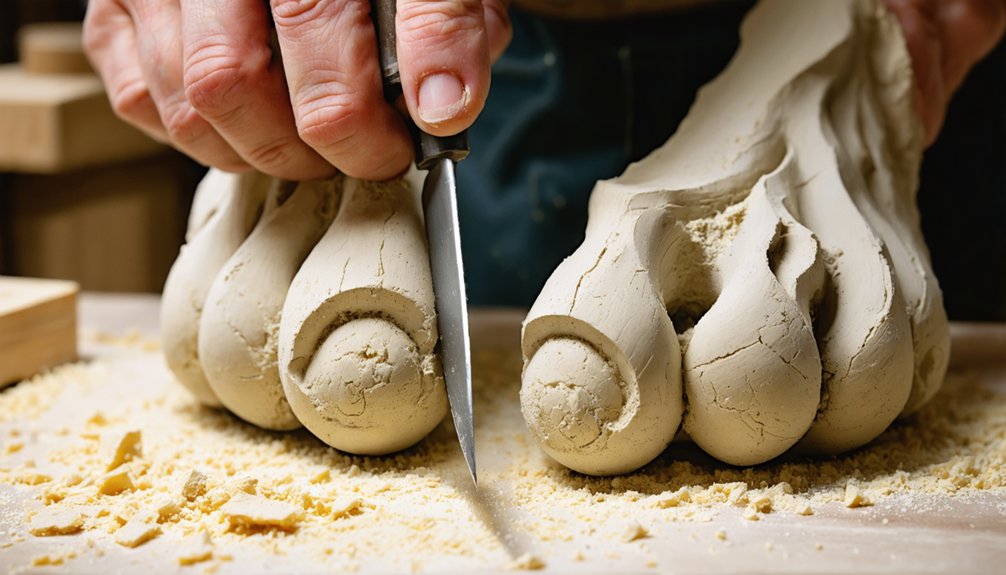
The cloven split transforms generic hoof shapes into anatomically credible satyr feet, requiring precise depth control and symmetrical execution across both pieces. Using rotary tools or carving implements, excavate a central channel that extends from the toe backward, creating distinct halves while maintaining structural integrity at the heel junction.
For foam constructions, carve the depression down to shoe surface level, ensuring the cleft penetrates deeply enough to read visually from all angles. Wood-based hooves need saw cuts followed by strategic sanding to refine the division without compromising stability.
When employing casting techniques with clay sculpts, define this split detail before molding—your mold will replicate every depression precisely. Paint the recessed area black afterward to amplify depth perception and enhance the anatomical separation between hoof segments.
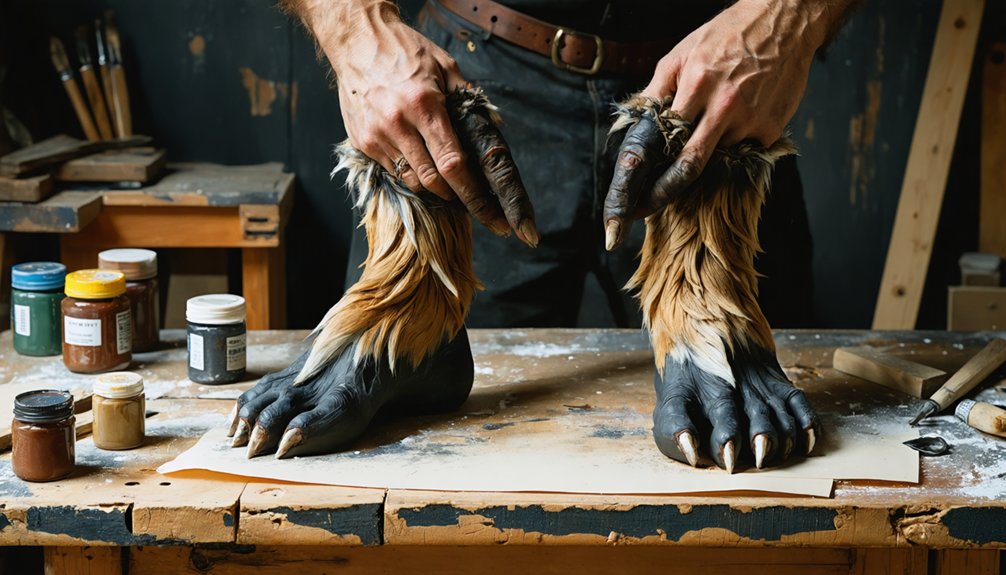
Reinforcing Hooves With Thermoplastic Shells
Structural vulnerabilities plague hooves constructed from foam alone, particularly where costumes demand extended wear or dynamic movement across convention floors. Layering thermoplastic shells over your carved foam base transforms fragile sculptures into durable performance pieces. Heat two Wonderflex sheets and drape them over each hoof section, conforming the material to your cloven split while pliable.
Critical reinforcement zones include:
- Hoof tips: Triple-layer Worbla prevents bending where ground contact occurs
- Cloven divide: Sandwich thin EVA foam between thermoplastic sheets along the split line
- Base perimeter: Fold excess thermoplastic over foam edges, securing with heat gun pressure
Smooth seams by finger-pressing heated overlaps, then apply sandable filler primer. This shell construction withstands repetitive stress while maintaining sculptural definition throughout reinforcing hoof tips and weight-bearing areas.
Designing Wearable Attachment Systems
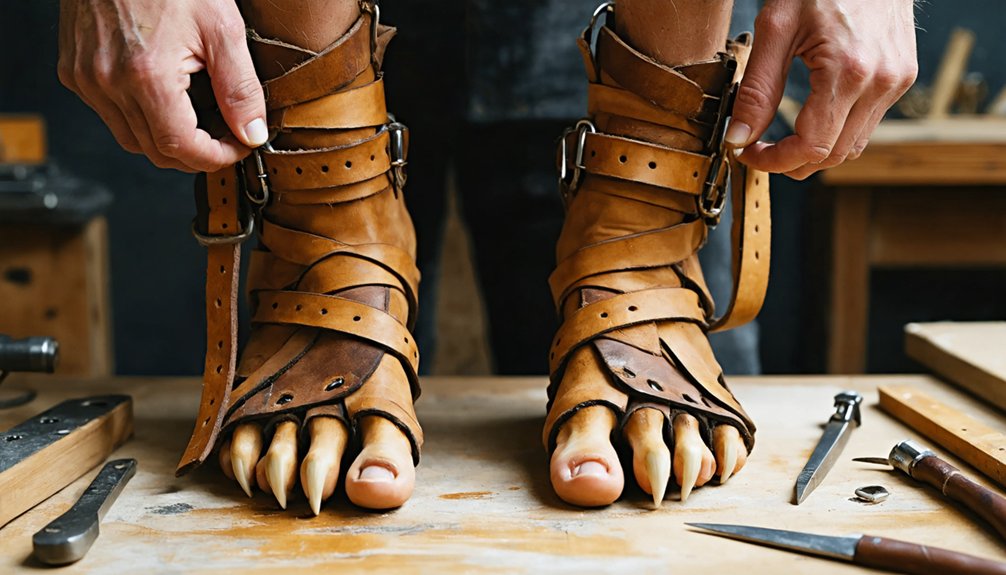
Your satyr hooves require a robust attachment system that transfers weight from the hoof structure through your leg without shifting during movement. Position primary load-bearing straps across the instep, around the ankle, and behind the calf to create three anchoring points that distribute pressure evenly across your foot and lower leg.
Select 1-inch wide nylon webbing or leather strapping material paired with side-release buckles for quick adjustments, ensuring each strap can tighten independently to accommodate the contours of your leg while maintaining stability during performance.
Secure Strapping Methods
Strapping systems hold together every component of your satyr costume, transforming individual foam and plastic pieces into a wearable suit that moves with your body. Your strap connection points require strategic placement where tension naturally distributes across your frame.
Consider these integrated fastener systems:
- T-strap harnesses link chest, back, and shoulder pieces using 2-inch webbing with maximum velcro grip surface
- Nylon webbing with quick-release buckles enables rapid donning while maintaining structural integrity through hot glue baths
- Elastic bands with sewn velcro tabs pass through razor-cut slots, offering micro-adjustability at pressure points
Reinforce critical junctions with crosswise fabric pieces bonded perpendicular to primary tension lines. Hot glue buttons press velcro deep into foam substrates, while edge beading prevents peeling under repeated stress cycles.
Weight Distribution Considerations
Every pound of foam, resin, and hardware creates downward force that your legs must support through hours of convention wear. Design your hoof attachment system using total surface-bearing principles—distribute load across your entire foot and lower leg rather than concentrating pressure at single points.
Socket fatigue occurs when uneven weight transfer creates hotspots and pain. Counter this by engineering a flexible inner liner within rigid hoof shells, mimicking pressure distribution management techniques from prosthetic design.
Your calf interface should feature breathable fabric over structural frames, spreading forces while allowing evaporative cooling. Test continuously: eight-hour wear time reveals pressure points invisible during brief trials.
Map force vectors during walking, standing, and dynamic movement—your attachment system must stabilize these multi-directional loads without creating shear stress against skin.
Adding Realistic Texture and Surface Details
Creating authentic texture on your satyr hooves transforms rough lumber into convincing animal appendages through strategic material removal and surface refinement. After establishing basic shapes with your circular saw, implement sanding pattern variations to develop realistic textural gradients across each surface.
The cloven split demands particular attention—cut down the middle, then sand thoroughly to eliminate sharp shifts while preserving dimensional depth. Progressive refinement creates “rounded awesomeness” that eliminates blocky edges without compromising structural integrity.
Your texturing strategy should emphasize:
- Corner rounding for organic contours that mimic natural hoof geometry
- Split depth consistency ensuring symmetrical appearance across paired hooves
- Balanced surface detail maintaining stability under costume wear conditions
Cover approximately two-thirds with fur, letting textile concealment reduce detailing requirements on hidden sections while perfecting visible areas for maximum visual impact.
Painting Techniques for Authentic Keratin Appearance
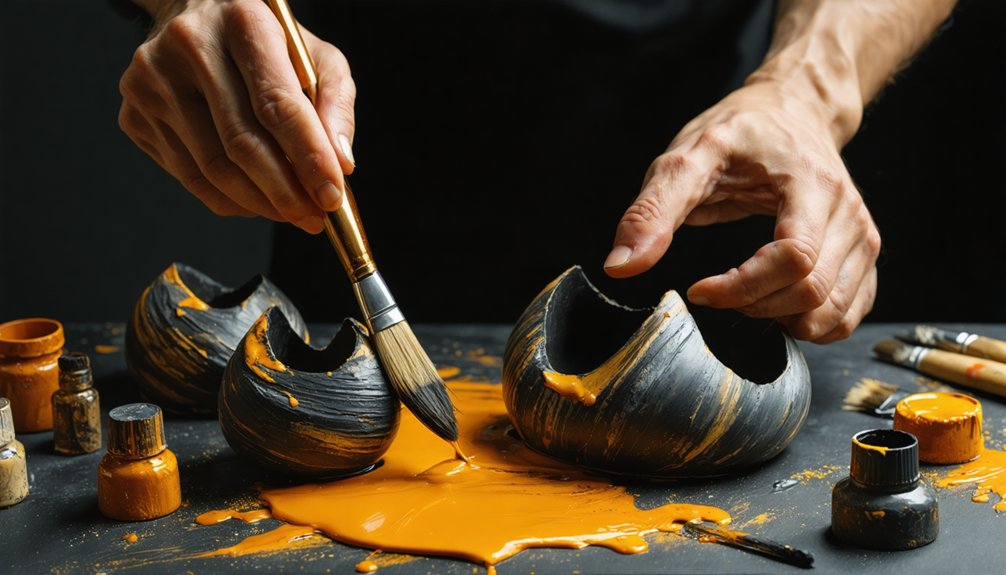
You’ll achieve realistic keratin appearance by starting with a mid-tone neutral base coat that matches natural hoof coloration—typically charcoal gray, warm brown, or off-black depending on your reference animal. Build depth through translucent layering techniques that mimic keratin’s natural striations and growth patterns, applying darker washes in recesses and lighter dry-brushing along edges where wear occurs.
Seal your work with varying gloss levels across different hoof zones, since authentic keratin displays matte texture on rough surfaces and subtle sheen on smooth, compressed areas.
Base Coat Color Selection
Black glossy paint forms the foundation of convincing keratin replication on satyr hooves, transforming shaped Wonderflex into surfaces that catch light like polished animal horn. This single-coat application delivers the wet-sheen appearance characteristic of natural hoof material, creating immediate visual authenticity when applied directly over standard Wonderflex’s inherent texture.
Your base coat strategy should focus on these coverage priorities:
- Exposed heel sections that remain visible during movement and weight-bearing
- Toe regions that peek beyond fur covering on the lower hoof structure
- Broken heel areas if you’ve removed heels for flat, realistic profiles
The glossy black finish eliminates needs for color variations or unique finishes in base layers, allowing the Wonderflex’s rough surface to provide textural complexity while paint delivers reflective keratin qualities that photograph exceptionally well under convention lighting.
Layering and Texture Effects
Once your glossy black foundation dries, authentic hoof realism emerges through strategic texture enhancement rather than additional paint layers. Your Wonderflex surface already provides natural imperfections that mimic keratin striations, requiring minimal intervention.
For dimensional depth, consider embedding plaster in strategic grooves to simulate weathered keratin ridges—apply thin lines along natural contour breaks before they fully set. Alternatively, incorporating leather scraps onto textured surfaces creates irregular surface variations matching aged hooves. Focus enhancement efforts on exposed heel sections where costume pants won’t provide coverage.
The papier-mâché method inherently generates authentic texture through layered construction, while wood-based builds benefit from preserved sanding marks that replicate keratin grain patterns. Your fur coverage strategically conceals construction imperfections while allowing intentional texture to remain visible, balancing craftsmanship with practical wearability.
Weathering and Final Sealing
After establishing your textured foundation, weathering transforms uniform surfaces into believable keratin through controlled paint degradation. Smooth unwanted ridges and sharp edges post-priming, then test-wear your legs between coats to identify rub spots requiring reinforcement. This practical approach guarantees securing durable finishes before committing to final layers.
Strategic weathering techniques include:
- Comparing your work against reference art to balance color saturation and sheen levels
- Adjusting paint proportions to achieve narrower or wider hoof proportions matching your character
- Directing fur growth over seam lines to conceal unpainted exterior sections
For maintaining scuff resistance, apply thin glossy black layers over Wonderflex, allowing complete drying between applications. Optional Mod Podge sealing protects foam substrates, while power-tac adhesive secures materials permanently. This methodical finishing process delivers convention-ready hooves withstanding repeated wear.
Integrating Fur and Leg Coverage
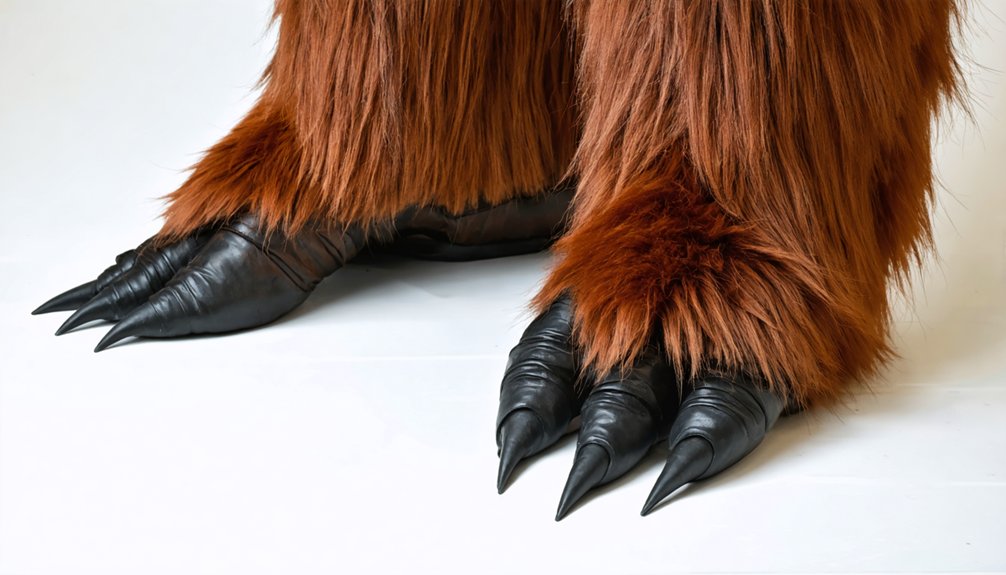
When your hoof structure reaches completion, the shift from leg to cloven foot becomes your next critical challenge. Furry fabric layering demands strategic material placement—glue gun secure fur directly over foam and shoe structures, extending coverage seamlessly upward. For hoof shape incorporation, wrap duct tape in matching fur tones around visible shoe backs, then apply your base fur layer.
Stiletto heels four inches or higher create authentic leg lines without bulky shifts. Carve foam precisely where it meets your shoe’s toe, allowing the cloven silhouette to emerge naturally. Optional furry pants eliminate awkward mid-calf reveals, though fitted options preserve realistic proportions better than thick alternatives.
Elastic bands anchor hooves beneath fur coverage, while Wonderflex shaped over shoes provides stable bonding surfaces before final fur application completes your transformation.
Testing Stability and Making Final Adjustments
Before declaring your satyr hooves complete, you’ll need rigorous stability testing that reveals structural weaknesses invisible during construction. Begin with 10-15 minute wear trials on flat surfaces, then graduate to uneven terrain that simulates convention floors and outdoor photoshoot locations.
Critical testing checkpoints:
- Adjusting heel retention through elastic strap reinforcement prevents slippage during strides
- Evaluating weight distribution across the split-toe alignment guarantees balanced loading
- Verifying screw-fastened connections withstand repeated impacts without loosening
Sand any snagging points in the split middle cut, then apply final fur adjustments where coverage impedes natural gait. If ankle strain emerges, add rigid sole inserts to your 4-inch heel rise models. Address exposed heel visibility with matching paint layers, achieving professional concealment without sacrificing the elevated stability that defines functional satyr hooves.
Frequently Asked Questions
Can Cloven Hooves Be Made to Work With Digitigrade Leg Stilts?
Yes, you’ll integrate cloven hooves with digitigrade stilts by angling the front assembly and tucking furry pants over both components. This technique’s increasing stability through proper weight distribution while enhancing comfort by creating seamless shifts between foam materials and stilt mechanisms.
How Much Do Finished Satyr Hooves Typically Weigh per Foot?
Hoof weight variations range from 1-3 pounds per foot depending on your material choices. Material density impacts vary dramatically—wood constructions weigh heaviest, while EVA foam and clay alternatives offer lighter, more comfortable options for extended wear.
Are Cloven Hooves Suitable for Outdoor Convention Photography and Terrain?
Like Pan traversing Mount Olympus, you’ll find cloven hooves excel on flat convention surfaces with slip-resistant sole design and proper traction. However, weatherproofing considerations and terrain limitations make uneven ground challenging—stick to smooth, predictable outdoor photography locations.
What’s the Average Cost to Build a Pair of Hooves?
You’ll spend $40-80 for DIY builds using shoe making materials like Wonderflex and foam, while hoof shaping techniques with plaster gauze cost $60-120. Premium custom pairs run $250-350, depending on your desired durability and finish quality.
How Long Does It Take to Construct Cloven Hooves From Start to Finish?
You’ll wait anywhere from *20 minutes to 10 weeks*—your materials selection and construction techniques dramatically impact timelines. DIY epoxy methods finish fastest, while professional resin hooves require patient waiting. Choose wisely based on your deadline and desired quality level.