Use wire-pull smoke grenades like Enola Gaye’s 90-second models outdoors in well-ventilated areas with proper permits and safety gear. Position your cosplayer strategically, considering wind direction, then lock your camera settings between 1/800-1/2500 sec shutter speed using RAW format. Place overhead strobes like the Godox AD600 Pro to illuminate smoke particles and create dimensional layers. Stack complementary smoke colors, rehearse movements beforehand, and time your shots during peak smoke density. Master these fundamentals, and you’ll discover advanced techniques for transforming atmospheric effects into truly cinematic compositions.
Key Takeaways
- Choose smoke bomb types matching your character concept: wire-pull grenades for thick clouds, handheld for action shots, fountains for backgrounds.
- Prioritize safety by using smoke bombs outdoors only, wearing protective gear, checking local regulations, and maintaining fire safety equipment nearby.
- Scout outdoor locations assessing lighting conditions, smoke visibility against backdrops, accessibility, and securing necessary permissions before shooting.
- Position strobes to illuminate smoke particles, stack complementary colors, and place bombs inside props to direct plumes strategically.
- Use high-resolution cameras with fast apertures, lock focus and exposure before ignition, and shoot at 1/800-1/2500 sec shutter speeds.
Choosing the Right Smoke Bombs for Your Cosplay Theme
When selecting smoke bombs for your cosplay photography, you’ll need to match the device type to your specific shooting scenario and character concept. Wire-pull grenades from top smoke bomb brands like Enola Gaye deliver 90-second burns with high-output clouds, perfect for dramatic character reveals.
Handheld options work best for action shots, while ground-based fountains create atmospheric backgrounds during 45-second burns.
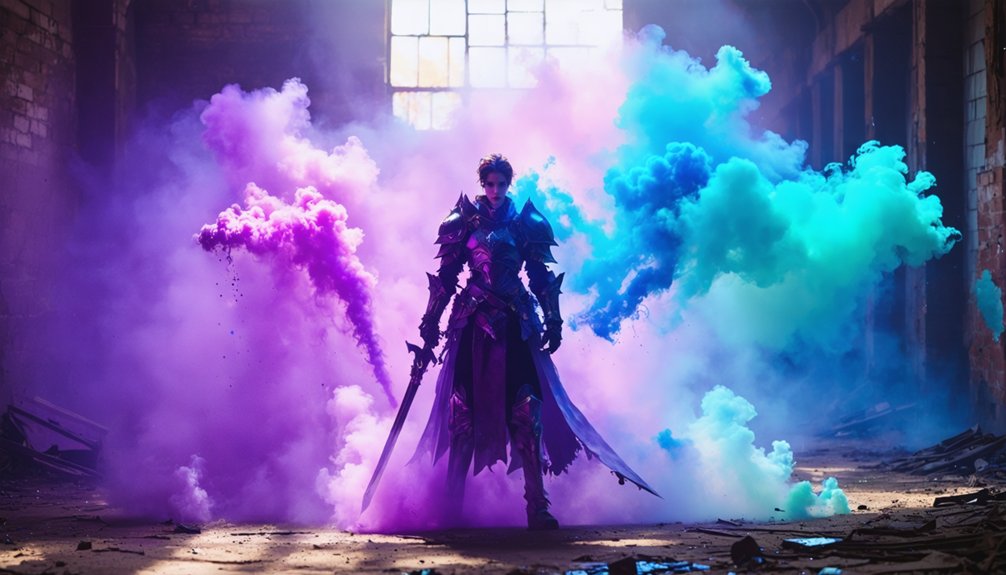
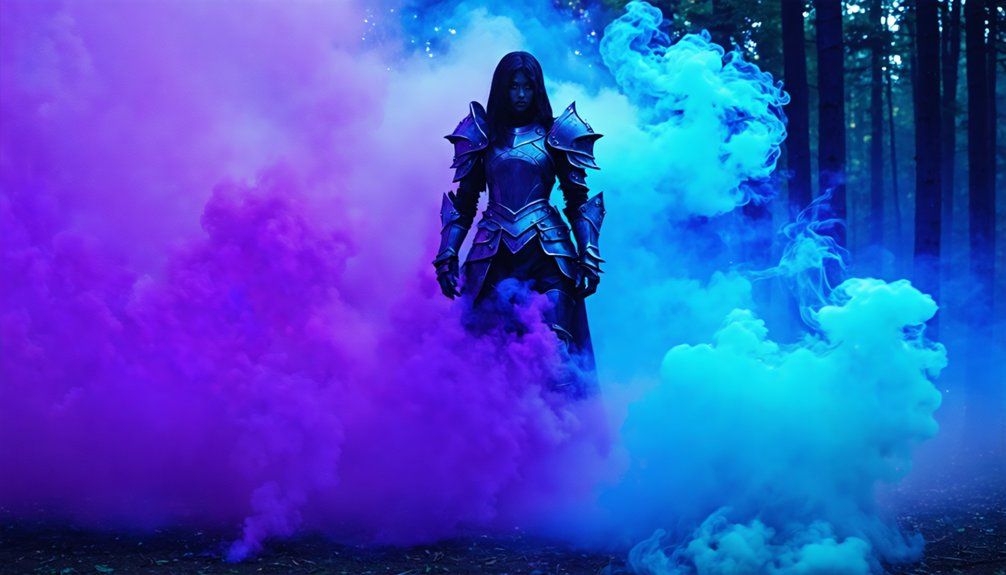
Consider smoke density levels carefully—thick, heavy clouds suit immersive supernatural themes and background elimination, whereas lighter mists enable subtle atmospheric layering. Match colors to your costume palette: vibrant hues enhance cyberpunk aesthetics, while white generates moody fog effects.
Peacock Smoke grenades offer lighter-free activation for quick deployment. Layer complementary colors to visualize magical energy, or choose analogous schemes for unified thematic cohesion within your cosplay community’s evolving photography standards.
Essential Safety Precautions When Using Smoke Effects
Safety protocols protect both you and your fellow cosplayers during smoke effect shoots. You’ll need to use smoke bombs exclusively outdoors in well-ventilated areas, wear appropriate protective gear like gloves and respirators when handling effects, and familiarize yourself with local regulations governing pyrotechnic use and disposal.
Always verify your location permits smoke devices and maintain proper fire safety equipment on-site before initiating any smoke photography session.
Outdoor Use Only Requirement
Since smoke bombs produce concentrated particulate matter and combustion byproducts, you must limit their use to well-ventilated outdoor environments. Proper ventilation requirements are non-negotiable—open-air settings guarantee carbon monoxide concentrations remain below hazardous thresholds while allowing rapid particulate dispersal.
Indoor deployment violates fundamental safety protocols, as smoke propagation in confined spaces creates respiratory hazards and elevates CO levels to dangerous concentrations. Enclosed venues like alleys, tunnels, or interior spaces trap combustion products, prolonging exposure risks for you and your photography team.
Beyond health concerns, aerosol propellants in some formulations pose explosion hazards when ignited indoors. Always conduct shoots in expansive outdoor locations where natural air circulation mitigates accumulation. This approach safeguards your cosplay community while enabling creative experimentation with atmospheric effects under controlled, responsible conditions.
Protective Gear And Equipment
Beyond selecting appropriate outdoor locations, you’ll need specific protective equipment to handle smoke bombs safely during your shoot. Heat-resistant gloves are essential—leather works best for managing hot casings during ignition and burnout. Position your grip low on the base where temperatures remain coolest.
Keep water bottles and fire extinguishers accessible for immediate suppression post-use. Area ventilation requirements dictate maintaining open spaces to disperse smoke away from breathing zones. Wear dark, non-valuable clothing since pigments create permanent stains on contact with fabrics.
Smoke control methods include checking wind direction before ignition and pointing devices away from faces and bodies. Saturate tubes after burnout to guarantee safe disposal. Never compromise on protective gear—your safety enables creative innovation in effects photography.
Proper Disposal And Regulations
Before you ignite your first smoke bomb, understand that these devices fall under pyrotechnic classifications in most jurisdictions, making them subject to local fireworks regulations. You’ll need venue permissions before deploying effects on private grounds, and certain public spaces restrict pyrotechnic use entirely. While legal across all 50 US states, specific area rules vary substantially.
Environmental impact considerations demand attention to wind patterns and nearby flammable materials—never use smoke bombs in dry fields, forests, or enclosed structures. Keep fire extinguishers accessible and monitor spark direction during ignition.
Post-use, pour water directly into the tube immediately after burnout, handling only the coolest bottom end. Proper storage techniques require complete cooling before disposal. Never inhale fumes, particularly if you’ve got respiratory sensitivities, as burning chemicals prove toxic when mishandled.
Scouting and Selecting Perfect Outdoor Locations
While dramatic smoke effects can elevate your cosplay photography, they’ll fall flat without the right backdrop—making location scouting a critical pre-shoot step. Scout during your planned shoot time to assess lighting conditions and guarantee smoke visibility against your chosen background. Document natural light variations and identify compositional elements like architectural lines or textures that’ll complement both your cosplay and pyrotechnic effects.
Verify accessibility for crew coordination, confirming space for equipment, wardrobe changes, and safe smoke bomb deployment. Secure necessary permissions, as smoke effects often require additional approvals beyond standard photography permits. Prioritize locations with minimal environmental impact—avoid fire-prone areas and ecosystems sensitive to residue. Use Google Maps and social media to identify potential spots, then physically visit to test backdrops and plan ideal camera angles before your shoot.
Creative Techniques for Dramatic Smoke Photography
Smoke bombs transform ordinary cosplay shots into cinematic masterpieces when you apply specific creative techniques during your shoot. Master these advanced methods to elevate your smoke simulation experiments beyond basic backdrops.
Strategic smoke techniques transform basic cosplay photography into professional-grade cinematic imagery through deliberate choreography and advanced lighting methods.
Essential Smoke Motion Choreography Techniques:
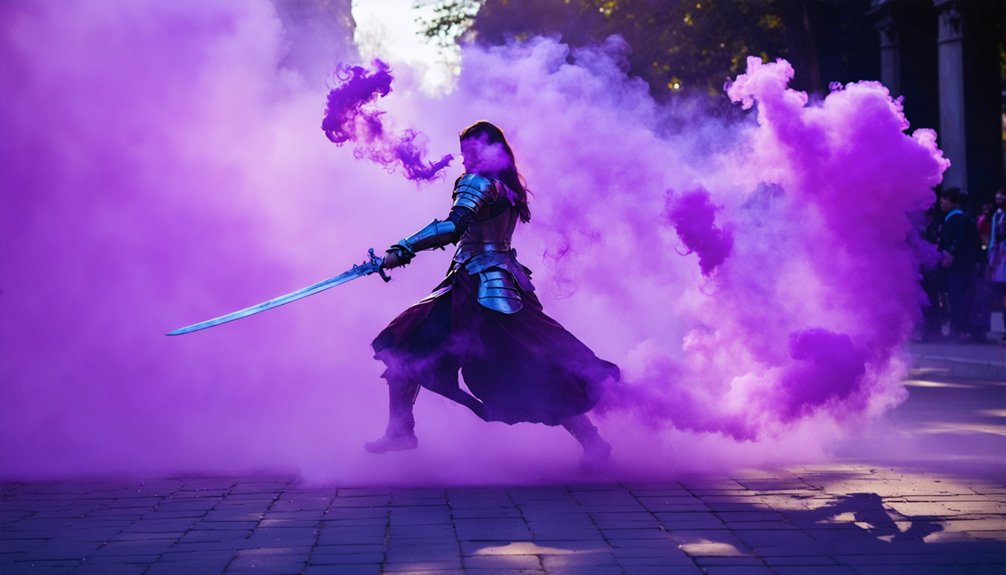
- Flash Integration – Position your Godox AD600 Pro or similar strobe to illuminate smoke particles, creating dimensional layers and dramatic shadows that enhance character depth.
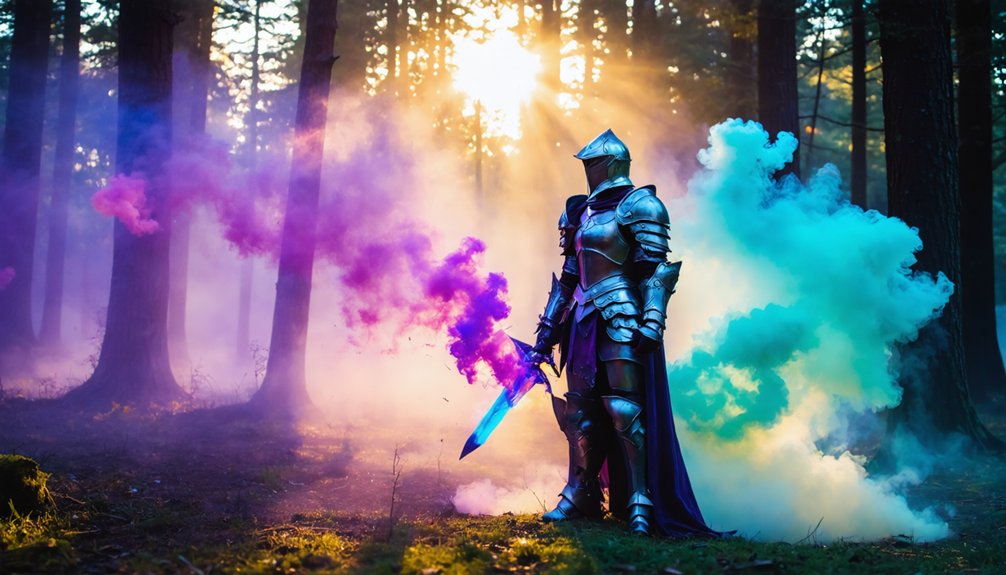
- Color Layering – Stack complementary smoke colors (orange against blue skies, purple with green landscapes) to generate magical energy effects around your subject.
- Movement Coordination – Rehearse poses first, then execute slow, deliberate motions through activated smoke for controlled trail formation.
- Prop Containment – Place smoke bombs inside thematic props like lanterns or birdcages, directing plumes strategically while maintaining character authenticity.
Combine these techniques for maximum atmospheric impact in your cosplay portfolio.
Lighting Equipment and Camera Settings for Smoke Shots
Setting up your camera and lighting gear correctly makes the difference between flat, washed-out smoke photos and dramatic, portfolio-worthy shots. You’ll want a high-resolution camera like the Sony A7Riii paired with fast apertures (f/1.4 or wider) to capture fine smoke particle density details.
Position your Godox AD600 Pro flash 10-12 feet overhead with a Westcott Rapid Box XXL softbox—this diffusion prevents harsh hotspots while illuminating smoke clouds evenly. Flash power control becomes critical here; start at half power and adjust based on your smoke particle density.
Stabilize your C-stand with sandbags for outdoor shoots. Shoot RAW to preserve highlight and shadow detail, and don’t hesitate to push ISO when smoke diffuses your light source unexpectedly.
Posing and Movement Tips for Dynamic Compositions
4. Action Sequencing – Establish ambient atmosphere first, lock focus, then execute planned movements.
Test choreography to capture peak swirl before dissipation.
Timing Your Shots During the Smoke Bomb Window
Because smoke bombs provide such a brief performance window—typically just 60 to 90 seconds—you’ll need to finalize every technical detail before ignition. Lock your exposure settings, composition, and focus beforehand to maximize that critical half-minute of peak smoke density. Set your shutter speed between 1/800 and 1/2500 sec to freeze intricate plume patterns, balancing with appropriate aperture and ISO adjustments.
Have your cosplayer move the smoke bomb across the scene initially to build coverage, then position strategically as you capture. Monitor wind direction constantly—gentle breezes enhance plume patterns, but strong gusts rapidly diminish usable smoke density. Stock multiple backup bombs for your shoot, and consider using a helper to manage ignition while you concentrate exclusively on timing your shots during those precious seconds of ideal smoke output.
Post-Production Editing for Enhanced Smoke Effects
Once you’ve captured your smoke bomb shots, post-production becomes essential for refining the final image. You’ll enhance color and contrast through targeted adjustments, composite multiple smoke layers for dramatic depth, and remove distracting elements that pull focus from your cosplay subject.
These editing techniques transform raw captures into polished portfolio pieces that showcase both your costume work and atmospheric effects.
Enhancing Color and Contrast
While capturing smoke effects in-camera sets the foundation, post-production editing transforms good cosplay photos into gallery-worthy pieces. Your workflow should prioritize strategic enhancement that preserves authenticity while maximizing visual impact.
Essential Color and Contrast Enhancement Steps:
- Apply contrast masking using adjustment layers to isolate smoke plumes, bringing out fine details while maintaining background integrity
- Execute tonal adjustments through curves, strategically darkening shadows to create depth without crushing blacks
- Boost saturation via vibrance layers rather than raw saturation—this preserves skin tones while intensifying smoke hues
- Sharpen selectively using high-pass filters on opaque smoke areas, avoiding over-processing that creates artificial halos
Combine complementary color schemes (orange smoke against blue skies) during your shoot planning to simplify post-processing while amplifying final results.
Removing Unwanted Elements
After perfecting your smoke’s color and contrast, you’ll inevitably discover distracting elements that diminish your composition’s impact—stray props, background bystanders, or unwanted debris that competed for attention during the shoot. Lightroom’s AI-powered masking tools streamline background cleanup through automatic subject detection, isolating your cosplayer for targeted refinement while preserving intricate smoke textures. For distraction removal, employ healing brushes at approximately 20% flow with 100% opacity, enabling subtle, controlled elimination of unwanted elements without compromising surrounding smoke detail.
Layer masking techniques provide surgical precision when removing specific background components, ensuring your smoke effects remain untouched. Combined with strategic exposure adjustments that convert distracting shadows to neutral tones, these selective editing approaches maintain viewer focus on the essential interaction between subject and atmospheric effects while eliminating compositional interference.
Compositing Multiple Smoke Layers
When single smoke bomb exposures lack the atmospheric intensity your vision demands, compositing multiple smoke layers transforms ordinary captures into ethereal, multidimensional artworks.
Essential layering workflow:
- Stack complementary colored smoke elements using soft blending modes that preserve blended textures while maintaining your cosplayer’s layer visibility through translucent overlays
- Apply adjustment layers independently to control hue/saturation for each smoke element, boosting vibrance without over-processing your subject
- Increase contrast through curves adjustments to prevent muddy appearances and create definition between smoke plumes at different depths
- Utilize opacity masks for graduated transparency that builds depth perception—thinner smoke creates mist-like subtlety while fuller coverage delivers dramatic presence
Backlighting effects intensify dramatically when multiple exposures combine, creating light streaks that enhance your composition’s otherworldly atmosphere.
Frequently Asked Questions
Are Smoke Bombs Allowed at Conventions and Indoor Cosplay Events?
Don’t let your creative dreams go up in smoke—you’ll find smoke bombs are universally banned at conventions and indoor cosplay events. Venue policies strictly prohibit them due to safety considerations including fire alarms, evacuation risks, and potential hazardous conditions.
How Much Do Professional-Grade Smoke Bombs Typically Cost?
Professional-grade smoke bombs cost $8-$12 for 60-90 second duration units. You’ll need proper smoke bomb storage in cool, dry conditions to maintain smoke bomb durability. Multi-packs offer better value for regular cosplay shoots.
What Permits or Permissions Are Needed to Use Smoke Bombs Publicly?
Traversing the red tape requires you’ll need permits from local fire department regulations and possibly event venues. Always verify safety precautions for public use, maintain proper documentation, and guarantee you’re meeting age requirements before creating that perfect atmospheric shot.
Can Smoke Bombs Stain Costumes or Damage Delicate Cosplay Materials?
Yes, smoke bombs can cause delicate fabric discoloration through pigment contact and heat damage. You’ll need proper distancing techniques and chemical residue removal methods. Always test on fabric scraps first, wear protective layers, and maintain safe positioning to preserve your cosplay integrity.
How Do Weather Conditions Like Rain Affect Smoke Bomb Performance?
Rain severely compromises smoke bomb performance in wet conditions, preventing proper ignition and reducing smoke density. You’ll notice drastically altered smoke dispersion patterns, with moisture causing uneven output, shortened burn times, and faded colors that’ll disappoint your cosplay photography goals.