You can craft convincing elf ears using masking tape, EVA foam, or upgraded silicone prosthetics, depending on your skill level and budget. Tape builds work for beginners and cost almost nothing, while EVA foam mid-tier builds run $15–$30 and deliver sharper, more durable results. Secure everything with spirit gum, blend edges using rubber mask grease paint, and conceal seams with wrap-around ear cuffs. The techniques ahead will sharpen every step of your build.
Key Takeaways
- Use masking tape and false eyelash glue for a quick, budget-friendly elf ear method that delivers convincing results for beginners.
- EVA foam offers a mid-tier option costing $15–$30, providing durability and a realistic skin-like texture with rubber coating.
- Apply spirit gum in two thin layers, pressing ears firmly for sixty seconds to ensure secure, lasting adhesion.
- Conceal DIY ear seams using wrap-around or chain-connected ear cuffs to create a polished, seamless appearance.
- Prepare a touch-up kit with spirit gum, prosthetic sealer, and isopropyl alcohol for quick mid-event repairs.
What Materials Do You Need for DIY Elf Ears?
Crafting convincing elf ears starts with gathering the right materials, and your choices will directly determine the quality and durability of the final result.
Your core cosplay materials should include white EVA foam for structural shaping, super glue or contact glue for assembly, and rubber coating to achieve a realistic skin-like texture.
White EVA foam, contact glue, and rubber coating are your three essential building blocks for professional-quality elf ears.
For adhesion, spirit gum remains your most reliable option, bonding the finished piece securely against your skin.
You’ll also want rubber mask grease paint for color-matching, setting powder for a polished finish, and masking tape for creating precise ear templates.
Don’t overlook ear cuffs — they’re essential for concealing back seams and elevating your overall look.
Investing in quality materials upfront saves significant time during application and dramatically improves your finished cosplay presentation.
Which Elf Ear Method Is Right for Your Cosplay?
Choosing the right elf ear method hinges on three critical factors: your skill level, your budget, and the visual effect you’re chasing.
If you’re a beginner with minimal supplies, the basic tape method delivers a quick, low-cost solution, while EVA foam and silicone techniques demand more hands-on craftsmanship and a deeper material investment.
Match your method to your cosplay’s aesthetic needs — a whimsical high-fantasy look calls for silicone with decorative detailing, whereas a subtle, everyday cosplay works perfectly with shaped foam or tape.
Skill Level Considerations
Whether you’re a first-time cosplayer or a seasoned prop builder, matching your elf ear method to your actual skill level saves time, money, and last-minute frustration.
Skill levels dictate which techniques deliver clean results without costly mistakes.
For beginner tips, start with the tape method—it’s forgiving, repositionable, and requires zero special tools.
Intermediate builders should graduate to EVA foam, experimenting with contact glue and rubber coating for a skin-like finish.
Advanced techniques like silicone modification using heat tools, jump rings, and layered painting reward those comfortable with precision instruments.
If something goes wrong, troubleshooting methods vary by material: peel tape cleanly, re-glue lifting foam edges with contact adhesive, or patch silicone tears using spare material.
Always test your chosen method before event day.
Budget And Materials
Three distinct budget tiers define the elf ear landscape, and knowing where your cosplay falls within them prevents overspending on materials you don’t need.
Budget friendly options start at nearly zero—masking tape and false eyelash glue create surprisingly convincing pointed ears for single-event wear.
Mid-tier builds require EVA foam, contact glue, rubber coating, and RMG paints, totaling roughly $15–$30 depending on your material sourcing strategy.
Craft stores, dollar shops, and online foam suppliers each offer price advantages worth comparing.
Premium silicone modifications demand specialty tools—lighters, needles, jump rings, and spirit gum—pushing costs higher but delivering convention-level durability.
Match your investment to your commitment: one-day Halloween appearance versus recurring cosplay character warrants entirely different spending.
Prioritize reusability when calculating true cost-per-wear across multiple events.
Desired Visual Effect
Budget shapes what you build, but the visual effect you’re chasing determines which method actually belongs in your hands. Your desired visual effect should drive every material decision before you cut a single piece of foam.
For subtle, grounded elf ear aesthetics — think Tolkien rangers or woodland scouts — EVA foam delivers clean, paintable surfaces that photograph realistically.
If you’re building a high-fantasy creature with ornate detailing, modified silicone ears accept jump rings, chains, and charms that foam simply can’t support structurally.
Quick theatrical looks? The tape method executes fast with zero cure time.
Match your construction technique to your character’s world, not just your wallet, and your ears will sell the illusion completely.
Make Elf Ears With Nothing but Tape
Making elf ears with nothing but tape is one of the easiest and most budget-friendly approaches you can take, requiring just a few strips of masking tape and about five minutes of your time.
Press masking tape firmly against the back of your ear to capture its exact contour as a template. Cut the tape into a pointed elf ear silhouette, matching your ear’s natural size and curve precisely.
These quick methods eliminate the need for foam, glue, or paint entirely. Layer two or three strips for structural integrity, then secure the finished shape using false eyelash glue or double-sided tape.
Among available tape techniques, this approach delivers surprisingly convincing results, staying firm throughout extended cosplay events without uncomfortable adhesives touching your skin.
Shape Elf Ears From EVA Foam
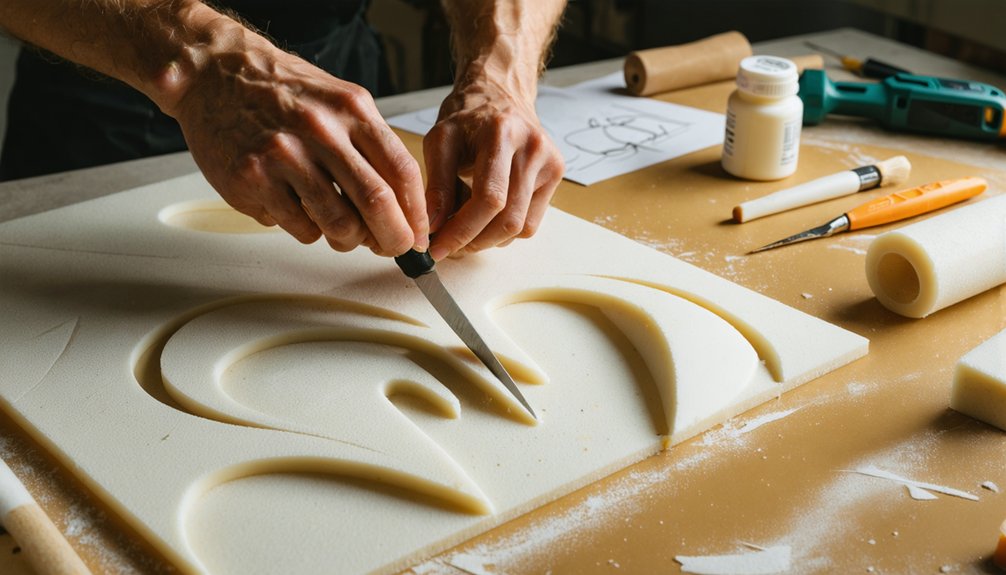
When you want elf ears that look genuinely convincing up close, EVA foam delivers a level of structural realism that tape simply can’t match.
EVA foam techniques begin with tracing a precise ear template onto white foam, then cutting it to contour seamlessly behind your actual ear.
Assemble the shaped pieces using super glue or contact glue, ensuring tight, gap-free bonds throughout the structure.
Once assembled, apply a rubber coating layer to transform the foam’s porous surface into something resembling actual skin texture.
Elf ear shaping reaches its full potential during the finishing stage — paint the foam using rubber mask grease paint, blend highlight tones carefully, then set everything with setting powder.
The result is a rigid, wearable prosthetic that holds its fantasy silhouette convincingly throughout your entire cosplay event.
Upgrade Store-Bought Silicone Ears With Simple DIY Modifications
Store-bought silicone elf ears give you a ready-made foundation that’s faster than building from scratch, but straight out of the package they often look generic and flat.
Strategic silicone modifications transform them into something truly custom. Start by using a lighter to carefully soften specific surface areas, then use a needle to sculpt subtle vein textures or sharper tip geometry.
A lighter and needle are all it takes to sculpt store-bought silicone into something unmistakably your own.
Next, grab your pliers and thread small jump rings through the ear’s upper cartilage edge, creating anchor points for lightweight chains and whimsical charms.
These dangling details catch light and add high-fantasy dimension instantly. Layer different chain lengths for visual depth, and choose charms that match your character’s lore.
Suddenly, a five-dollar pair of ears becomes a signature costume piece nobody else is wearing.
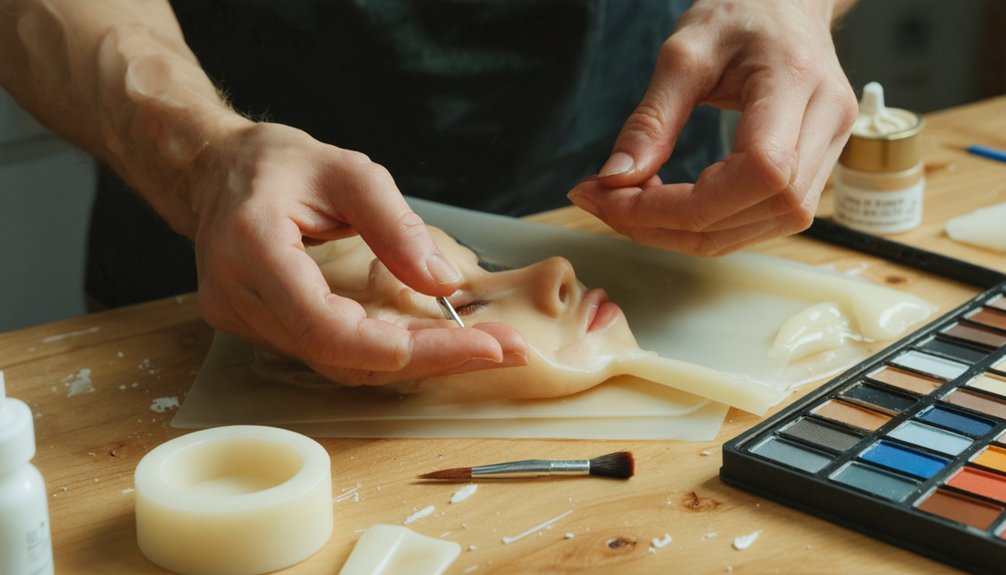
Paint Your Elf Ears to Match Your Skin Tone

Seamless skin-matching transforms a visible prosthetic into a convincing extension of your own body. Mastering paint techniques elevates your cosplay from costume to character.
Follow this precise skin tone matching process:
- Base coat first — Apply rubber mask grease paint (RMG) matching your foundation shade directly onto the ear’s surface, building coverage gradually.
- Layer dimension — Paint your ear’s flap with Sierra tones, blending outward to replicate natural shadow and highlight patterns visible on fair or deeper complexions.
- Lock it down — Press a powder puff loaded with setting powder firmly over painted surfaces, then wipe excess away, revealing a matte, skin-accurate finish that photographs realistically.
Practice color-mixing beforehand — subtle undertones make the difference between obvious prop and flawless illusion.
Apply Spirit Gum Without Ruining Your Hairline
Once your paint is locked in and the finish looks convincingly skin-like, adhesive becomes your next technical challenge — and spirit gum applied carelessly near your hairline will lift follicles, snag fine hairs, and leave a sticky residue that’s miserable to remove.
Precise spirit gum application starts with mapping your placement zone — stay at least a centimeter below your hairline. Use a fine brush instead of direct bottle application for controlled coverage.
Precision is everything — map your placement zone and keep adhesive a full centimeter clear of your hairline.
Apply two thin layers, letting the first go tacky before the second. For hairline protection, lay a thin strip of petroleum jelly along the hair boundary before applying adhesive; it blocks unwanted bonding.
Press the ear firmly for sixty seconds minimum. You’ll get a clean, lasting hold without sacrificing your hairline’s integrity.
Hide the DIY Elf Ear Seam With Ear Cuffs
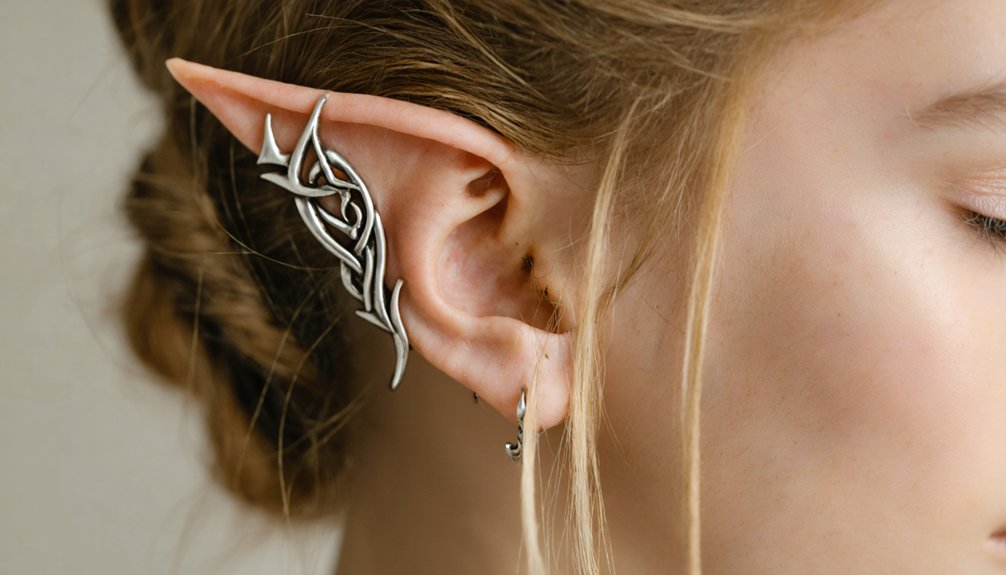
The seam running along the back of your DIY elf ear is the one detail that breaks the illusion — but an ear cuff turns that liability into a design asset. Among seam hiding techniques, strategic cuff placement outperforms blending alone.
Choose your ear cuff styles based on your character aesthetic:
- Wrap-around cuffs — Coil directly over the seam junction, masking the foam edge while adding dimensional texture.
- Chain-connected cuffs — Link multiple cuffs vertically, drawing the eye upward toward the ear’s pointed tip instead of the attachment line.
- Cluster charm cuffs — Stack layered designs at the seam’s most visible point, converting the flaw into intentional ornamentation.
Slide each cuff firmly before photographing your cosplay — secure placement prevents mid-shoot shifting.
Why Your Elf Ears Keep Falling Off (And How to Fix It)
Even a flawlessly painted EVA foam ear turns into a mid-convention disaster when your spirit gum fails — and the culprit is almost always surface prep, not the adhesive itself.
Adhesive issues typically stem from skin oils, moisturizer residue, or sunscreen blocking bonding. Clean the contact zone with isopropyl alcohol before application.
For ideal ear placement, position the foam behind your ear’s cartilage ridge rather than flush against the lobe — this distributes pressure and reduces peel points.
Apply spirit gum in thin, overlapping layers, letting each tack up slightly before pressing. Hold firmly for 90 seconds minimum.
In humid environments, switch to a stronger contact glue or layer spirit gum with a prosthetic sealer.
Reapplication mid-event becomes effortless once you’ve prepped a small touch-up kit.
Frequently Asked Questions
How Long Do DIY Elf Ears Typically Last During a Full Convention Day?
Your DIY elf ears’ll typically last 6–8 hours during convention duration when spirit gum’s applied correctly. Durability factors like heat, sweat, and movement affect longevity, so carry touch-up adhesive for reliable, all-day cosplay performance.
Can You Reuse Spirit Gum Adhesive After Removing Your Elf Ears?
You can’t reuse spirit gum directly from your skin, but you’ll recover dried residue from the ears themselves. Master smart application techniques to maximize adhesive longevity—reapplying fresh spirit gum each session guarantees peak, innovative bonding performance.
Are DIY Elf Ears Safe for People With Sensitive Skin?
Over 30% of cosplayers experience skin irritation from adhesives. If you’ve got sensitive skin, you’ll want to conduct allergy tests on spirit gum and EVA foam materials before fully committing to your DIY elf ear transformation.
How Do You Store Handmade Elf Ears Between Cosplay Events?
Store your handmade elf ears in padded containers for best ear protection. You’ll want to use rigid storage solutions like small jewelry boxes lined with soft foam, preventing crushing, warping, or paint chipping between your cosplay events.
Can Children Safely Wear DIY Elf Ears Made From EVA Foam?
Over 60% of cosplay parents prioritize child safety when crafting accessories. You can safely use EVA foam materials for kids’ elf ears — they’re lightweight, flexible, and non-toxic, but always skip spirit gum adhesives on children’s sensitive skin.
References
- https://www.youtube.com/watch?v=44zVmtzzsG0
- https://www.youtube.com/watch?v=rvBeXONhqJU
- https://www.instructables.com/Applying-Elf-Ears-realistically…-in-5-minutes/
- https://www.youtube.com/watch?v=Jvyr_PeuwfA