Master cosplay wig styling through five essential techniques: use spidering to build volume by gently separating fibers at the roots with a teasing brush, employ point-cutting at 45-degree angles for natural-looking layers, apply targeted heat at 320-340°F to lock gravity-defying shapes, trim and adhere lace fronts with spirit gum for seamless hairlines, and create structural hold through systematic backcombing combined with Got2B Freeze Spray at one-foot distance. These foundational methods transform synthetic fibers into character-accurate styles with professional-grade results.
Key Takeaways
- Use spidering technique with a teasing brush to gently separate fibers at roots, building volume without damaging synthetic strands.
- Apply heat at 320-340°F to teased sections of heat-resistant fibers, holding shapes during cool-down to lock gravity-defying styles.
- Point-cut at 45-degree upward angles to create natural-looking layers and softer, blended edges instead of blunt cuts.
- Backcomb systematically from roots to tips while working in sections to transform flat fibers into gravity-resistant volumetric structures.
- Spray Got2B Freeze Spray from one-foot distance, layering from crown to ends for strong hold without visible residue.
Mastering the Spidering Technique for Knot-Free Fibers
When styling synthetic wigs for cosplay characters with gravity-defying hair, spidering serves as the foundational technique for building volume without creating irreversible fiber damage. Unlike traditional backcombing, you’ll gently separate fibers at the roots using a teasing brush, loosening rather than compacting them. This fiber preservation technique maintains strand integrity while establishing structural support.
Begin by sectioning hair into your desired spike formations. Apply directional spiker adjustment by teasing roots downward while maintaining spike trajectory. Work in small segments with multiple light crimps to prevent matting. Spray bases lightly, then set with a low-heat dryer. Between applications, brush out spikes repeatedly before final styling—this guarantees knotting doesn’t compromise your work. Leave inner teased areas deliberately gnarled; this controlled texture provides natural stability for extended wear.
Point-Cutting and Feathering Methods for Natural-Looking Layers
To achieve natural-looking layers, you’ll position your scissors at an upward angle into the hair strands rather than cutting straight across horizontally. This point-cutting technique creates softer, blended edges by removing length in a graduated pattern as you work through each section.
You’ll hold the hair vertically with your comb as a guide, then angle the scissors upward at approximately 45 degrees to establish proper depth while preventing blunt, costume-like lines.
Upward Scissor Angle Technique
While blunt cuts establish wig length, point-cutting transforms those harsh lines into natural-looking layers through precise vertical scissor angles. You’ll position your scissors vertically, gliding the open blades upward through synthetic fibers in your target area. This upward direction sculpting minimizes opening-and-closing motions while the blade edges perform the texturizing work.
Vertical scissor positioning at 90 degrees removes bluntness from bottom edges, creating wispy ends ideal for character-specific spiking effects. For controlled refinement, modify your angle to 45 degrees—this maintains structural integrity while softening harsh lines. Take small chunks of hair to prevent bulk accumulation in your layers. The technique’s gliding motion feathers edges naturally, adding dimension without sacrificing length. You’ll achieve professional-grade volume enhancement that elevates cosplay authenticity beyond standard cutting methods.
Gradual Length Reduction Process
Mastering the upward angle technique provides the foundation for systematic length reduction—a controlled process that builds natural-looking layers through incremental cuts. You’ll achieve steady length maintenance by working methodically through sectioned areas, removing 0.5-1 inch per pass. This approach prevents overcutting while delivering precise cutting techniques that preserve wig integrity.
Execute gradual reduction through this sequence:
- Section vertically from nape to crown, isolating bottom layer first
- Point-cut outer perimeter edges, establishing shortest baseline length
- Feather inward connections between adjacent sections for seamless shifts
- Verify symmetry by rotating wig on stand, adjusting asymmetries immediately
Alternate between point-cutting for texture and feathering for softness. Check progress frequently—cosplay accuracy demands precision. Your final pass should refine wispy ends through minimal point-cutting, creating character-authentic dimension.
Strategic Heat Application for Gravity-Defying Styles
Gravity-defying cosplay styles demand precise thermal manipulation of synthetic fibers to achieve and lock extreme shapes. You’ll need targeted heat exposure patterns focusing on base layers where structural integrity matters most. Apply your flat iron at 320-340°F to teased sections, softening fibers until pliable. Hold each manipulated section with pins or rollers during the cool-down phase—this locks your gravity-defying architecture permanently.
For ringlets and volumetric spikes, employ thermal conditioning techniques by gradually increasing heat while monitoring fiber malleability. Steam methods work exceptionally well for curves without direct contact damage. Your heaviest teasing requires maximum heat tolerance to solidify tangled structures that defy physics.
Always verify your wig uses heat-resistant Futura fibers before attempting extreme styling. Treat these synthetics like thermoplastic materials—they’ll retain whatever shape you impose during cooling.
Lace Front Preparation and Secure Attachment
Before you secure your lace front wig, you’ll establish the foundation that determines whether your hairline reads as authentic or obviously artificial. Master these critical protocols:
Your foundation work determines everything—the difference between a hairline that looks authentic versus one that screams artificial from across the room.
- Trim excess lace along the frontal edge to match your unique face contours, leaving minimal material for seamless skin blending
- Execute proper skin cleaning techniques by removing oils and debris from the application zone to maximize adhesive performance
- Apply spirit gum or lace adhesive in thin, strategic layers starting at the widow’s peak, allowing 20 seconds for tackiness development
- Press lace firmly into the adhesive bond, then camouflage visible mesh with color-matched foundation
These adhesive application nuances separate amateur attempts from professional-grade illusions. Flatten your natural hair completely beneath a wig cap before positioning your hairline forward-to-back for ideal alignment.
Building Volume Through Backcombing and Layered Spraying
Strategic teasing transforms flat synthetic fibers into gravity-resistant structures that hold character-accurate silhouettes throughout convention wear. You’ll section the wig systematically, holding each portion upward while backcombing downward from roots to tips. These volumizing techniques require no initial product—the mechanical friction alone creates foundational lift.
Work circumferentially, folding treated sections aside to maintain strategic placement across the entire cap. After completing base teasing, use your fingers or brush-back to distribute volume naturally. The messy intermediate stage precedes final refinement.
Steam the wig inside-out on a foam head first to eliminate dome curvature. Only after establishing teased foundation should you apply minimal spray reinforcement at roots. This layered approach prevents product buildup while maximizing structural integrity for dramatic drag-queen-level volume or anime-accurate proportions.
Selecting the Right Hairspray for Maximum Hold
You’ll achieve maximum hold by selecting freeze-spray formulas like Got2b’s strongest variant, which maintains structural integrity through extended convention wear and environmental stress. Apply product from 12 inches away in thin, even layers, allowing each coat to dry before adding subsequent applications to prevent visible residue buildup on fibers.
Combine spray application with heat-setting techniques using a hair dryer to lock the style overnight, creating a durable finish that withstands wind and physical contact.
Strong-Hold Spray Options
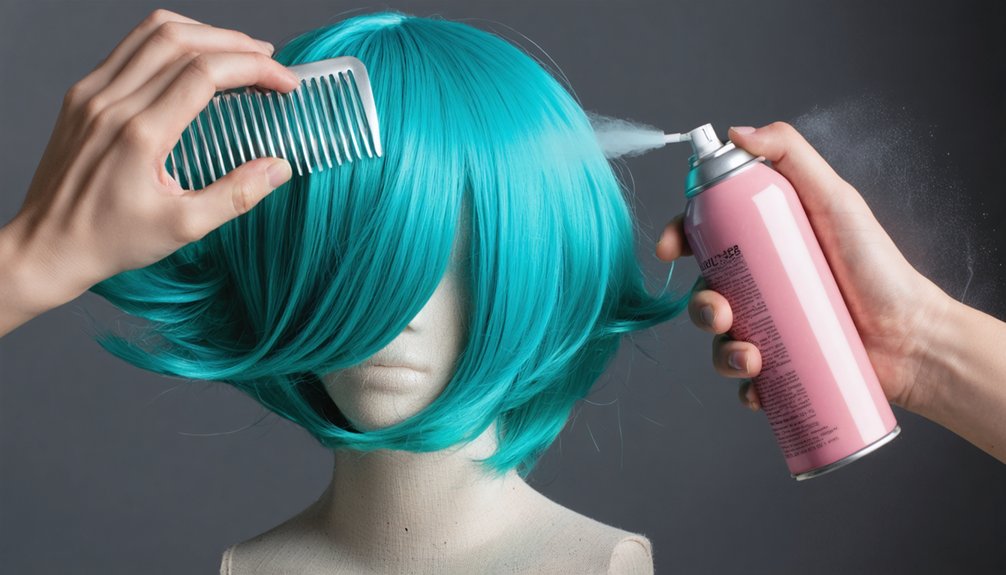
Selecting the ideal hairspray for cosplay wig styling requires understanding the relationship between hold strength, formulation weight, and residue characteristics. Freeze blast formulations deliver maximum hold but generate flakiness during restyling attempts. Subtle hold variations exist across product lines, with lightweight options sacrificing staying power for reduced fiber weight. Spraying distance considerations greatly impact visible residue—maintain approximately one-foot separation between nozzle and wig surface.
Top Strong-Hold Options for Cosplay Applications:
- Got2B Blasting Freeze Spray – Industry-standard super strong hold with lightweight formulation
- Got2B Glued – Versatile holding power for spikes and general shaping
- Rene of Paris Protect Holding Spray – Synthetic-fiber engineered formula for all-day hold
- Aquanet – Budget-conscious option delivering reliable performance
Test products on practice wigs before final application to prevent synthetic fiber incompatibility or discoloration issues.
Application and Layering Techniques
Proper application distance and layering sequence determine whether your hairspray delivers professional-grade hold or creates a sticky, uneven mess. Maintain one-foot spray distance from wig fibers to prevent visible residue and guarantee even distribution without heavy buildup. This allows the product to settle naturally for superior adhesion.
Implement top down layering by working from crown to ends, affecting everything underneath simultaneously. This progressive build prevents re-spraying styled sections and maintains structural integrity in voluminous designs.
Always style each section before applying additional spray layers—crimping pre-sprayed areas creates moisture buildup and compromises texture uniformity. Let got2b hair glue set naturally without heat intervention to maximize adhesion strength.
For next-level foundation stability, spray your wig cap directly before placement, securing it against slippage during extended wear sessions.
Avoiding Product Overuse
- Deploy economy-grade formulas (Got2B Freeze Spray, Aquanet) that deliver superior hold without requiring multiple coats
- Test candidates on sacrificial wigs to assess hold strength and residue patterns before committing to costume pieces
- Prioritize wax or pomade for temporary styling needs, eliminating sticky buildup while maintaining fiber flexibility
- Implement proper product removal techniques through complete saturation before restyling—partial wetting targets specific sections while minimizing product residue across the entire piece, preventing yellowing and texture degradation from accumulated layers
Crimping Techniques for Even Texture Distribution
When crimping cosplay wigs for volume and texture, you’ll achieve the most natural results by applying the crimper diagonally across each section rather than horizontally. This X-shaped pattern eliminates harsh linear marks while distributing waves uniformly throughout the fibers. Strategic sectioning for consistent texture requires isolating one-inch segments, working bottom-to-top while pinning excess hair away.
For ideal results, position your Dshow 4-in-1 crimper with smallest attachment at the section base for 3-4 seconds on high heat, then glide downward through heat-resistant fibers. Crimping patterns for customized waves develop through multiple passes per section.
Post-application refinement involves bristle brushing to set waves while preventing frizz, followed by light steaming to smooth excessive texture. This systematic methodology guarantees controlled volume without compromising natural movement.
Working With Curly Versus Straight Wig Constructions
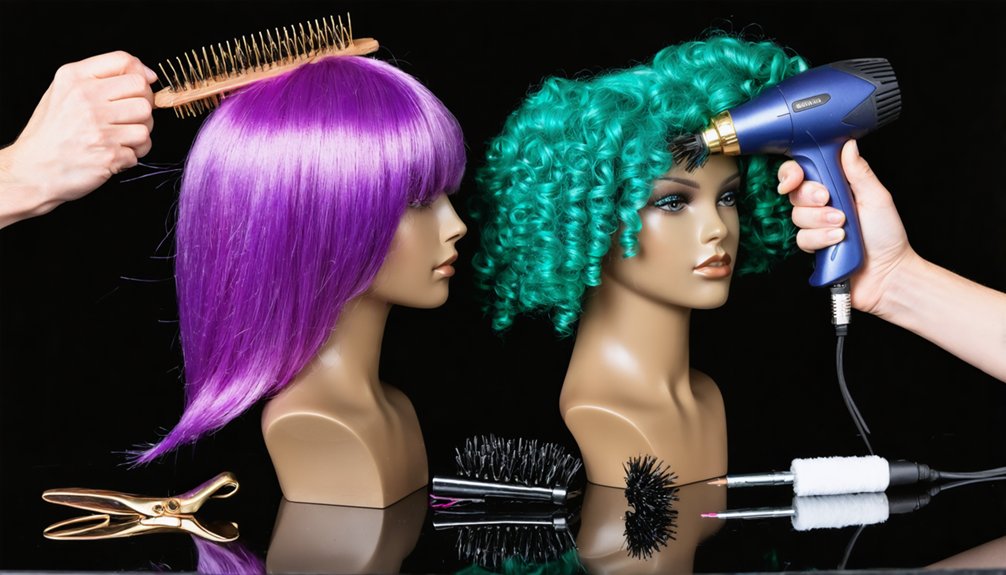
You’ll encounter distinct challenges when working with curly versus straight wig constructions, each requiring specialized detangling and styling approaches. Curly wigs demand curl-by-curl separation with finger detangling before tool application, while straight constructions benefit from silicone lubrication and systematic end-to-root combing.
Master both techniques to prevent fiber breakage and maintain the wig’s structural integrity throughout your cosplay styling process.
Detangling Curly Wig Fibers
Curly wig fibers demand a fundamentally different detangling approach than their straight counterparts. You’ll need specialized sectioning techniques and curl preservation methods to maintain fiber integrity while removing knots.
Essential Detangling Protocol:
- Finger-separate major knots before introducing any combing tools to prevent fiber breakage and additional tangling
- Section into finger-thick layers using clips to isolate detangled portions from matted areas
- Comb from ends upward on each individual lock, never pushing knots downward through the length
- Twist-reform each processed curl around your finger after combing to restore the heat-set memory shape
Apply detangler spray or conditioner-water mixture for resistant knots. Process one side completely before shifting to the opposite section. For severely matted pieces, straighten first, then recurl using heat tools for faster restoration.
Styling Straight Wig Constructions
Straight wig constructions offer distinct manipulation advantages over curly counterparts through their uniform fiber alignment and predictable structural behavior. Your wig base preparation begins with steam-molding bent fibers into upright positions, followed by silicone-spritzed detangling from knots outward—preventing fiber snapping that creates frizz. Section every lined layer for crimping in 1-2 directions, brushing between passes to maintain clean texture before spray application.
Implement directional cutting techniques by sliding scissors vertically along edges rather than straight-across, utilizing thinning shears to eliminate blunt construction lines. Spray each section pre-cut to secure stray fibers. Reference your character image to identify spike trajectories, then backcomb crimped bases sparingly for structural integrity. Mount your wig on a clamp stand, hairspray final shapes, and respray post-cutting for enduring cosplay hold through multiple wear sessions.
Creating Anime-Style Spikes With Steam and Product Combination
Transforming a synthetic wig into gravity-defying anime spikes requires a systematic approach that combines heat manipulation, texture modification, and strategic product application.
Achieving dramatic anime-style spikes demands precise technical execution combining controlled heat application, structural manipulation, and professional-grade styling products.
Steam the wig to reset fibers, then establish your wave foundation through crimping iron application. Execute the following sequence for ideal spike formation:
- Crimp sectioned segments using hybrid texturizing combs to create separation and structural foundation
- Backcomb without slack to build progressive volume that defies gravity
- Apply Got2b Glued heavily while shaping with low-heat hairdryer focused on spike tips
- Layer lightweight spray on wig adhesive between heat-setting cycles for reinforced hold
Trim excess fibers with precision scissors to achieve clean spike edges. Repeat spray-dry reinforcement cycles until spikes maintain architectural integrity without support.
Choosing Wig Density Based on Character Requirements

While spike architecture determines your wig’s final silhouette, fiber quantity establishes whether that silhouette reads accurately on camera. Character specific density requirements demand precise analysis: natural everyday characters require 80-130% density through Pish Posh or Iris lace fronts, while voluminous anime protagonists need 150-180% Daphne-style construction.
The hair type density relationship directly impacts authenticity—straight styles maintain definition at 120-150%, but curly textures demand 150-180%+ to replicate source material volume. Match cap construction to density targets: monofilament and lace fronts accommodate 120-150%, while wefted bases support theatrical 180-200% loads.
Consider shoot conditions—heavy densities add weight and reduce breathability during extended wear. Calculate your character’s canonical hair thickness against available cap technologies before purchasing base materials.
Frequently Asked Questions
How Do You Store Styled Wigs Between Conventions Without Losing Their Shape?
You’ll maintain wig shape by positioning styled pieces on foam heads, securing with strategic pins. Use breathable storage bags with dryer sheets, implementing proper storage methods in cool, dark spaces. This prevents fiber degradation while preserving complex styling configurations between conventions.
Can You Dye Synthetic Wigs or Are Pre-Colored Options the Only Choice?
Why settle for pre-colored options? You can absolutely achieve dyeing synthetic wigs using polyester-specific dyes like Rit DyeMore or iDye Poly, mixing wig colors darker through heat-activated processes at 82-90°C for innovative, custom cosplay results.
What’s the Best Way to Remove Hairspray Buildup From a Wig?
Soak your wig in diluted wig shampoo solution for 5-10 minutes to break down buildup, then gently brush out residue using a wide-tooth comb. Rinse thoroughly with cool water and air-dry flat for best fiber preservation.
How Do You Prevent Wig Caps From Showing Through Thin Fiber Sections?
You’ll prevent cap show-through by using wig caps with additional lining beneath thin fiber sections. Reinforce problematic areas by applying wig tape strategically along exposed edges, creating opacity barriers that’ll guarantee seamless coverage throughout your performance.
Are There Techniques to Make Short Wigs Appear Longer for Characters?
You’ll find 80% of cosplayers layer wefts underneath for instant length. Master wig lengthening methods by sewing additional tracks at the nape, then apply wig volumizing techniques like backcombing roots and strategically crimping sections to blend extensions seamlessly into your base styling.