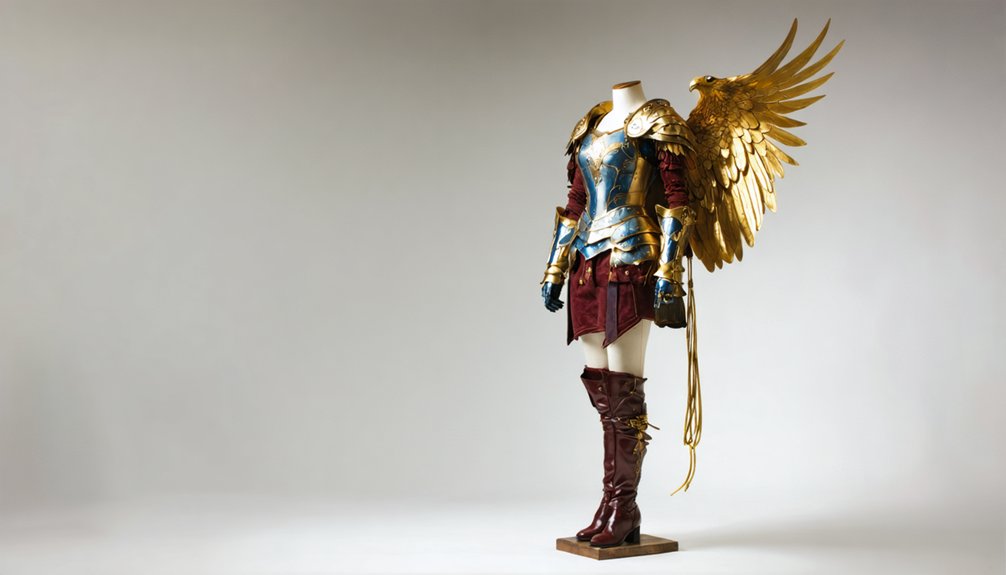
To build screen-accurate Wonder Woman armor, you’ll construct five essential components using EVA foam and Worbla thermoplastics. Start with the golden eagle bodice by applying metallic fabric paint or heat-molded foam wings spanning 8-12 inches. Create bulletproof bracers from 5mm EVA foam with integrated NeoPixel strips for energy effects. Heat-mold a star tiara using Worbla or 2mm craft foam, then assemble a six-panel gladiator skirt and battle-worn belt with layered gold craft foam. Master these dimensional layering techniques to transform basic materials into combat-ready Amazonian regalia that captures every authentic detail.
Key Takeaways
- Create the golden eagle emblem using metallic fabric paint or heat-molded EVA foam, centering it symmetrically on the red spandex bodice.
- Build bulletproof bracers from 5mm EVA foam with integrated NeoPixel strips for light effects and energy absorption animations.
- Construct the star tiara using Worbla, Wonderflex, or 2mm EVA foam, heat-molding it to match head contours for comfortable fit.
- Assemble the gladiator skirt from six panels using contact cement, positioning smaller strips halfway up larger pieces with proper tapering.
- Design the warrior belt by layering gold and silver craft foam over leather, adding battle-worn effects through distressing and bronze accents.
Crafting the Iconic Red Bodice With Golden Eagle Emblem
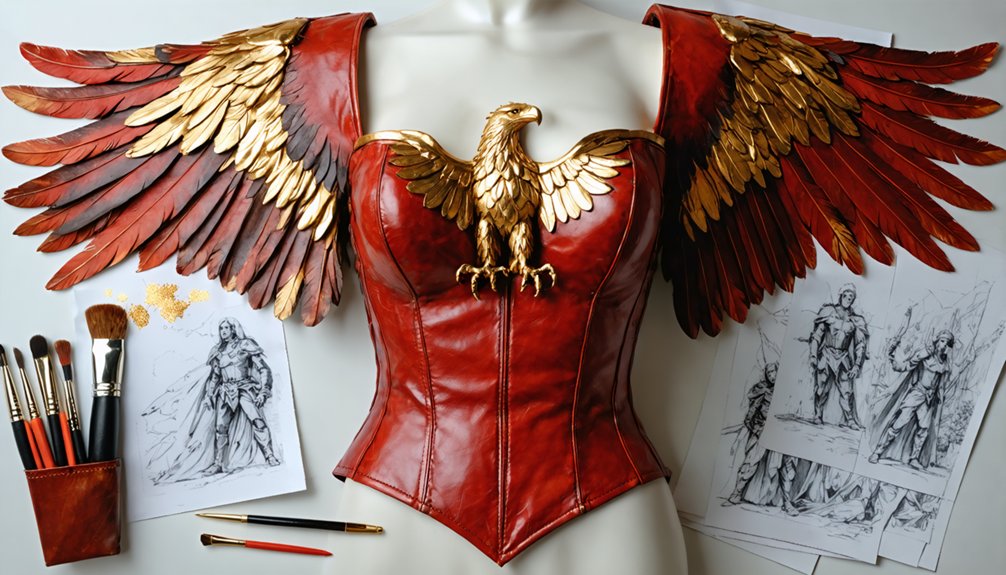
The golden eagle emblem anchoring Wonder Woman’s red bodice serves as more than decorative flair—it represents the character’s core values of truth, justice, and empowerment while establishing instant visual recognition. Understanding historical style progression helps you choose between the 1941 straightforward eagle or Milton Glaser’s transformative 1980 “W” hybrid with evocative wing symbolism.
For construction, apply metallic gold fabric paint or heat-molded EVA foam to create dimensional wings spanning 8-12 inches across your red spandex bodice. Center the emblem on your upper chest, ensuring symmetrical placement. Layer embroidered patches or gold vinyl applique for authentic texture, then seal with Mod Podge for durability. This isolated chest placement—avoiding belt integration—maintains canonical accuracy while delivering maximum visual impact during performance.
Building Bulletproof Bracers and Armbands
Wonder Woman’s Bracelets of Submission function as indestructible vambraces that encircle your wrists, deflecting everything from conventional bullets to Doomsday’s thermal blasts while absorbing divine lightning and generating protective force-fields when clashed together.
Construct your bracers using 5mm EVA foam traced from PDF templates, then trim overlays from 2mm foam sheets. Integrate NeoPixel strips on Circuit Playground pin 6 for energy absorption effects, adding individual pixels on pin 12 for bullet-deflection sparks. Solder red/black wires to power terminals, white to data IN, then glue pixels face-outward on acrylic backing in randomized patterns. Apply 1″-wide Worbla strips along edges to secure your on/off switch and conceal wiring. Test force field generation animations by shaking with battery connected. Complete assembly requires three hours from cutting through fastener installation.
Designing the Signature Star Tiara

Crowning Diana’s arsenal, the star tiara serves dual purposes as both royal insignia and razor-edged projectile weapon capable of slicing through steel when thrown with Amazonian precision. Begin by measuring your forehead width and head circumference for customizable sizing options.
Create your pattern using official DC Comics references, printing across two sheets for full-scale accuracy. For base material alternatives, select between professional-grade Worbla/Wonderflex combinations or budget-friendly 2mm EVA craft foam.
Heat-mold your chosen thermoplastic to match head contours precisely. Construct layered depth by numbering pattern segments, securing the central red star with hot glue backing pieces. Install eyelets at terminals for elastic attachment.
Apply brown metallic spray paint base coat, followed by strategic gold highlighting using paper-towel application along raised ridges for dimensional metallic finish.
Constructing the Gladiator-Style Skirt
Moving from headpiece to lower body armor, Diana’s gladiator-style skirt requires precise pattern work across six distinct panels: two back pieces and four front sections.
Pattern alignment starts with the larger back piece, angled like the center and 1 cm shorter—duplicate this twice for thorough coverage. Cut four side strips at an inward taper angle for proper contouring.
For foam placement, apply thin contact cement along the larger back piece’s top center and the smaller front layer‘s entire top back. Wait twenty minutes before joining. Position the smaller strip halfway up the larger back piece, keeping it underneath when facing outward. Pin panels with 1/4-inch seams to prevent twisting.
Attach side strips while wearing the skirt, ensuring ribbon lies along bottom glue lines with concave curves facing upward.
Creating the Warrior Belt With Battle-Worn Details
You’ll construct Wonder Woman’s signature belt using gold and silver craft foam layered over leather or soft PVC, with contact cement bonding each dimensional component. Thinning the foam edges with heat tools or careful blade work creates graduated shifts between layers, while beveling leather borders produces professional-grade definition.
Battle-worn effects emerge through strategic bronze glitter foam application along edges, selective distressing with sandpaper or rotary tools, and varied gold acrylic paint layering that mimics combat wear patterns.
Material Selection and Preparation
Laying the foundation for Wonder Woman’s iconic warrior belt starts with selecting craft foam as your primary structural material, specifically EVA foam sheeting in 3-5mm thickness that accommodates standard body measurements and allows precise template work. You’ll complement this base by securing EVA foam templates with contact cement, creating durable bonds between layers.
For rigid structural elements, cut ABS plastic using bandsaw or laser equipment, then enhance formability by heat-applying Worbla over these surfaces. Leather pieces require specialized preparation—use PVA glue to compress offcuts into solid blocks for sculptural eagle embellishments.
The metallic aesthetic demands strategic material layering: score and peel silver sheeting for center edges, while gold fabric wraps around foam cores. This multi-material approach guarantees authentic texture variation and dimensional depth throughout your construction.
Shaping and Thinning Techniques
Before cutting your foam base, measure your waist circumference to determine the belt’s total length, then create a two-piece construction by splitting the design into front and back sections. Draw your pattern freehand, ensuring 1.5-inch width coverage with reed triangles widening outward on the front piece. Fold your template along the center line to maintain bilateral symmetry before cutting.
Advanced thinning techniques for dimensional details:
- Use a razor blade to bevel all internal pattern lines, creating depth without adding bulk
- Apply a heat gun to warm Worbla strips cut with a leather strap cutter for moldable precision
- Score beveled foam surfaces with a wood burner to etch battle-worn grooves
Master contour forming by pressing multiple layers flat, then shape warmed Worbla with needle-nose tools for seamless dimensional effects.
Adding Battle Damage Effects
Once your dimensional details achieve the desired depth, authentic battle damage transforms a pristine belt into a warrior’s weathered artifact. Bash foam edges with your bevel tool to create dented, worn surfaces that simulate combat wear. Score and burnish edges systematically for distressed, battle-scarred appearances.
Layer thin strips unevenly across sections to replicate ancient repairs over structural cracks. Vary material thickness strategically to achieve irregular, damaged contours throughout the piece.
Apply custom paint distressing using gold acrylics with controlled brushstrokes for metallic, battle-worn sheen. Execute an undercoat followed by topcoat with adequate dry time between applications for layered patina effects. Incorporate cherry red stains on select elements to enhance worn leather aesthetics.
Create battle damaged textures by heating Worbla until sticky, then molding for authentic damage details. These weathering techniques elevate your costume from replica to battlefield-tested armor.
Assembling Sword, Shield, and Lasso Props
Three essential props define Wonder Woman’s iconic warrior appearance: the Godkiller sword, her Amazonian shield, and the golden Lasso of Truth. For the Godkiller blade, layer EVA foam (1/4″ to 8mm thickness) over foam board backing, securing with contact cement. Shape dragon head details using foam clay, then refine with Dremel rotary tools and 320-grit sandpaper.
Layer EVA foam strategically over foam board, then sculpt dragon details with foam clay before refining with rotary tools and sandpaper.
Shield construction requires:
- Two 12-inch plywood discs laminated together for structural integrity
- Dremel-engraved WW logo positioned through center alignment holes
- Royal blue leather straps with dual forearm belts and fist-grip configuration
Apply silver and gold metallic paint using dry-brushing techniques over black base coats. Seal both props with polyurethane to guarantee their durability. These blaster construction details maintain professional-grade props, while integrated display stand design retains their presentation between events.
Adding Leg Armor and Boot Accessories
Leg armor construction typically begins with pattern transfer from Can We Cosplay templates onto EVA foam, maintaining 45-degree angle cuts at all joining seams for seamless integration. You’ll employ contact cement to bond shin, calf, knee, and thigh components, then heat-form overlapping sections with a heat gun for anatomical contouring.
Secure leg armor integration through elastic backing on shin guards and kneecaps, or sew pieces directly into your undersuit’s inseam while wearing it.
For customizable footwear designs, layer 2mm foam pieces onto Funtasma gold gogo booties using E600 industrial adhesive, incorporating Velcro between layers for removable functionality. Apply Plasti Dip primer before gold metallic spray paint, then wood-burn intricate details. Complete weathering effects through strategic dry-brushing with black paint, enhancing dimensional depth across all leg components.
Essential Materials and Tools for Your Build
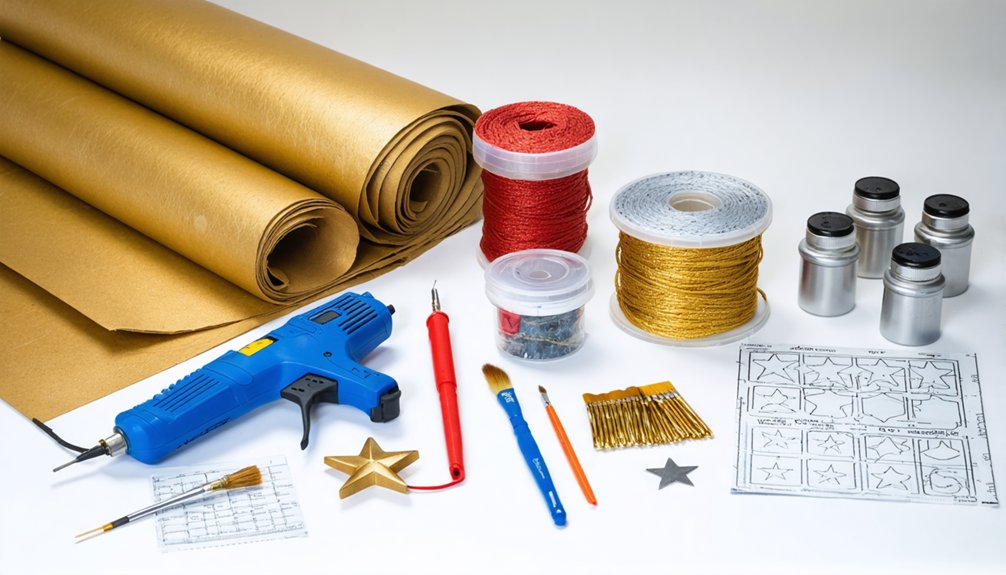
Before you begin cutting foam or heating thermoplastics, gather your complete materials inventory to prevent workflow interruptions during armor fabrication. Your foundation requires half-inch EVA foam from interlocking floor mats for structural components, supplemented by thin craft foam for detailed layering.
Complete your materials checklist before starting—workflow interruptions during armor construction compromise precision and waste valuable thermoplastic working time.
Moldable thermoplastics like Worbla Finest Arts and Black Worbla enable precise curved elements—essential for boob cups, tiara construction, and breastplate detailing.
Critical tools include:
- X-acto knife with replacement blades for clean foam cuts, paired with a heat gun for thermoforming
- Contact cement (Barge All Purpose Cement) and hot glue for permanent bonds
- Dremel tool or sandpaper for edge refinement and surface smoothing
For securing armor pieces, install eyelets for back lacing, attach Velcro strips for overlapping sections, and incorporate elastic bands for leg components. Duct tape and plastic wrap facilitate body patterning.
Painting and Finishing Techniques for Authentic Results
Proper surface preparation determines whether your Wonder Woman armor achieves screen-accurate metallic sheen or reveals amateur foam texture. Begin by applying two coats of Plasti Dip to seal EVA foam surfaces. Follow with gloss black spray paint or airbrushed black acrylic as your flexible base layer, smudging into crevices for initial depth enhancement.
For achieving a smooth metallic finish, airbrush three coats of color-matched red acrylic on designated areas, then add gold detailing with paint pens or markers for precision work. Apply lighter gold to highlight curves and edges effectively.
Master creating the battle worn effect by watering down dark brown acrylic paint and wiping excess with paper towels. Add this weathering post-heat sealing. Allow 1-2 days drying time between major applications for ideal durability and authentic results.
Frequently Asked Questions
How Do I Style My Hair to Properly Secure the Tiara?
Create four diagonal cornrow braids from back to front, forming a headband structure. This braided updo styles foundation enables secure hair accessory placement. You’ll position the tiara atop these braids, eliminating slippage while achieving an authentic warrior aesthetic.
What Type of Wig Works Best for Wonder Woman Cosplay?
Luscious lace front wigs work wonderfully for Wonder Woman cosplay. You’ll want dark brown or off-black wig color choices with long, wavy lengths. Master wig styling techniques like edge gluing, center parting, and curling for authentic Amazonian appearance.
How Do I Create Wonder Woman’s Makeup Look Accurately?
Focus on skin preparation with foundation and powder, then build a warm color palette using gold lids, brown crease shades, and coral blush. You’ll complete the look with red lipstick and defined winged eyeliner for authenticity.
What Undergarments Should I Wear Beneath the Bodice?
You’ll need strapless undergarments matching your comfort level and support requirements. The corset includes removable garters and clear bra straps for adjustable configurations. Select seamless pieces that won’t create visible lines beneath the faux leather construction.
How Do I Transport the Completed Costume to Conventions Safely?
Carry sturdy carrying case sized to your disassembled armor pieces. Avoid folding costume components—instead, stack separated breastplate sections, bracers, and accessories flat. Wrap each piece individually, include repair supplies, and engineer props with threaded connections for efficient reassembly.