When it comes to enhancing your cosplay look, achieving realistic 3D makeup effects is like adding the final brushstroke to a masterpiece. Imagine transforming into your favorite character with astonishing detail and depth.
The secrets behind creating these effects, from intricate silicone applications to skillful prosthetic sculpting, are waiting to be explored. Discover how these techniques can elevate your cosplay game and bring your characters to life in ways you never thought possible.
Key Takeaways
- High-quality silicone products and blending techniques create lifelike textures for cosplay makeup.
- Layering thin coats of liquid latex with precision enhances depth and intricate details in cosplay looks.
- Prosthetic application with attention to blending, color matching, and small details elevates realism in cosplay makeup.
- 3D molding techniques using high-quality materials and detailed craftsmanship allow for customized character creation in cosplay.
Creating 3D Effects With Silicone
When aiming to achieve realistic 3D effects in your cosplay makeup, utilizing silicone can elevate your creations to the next level. Silicone application is a game-changer in creating lifelike textures and shapes on your skin.
To begin, choose a high-quality silicone product designed for special effects makeup. Start by applying a thin layer of silicone to the desired area using a spatula or brush. The key to seamless merging lies in mastering blending techniques. Use a stippling motion with a sponge or brush to feather out the edges of the silicone, ensuring a smooth shift into your skin.
Achieving Depth With Liquid Latex
To enhance the depth and texture of your cosplay makeup, incorporating liquid latex provides a versatile and impactful method for achieving realistic effects.
Texture blending is key when working with liquid latex. By mixing it with various materials like tissue paper or cotton, you can create textured surfaces that mimic scars, scales, or other intricate details.
Layering techniques play an important role in building up dimension with liquid latex. Start by applying thin layers and allowing each one to dry before adding the next. This method helps in creating a realistic 3D effect, as you gradually build up the desired texture and depth.
Experiment with different tools like sponges, brushes, or even your fingers to achieve a variety of effects. Remember to work patiently and strategically, as liquid latex requires precision to avoid clumping or uneven surfaces.
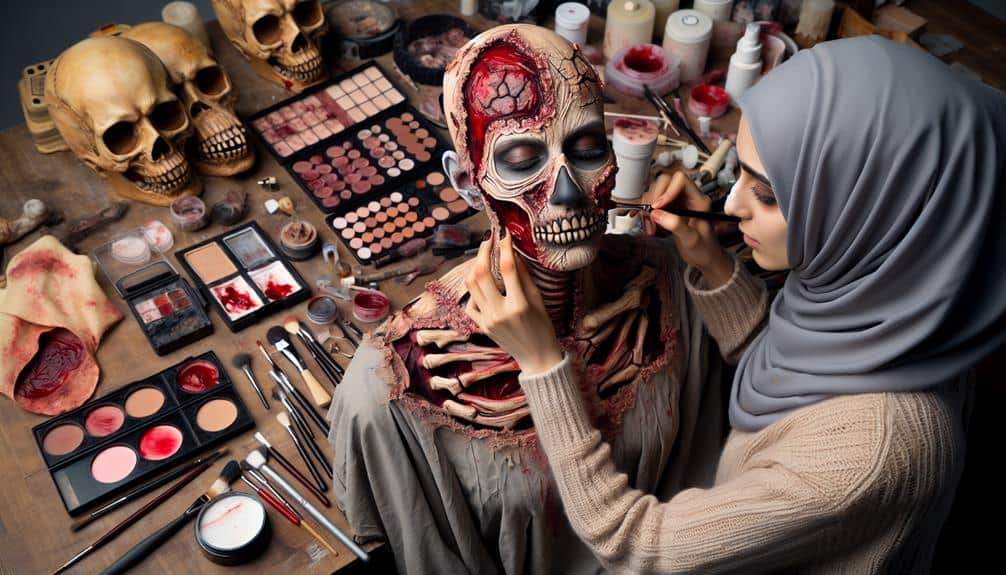
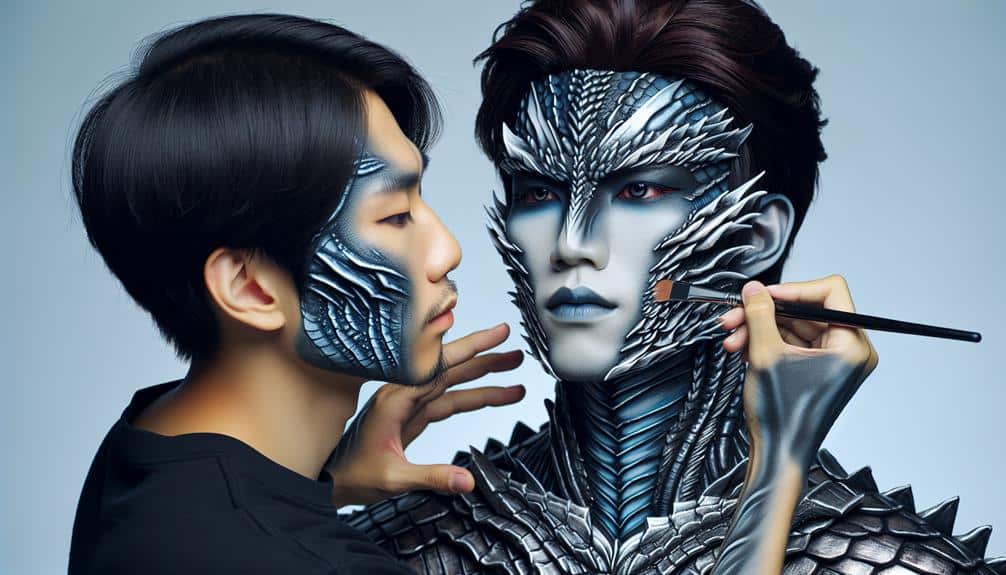
Sculpting Realism With Prosthetics
Enhance the lifelike quality of your cosplay makeup by skillfully integrating prosthetics, sculpting intricate details that bring your character to a whole new level of realism. When working with prosthetics, mastering blending techniques is essential for seamlessly melding the prosthetic edges into your skin. Use a high-quality adhesive to make a secure attachment that won't budge during your cosplay adventures.
Color matching is another vital aspect when sculpting realism with prosthetics. Take the time to match the color of the prosthetic to your skin tone perfectly. You can use makeup products like foundation and concealer to blend the edges and create a natural shift between your skin and the prosthetic.
To achieve a truly realistic look, pay attention to the small details. Add texture and dimension to the prosthetic by subtly highlighting and shading certain areas. These meticulous touches will elevate your cosplay makeup to a professional level, making your character come to life in vivid detail.
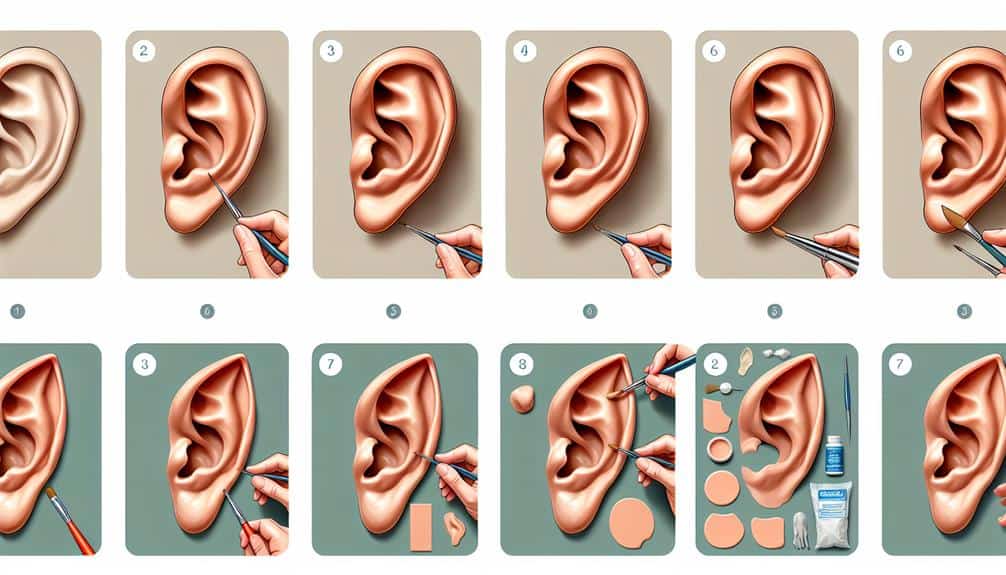
Enhancing Features With 3D Molding
By skillfully utilizing 3D molding techniques, you can elevate your cosplay makeup to a whole new level of artistic expression and bring your character to life in stunning detail. Creating a customized character through 3D molding allows you to enhance specific features that define your chosen persona. The key to success lies in the detailed craftsmanship involved in this process.
To start, select a high-quality molding material that suits your needs, such as silicone or gelatin, ensuring it's skin-safe and easy to work with. Begin by sculpting the desired features, paying close attention to proportions and details that will make your character instantly recognizable. Whether it's a unique nose shape, exaggerated cheekbones, or pointed ears, the possibilities are endless with 3D molding.
Once the molding is complete, carefully apply it to your face using adhesive, blending the edges seamlessly into your skin for a natural look. With patience and practice, you can achieve a stunning transformation that showcases your dedication to the art of cosplay.
Mastering Textures With Airbrushing
Crafting intricate textures with airbrushing techniques adds depth and realism to your cosplay makeup, elevating your character portrayal to a professional level of artistry. Perfecting your airbrushing skills involves mastering blending techniques and highlighting contours to achieve a flawless finish.
Here are four essential tips to help you master textures with airbrushing:
- Layering: Build up textures gradually by layering different shades and opacities to create depth and dimension in your makeup.
- Stenciling: Use stencils to add intricate patterns and textures to your makeup, creating a professional-looking finish with ease.
- Highlighting: Enhance the contours of your character's features by strategically highlighting areas that catch light, adding definition and realism to your makeup.
- Blending: Practice blending techniques to seamlessly merge different colors and textures, ensuring a smooth and natural shift between elements of your makeup.
Mastering these techniques will take your cosplay makeup to the next level, bringing your character to life with stunning textures and details.
Frequently Asked Questions
Are There Any Alternative Materials That Can Be Used Besides Silicone for Creating 3D Makeup Effects?
When looking for alternative materials to silicone for 3D makeup effects, explore creative options like gelatin, latex, or even tissue paper. These budget-friendly solutions offer makeup hacks that can elevate your cosplay game with unique textures and finishes.
How Long Does Liquid Latex Typically Take to Dry Before Makeup Can Be Applied Over It?
Liquid latex typically dries in about 5 to 15 minutes before makeup can be applied over it. To speed up drying, use a hairdryer on low. For removal, gently peel off or use makeup remover. Experiment with different application techniques for unique effects.
Can Prosthetics Be Reused for Multiple Cosplays, or Are They Typically One-Time Use Only?
Prosthetics can be reused for multiple cosplays if properly cared for. Regular maintenance is key to extending their durability. While the initial cost may be higher, reusability can save you money in the long run.
What Are Some Common Mistakes to Avoid When Using 3D Molding to Enhance Features for Cosplay?
When creating 3D makeup effects for cosplay, watch out for common pitfalls like improper blending or incorrect color matching. Use correct techniques such as proper priming, layering, and setting to enhance features seamlessly for a stunning transformation.
Is Airbrushing Difficult to Master for Beginners, or Are There Simpler Techniques That Can Achieve Similar Texture Effects?
Mastering airbrushing can be challenging initially. However, with practice and exploring simpler techniques like blending methods, coverage options, color matching, and contouring tricks, you'll soon achieve similar texture effects effortlessly. It's all about experimentation and patience.