Coincidentally, you've been searching for a way to take your cosplay makeup to the next level. Imagine being able to create your own custom prosthetics that perfectly match the character you're portraying.
From crafting materials to blending techniques, there's a universe of possibilities awaiting you in the domain of DIY prosthetics. So, are you ready to transform your cosplay look into something truly extraordinary?
Key Takeaways
- Silicone molds and liquid latex are essential for crafting custom prosthetics.
- Use sculpting tools and quality molds for detailed and realistic prosthetic pieces.
- Blend colors seamlessly with skin tone using color matching kits and blending techniques.
- Maintain prosthetics by cleaning them properly and storing them in suitable containers for reuse.
Materials Needed for DIY Prosthetics
To craft DIY prosthetics successfully, gather essential materials like silicone molds, liquid latex, and sculpting tools. When creating latex prosthetics for your cosplay makeup, the quality of your silicone molds plays a vital role in the final outcome. Silicone molds are used to shape the prosthetic piece before applying the liquid latex. These molds come in various shapes and sizes, allowing you to customize your prosthetics based on your cosplay character's needs.
Liquid latex is the primary material used to form the prosthetic itself. It's essential to apply multiple layers of liquid latex to make sure durability and a lifelike appearance. Sculpting tools such as brushes, spatulas, and sponges are necessary for shaping and detailing the prosthetic during the application process. These tools help you achieve precision and accuracy in your prosthetic design.
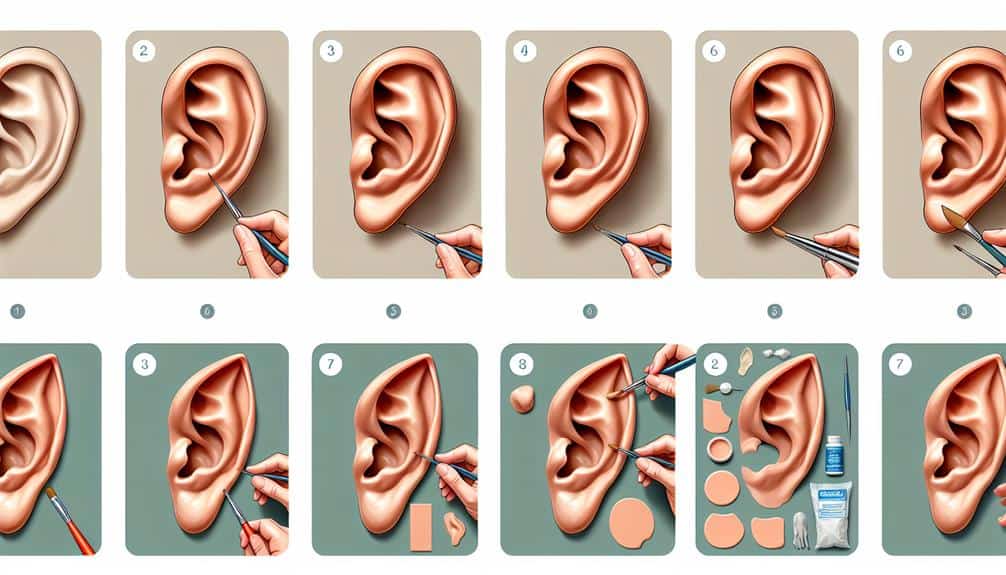
Step-by-Step Guide to Making Prosthetics
When initiating the creation of prosthetics for your cosplay, the initial step involves preparing your workspace and gathering all necessary materials for the upcoming detailed crafting process.
To guarantee a successful prosthetic creation, follow these steps:
- Workspace Preparation: Set up a clean and well-lit area where you can work comfortably for an extended period of time.
- Material Gathering: Collect the required supplies such as sculpting tools, molding materials, prosthetic adhesive, and a color matching kit.
- Sculpting Techniques: Use your sculpting tools to shape the prosthetic according to your design. Remember to work slowly and carefully to achieve the desired shape and details.
- Color Matching: Utilize the color matching kit to guarantee that the prosthetic blends seamlessly with your skin tone. Mix and match colors until you achieve a perfect match for a realistic finish.
Painting and Blending Techniques
Engage your artistic prowess by mastering the intricate painting and blending techniques essential for achieving a professional finish on your cosplay prosthetics. When blending colors, start by matching the prosthetic to your skin tone. Use a color wheel to adjust the base color with small amounts of other shades until you achieve a perfect match. Remember, blending is key to seamlessly integrating the prosthetic into your overall look.
For blending tips, consider using a stippling sponge or a makeup brush with soft, feather-like strokes. This technique helps avoid harsh lines and creates a natural change between the prosthetic and your skin. To enhance realism, add subtle highlights and shadows to mimic the contours of your face. Remember to blend these carefully to maintain a lifelike appearance.
Color matching is essential for a cohesive look. Test the colors in different lighting to ensure a seamless blend. Practice different blending techniques and experiment with various colors to find the perfect combination for your cosplay prosthetics. Mastering these techniques will elevate your cosplay game to a professional level.
Applying Prosthetics to Achieve Realism
Mastering the art of applying prosthetics is crucial in achieving a realistic transformation for your cosplay character. To guarantee your prosthetics blend seamlessly with your skin and create a convincing look, consider the following tips:
- Preparation is Key: Cleanse your skin thoroughly before applying prosthetics to make sure a smooth surface. Use a skin-safe adhesive to secure the prosthetic in place.
- Blending Techniques: Use a makeup sponge or brush to blend the edges of the prosthetic into your skin. Apply foundation and concealer matching your skin tone to further blend the prosthetic seamlessly.
- Precision Application: Take your time when applying prosthetics, especially around intricate areas like the eyes or mouth. Use small tools for precise application and blending.
- Setting the Prosthetic: Once the prosthetic is in place and blended seamlessly, set it with a setting powder to guarantee longevity and prevent any shifting throughout the day.
Tips for Maintaining and Reusing Prosthetics
To prolong the lifespan and guarantee the quality of your prosthetics, regularly clean and store them properly after each use. After removing the prosthetic, gently clean it with mild soap and lukewarm water to remove any makeup residue or adhesive. Avoid using harsh chemicals that can damage the prosthetic material. Once clean, allow it to air dry completely before storing.
Proper prosthetic storage is important for maintaining its shape and integrity. Store your prosthetics in a cool, dry place away from direct sunlight to prevent them from warping or deforming. Avoid bending or folding the prosthetic to make sure it retains its original form. Consider using a specialized storage container or a padded box to protect the prosthetic from dust and damage.
For reusable prosthetics, handling them with care to prevent tears or breakage is necessary. Avoid excessive stretching or pulling when applying or removing the prosthetic. Following these cleaning tips and storage practices will help you maintain your prosthetics in excellent condition for future use in your cosplay endeavors.
Frequently Asked Questions
Can Prosthetics Made for Cosplay Makeup Be Reused for Multiple Events or Costumes?
Yes, prosthetics made for cosplay makeup can be reused for multiple events or costumes. Guarantee skin safety by cleaning them properly. Their costuming versatility allows for creative adaptations. Be cautious of material toxicity; prioritize skin health.
Are There Any Specific Safety Precautions to Keep in Mind When Working With the Materials Needed for DIY Prosthetics?
When working with DIY prosthetic materials, it's essential to prioritize material safety and take necessary precautions. Pay attention to skin health by considering potential allergies. Prioritize safety to guarantee a seamless and worry-free cosplay experience.
How Long Does It Typically Take for Prosthetics to Fully Adhere to the Skin Before They Can Be Painted and Blended?
Once the prosthetic is applied, allow the adhesive to dry completely before painting and blending. Typically, this process takes around 15-20 minutes. Prioritize skin safety during removal by using gentle techniques to avoid irritation.
Are There Any Alternative Methods for Applying Prosthetics Besides Using Adhesive Glue?
When applying prosthetics, consider temporary options like medical tape or spirit gum as prosthetic alternatives. These skin-friendly adhesives offer easier removal. Prioritize skin health by opting for gentle removal techniques to avoid irritation and damage.
Can Prosthetics Be Easily Removed Without Causing Damage to the Skin or the Prosthetic Itself?
When removing prosthetics, prioritize skin safety. Gently lift the edges, using a remover solution if needed. Slowly peel back, avoiding quick tugs that may damage the skin or prosthetic. Take care to preserve both.