To create gills and scales for aquatic cosplay, you’ll sculpt gill prosthetics from warmed scar wax or silicone, secure them with spirit gum, and blend edges with liquid latex. For scales, press fishnet stockings into liquid latex or silicone to stamp realistic texture patterns onto skin. Layer ocean-inspired face paints, add cosmetic glitter for shimmer, then seal everything with setting spray. Keep going to master every technique that makes your aquatic transformation truly convincing.
Key Takeaways
- Sculpt gill prosthetics using warmed scar wax, secure with spirit gum, and blend edges with liquid latex for seamless results.
- Use fishnet stockings pressed onto liquid latex to create realistic, textured scale patterns on skin.
- Cleanse and dry skin thoroughly before applying adhesives to ensure scales and gills bond effectively all day.
- Layer ocean-inspired eyeshadow, blue face paint, and cosmetic glitter to achieve vibrant, dimensional aquatic scale coloring.
- Seal completed gill and scale work with setting spray, applying in short bursts every few hours for longevity.
Choose the Right Materials for Aquatic Cosplay Gills and Scales
Choosing the right materials makes or breaks the realism of aquatic cosplay gills and scales. Your primary toolkit should include silicone, scar wax, scar wax adhesive, fishnet stockings, liquid latex, and skin-safe glue. Each material serves a distinct structural role.
Flexible silicone or polymer clay forms the base structure, offering material durability for extended wear. Scar wax delivers a malleable medium for sculpting gill protrusions with precision.
Silicone and polymer clay anchor your design, while scar wax sculpts gill details with surgical precision.
Fishnet material generates texture variety, producing convincing scale patterns when pressed into soft surfaces. Liquid latex functions as an adhesive layer, securing foil or mesh scales directly against skin.
Matching each material to its intended function prevents structural failure during wear. Prioritize skin-safe formulations to maintain both performance and safety throughout your application process.
Tools You Need for Gill and Scale Application
Having the right tools determines how cleanly and accurately you’ll sculpt, shape, and attach your gill and scale prosthetics. Your crafting tools overview should include a makeup spatula, scraper, popsicle stick, and craft knife as core essentials.
For gill application techniques, use a spatula tip to carve precise gill shapes from scar wax. Your scale texture tips improve dramatically when a scraper presses defined patterns into soft silicone.
Apply silicone mixing methods with a popsicle stick, spreading the mixture evenly across targeted facial areas. A craft knife supports cosplay material options by cutting fishnet into custom cheek placements.
Combine adhesive application strategies with blending techniques advice to refine edges cleanly. These tools collectively support underwater effect ideas, color layering tips, and your finishing touches guide for maximum anatomical realism.
How to Prep Your Skin So Scales Actually Stick
Proper skin preparation determines whether your prosthetics bond securely or peel away within hours.
Begin with thorough skin cleansing using a gentle, residue-free cleanser to eliminate oils, dead cells, and prior makeup removal remnants that compromise adhesive longevity. Pat dry completely — moisture balance is critical, since excess hydration weakens spirit gum and cosmetic adhesive bonds.
Next, conduct adhesive testing on a small patch near your jawline to assess skin sensitivity and confirm skin compatibility before full application. Allow 10 minutes to check for reactions.
Apply a thin moisturizer base only where scales won’t adhere, keeping adhesive zones completely dry. Strategic product layering — moisturizer first on non-adhesive areas, adhesive applied last on prosthetic zones — prevents interference and guarantees your gills and scales stay locked throughout your event.
How to Build and Apply Gill Prosthetics
To sculpt gill shapes, press a spatula tip into warmed scar wax and carve elongated, curved slits that mimic natural gill structures along your neck or cheekbone area.
Once shaped, secure the prosthetic using spirit gum, pressing firmly along the edges and holding for several seconds to guarantee a durable bond.
Blend the gill edges into surrounding skin by feathering liquid latex outward with a popsicle stick, then apply vein tone over the shift zone to eliminate any visible prosthetic borders.
Sculpting Gill Shapes
Sculpting realistic gill prosthetics requires scar wax as your primary building material, since its malleable consistency lets you push, pull, and carve precise layered slits directly against the skin’s surface.
Warm the wax between your fingers until it’s pliable, then press it firmly onto your prepped skin in an elongated oval form.
Use a spatula tip to carve your gill design, cutting parallel horizontal slits that taper at each end for anatomical accuracy. Deepen each channel with a craft knife to create shadow depth.
For scale texture along the gill’s border, press a quarter-sized button repeatedly into the surrounding wax edge, generating uniform impressions.
Add vein tone details using a fine brush to reinforce structural realism before sealing everything with spirit gum around the prosthetic’s perimeter.
Securing Gill Prosthetics
Once your gill prosthetic is fully carved and detailed, securing it properly determines whether it lasts through hours of wear or peels away mid-event.
Start by cleaning and drying the target skin area completely. Apply spirit gum to both the prosthetic edge and skin, letting it tack before pressing firmly.
For heavier gill structures, layer Prosaide over the spirit gum to reinforce gill adhesion techniques and prevent lifting at high-movement zones like the jawline and neck.
Press edges flat using a spatula tip, working outward from the center. Once bonded, seal the perimeter with liquid latex. This also helps blend scale texture variations at prosthetic borders into surrounding skin.
Finish with setting spray to lock everything in place before applying color layers.
Blending Gill Edges
Blending gill edges determines how seamlessly your prosthetic integrates with surrounding skin, so approach this step methodically before applying any color.
Use a spatula tip to feather scar wax outward from the prosthetic’s perimeter, thinning the material gradually until it’s nearly translucent against your skin.
Apply liquid latex over the blending zone using a popsicle stick, stroking in short, directional passes to unify texture.
For scale edge seamlessness, press the scraper lightly along each scale’s outer rim, merging silicone into the surrounding surface without disturbing the defined pattern.
Gill blending techniques require patience—work in small sections, checking angles under direct light to catch visible ridges.
Once edges disappear visually, you’re ready to lock the foundation with setting spray before layering color.
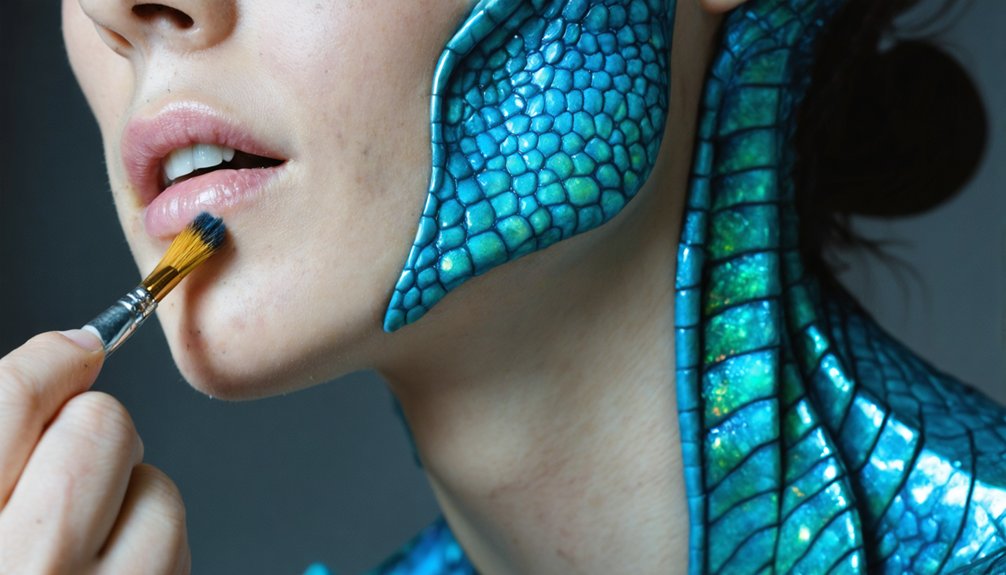
How to Paint, Blend, and Add Shimmer to Aquatic Scales
Painting aquatic scales requires a layered approach that builds depth and mimics the iridescent quality of underwater life.
Begin by applying ocean-inspired eyeshadow over your fishnet-patterned prosthetic, establishing scale gradients by layering lighter teal shades at each scale’s center and blending deeper blues and purples outward toward the edges.
Use blue face paint to sharpen scale boundaries, reinforcing definition with precise strokes from a fine spatula tip.
Once your base gradient dries, apply alcohol-mixed paint to intensify pigment saturation without clogging textured surfaces.
For shimmer techniques, press cosmetic glitter selectively onto scale centers, concentrating iridescence where light naturally strikes.
Finish with setting spray to lock every layer, ensuring your color work withstands extended wear throughout aquatic cosplay events without fading or smudging.
How to Seal Gill Prosthetics and Scales for All-Day Wear
To lock in your gill prosthetics and scale work for extended wear, apply spirit gum or Prozade beneath any heavy silicone pieces before layering a setting mist over the completed look.
Hold the setting spray six to eight inches from your skin and mist in short, controlled bursts, allowing each coat to dry fully before applying the next.
A final seal with alcohol-mixed paint over painted edges prevents smudging and keeps pigment intact through hours of cosplay activity.
Sealing Prosthetics for Durability
Sealing your gill prosthetics and scales is the critical final step that determines how well your aquatic look holds up through an all-day event. Your adhesive options directly influence durability factors, so apply spirit gum beneath heavy gill structures before layering setting mist over completed color choices.
Use alcohol-mixed paint to lock pigment into texture techniques applied across scale surfaces, preventing lift or fade. Your layering methods matter here — seal each stage independently rather than coating everything at once.
Finish variations include matte or glossy setting sprays depending on your design inspiration and desired realism. Reapply setting mist every few hours as a maintenance tip for extended wear.
Vein tone details on gill edges remain crisp when properly sealed with cosmetic-grade finish spray.
Setting Spray Application Tips
Once your gill prosthetics and scales are fully colored and dried, apply setting mist in short, controlled bursts held six to eight inches from the skin’s surface.
Don’t saturate any single zone; instead, sweep across the prosthetic edges first, then move inward to lock adhesive seams.
Setting spray benefits include extended wear resistance, pigment stabilization, and reduced transfer onto costumes during all-day aquatic cosplay events.
For precise application techniques, work in two to three thin passes, allowing each layer thirty seconds of dry time before the next.
Target gill protrusions with an angled approach to penetrate recessed textures fully.
Avoid direct airflow into eye zones.
Once all layers cure, the surface will resist moisture, friction, and incidental contact without compromising scale definition or color vibrancy.
Frequently Asked Questions
Can Aquatic Cosplay Scales Be Safely Worn by Children?
You can safely use aquatic cosplay scales on children if you follow age guidelines and select child-safe safety materials like liquid latex alternatives, skin-safe adhesives, and hypoallergenic silicone, avoiding spirit gum or harsh chemical-based adhesives.
How Do You Remove Gill Prosthetics Without Damaging Your Skin?
“Slow and steady wins the race.” Soak gill edges with oil-based remover to dissolve gill adhesive removal bonds, addressing skin sensitivity concerns. You’ll gently lift prosthetics outward, avoiding tearing, then cleanse residue with micellar water afterward.
Are These Aquatic Makeup Techniques Suitable for Underwater Photography?
These underwater techniques aren’t fully optimized for submerged photography tips. You’ll need waterproof spirit gum, silicone-sealed prosthetics, and alcohol-activated paints to withstand water pressure, ensuring your gill and scale details remain intact during aquatic shoots.
How Long Does a Full Aquatic Cosplay Transformation Typically Take?
Like sculpting a coral reef, your full aquatic cosplay preparation typically takes three to five hours. You’ll spend transformation duration applying prosthetics, layering colors, and securing adhesives for a flawless, innovation-driven aquatic result.
Can Gill Prosthetics Be Reused for Multiple Cosplay Events?
Yes, you can reuse gill prosthetics if they’re silicone-based. Follow these gill care tips: clean with gentle cleanser, store flat, and avoid tearing. Quality gill prosthetic materials withstand multiple applications when you’re maintaining them properly.
References
- https://www.countryliving.com/life/kids-pets/g37983152/mermaid-makeup-tutorial/
- https://www.youtube.com/watch?v=pqno-4ZC3f0
- https://www.youtube.com/watch?v=2FMCmvfVlDo
- https://espionagecosmetics.com/blogs/tutorials/how-to-create-magical-mermaid-scales-makeup-a-step-by-step-tutorial
- https://www.youtube.com/watch?v=70u9zFs2rU8
- https://hilo.hawaii.edu/affiliates/prism/documents/Lesson3.pdf
- https://espionagecosmetics.com/blogs/featured-blogs/how-to-create-magical-mermaid-scales-makeup-a-step-by-step-tutorial
- https://www.youtube.com/watch?v=lsWcxgef1Xw
- https://www.youtube.com/watch?v=uD4q6SB1aKo
- https://www.lovetoknow.com/celebrations/halloween/how-make-fish-costume