Perfecting your anime cosplay wig starts with choosing the right fiber type, color match, and construction for your character. You’ll need a lace front wig for realistic hairlines, heat-resistant fibers for spike styling, and products like Got2b Glued gel and freeze spray for lasting hold. Secure your natural hair flat beneath a wig cap, then anchor the wig with bobby pins and adhesive. There’s much more to master ahead.
Key Takeaways
- Choose a wig with heat-resistant fibers, accurate color match, and appropriate length to closely replicate your anime character’s silhouette.
- Lace front wigs offer greater styling versatility, enabling realistic hairlines and multi-directional parting for improved character accuracy.
- Use Got2b Glued gel and freeze spray to create and lock sharp anime spikes, shaping with fingers and a hairdryer.
- Flatten natural hair with braids or cornrows, then secure the wig using bobby pins and wig tape for all-day hold.
- When combining multiple wigs, match fiber types, anchor with long bobby pins, and seal connection points with gel and freeze spray.
Pick the Right Anime Cosplay Wig Before You Buy
Picking the right wig before you buy saves hours of frustrating styling work. Start by analyzing your character reference carefully, matching wig color as precisely as possible to reduce dyeing or blending afterward.
Fiber type determines your styling ceiling—heat-resistant synthetic fibers enable flat iron techniques unavailable with standard fibers. Evaluate length options against your character’s silhouette before committing.
Factor in budget considerations honestly; cheaper wigs often sacrifice fiber density and brand reputation, increasing styling difficulty considerably.
Always verify the retailer’s return policy before purchasing, since color accuracy varies between monitor displays and real-world products. Prioritize lace-front construction for realistic hairlines and wigs offering versatile parting directions.
Investing strategically upfront eliminates costly corrections later and accelerates your overall cosplay build timeline.
Lace Front vs. Basic Hairline: Which Wig Works Best?
Once you’ve locked in your wig selection, the hairline construction becomes your next major decision point.
Basic hairline wigs deliver limited versatility — you’re locked into fixed parting directions, and the artificial edge reads obviously against your skin, exposing the illusion entirely.
Lace front advantages completely redefine your styling options. The sheer lace panel allows you to trim the hairline precisely, creating a realistic skin-to-hair connection that photographs convincingly from multiple angles.
You can split and part the hair in virtually any direction, giving you dynamic styling flexibility that basic constructions simply can’t match.
Basic hairline drawbacks extend beyond aesthetics — they restrict your character accuracy.
Secure your lace front using wig tape or specialized adhesive along the hairline perimeter, ensuring it stays locked throughout extended convention wear.
The Exact Tools You Need for Anime Wig Styling
Achieving sharp anime-style results depends entirely on having the right tools assembled before you touch the wig. Skipping proper equipment guarantees inconsistent outcomes and damaged fibers.
Sharp anime-style results demand the right tools assembled before you begin — skipping preparation guarantees damaged fibers and inconsistent outcomes.
These essential styling tools form your non-negotiable foundation:
- Wig head and alligator clips — stabilize sections during precision work
- Sharp shears and varied combs — execute clean cuts and controlled teasing
- Flat iron with adjustable heat settings — reshape synthetic fibers accurately
- Freeze spray and Got2b Glued gel — lock spikes and structure permanently
For wig maintenance tips, always apply silicone spray lightly before styling to lubricate fibers and reduce breakage. Use heat-resistant spray whenever applying direct heat.
Having everything staged before starting transforms your workflow from chaotic to calculated.
Prep and Flatten Your Hair Before Putting the Wig On
Before the wig goes on, your natural hair needs to be completely flat and secure — any bulk underneath will distort the wig’s shape and shift its position throughout the day. Use braids, cornrows, or hair wrapping techniques depending on your hair’s length and thickness. For longer hair, cross braids over the back and pin them flat on top of your head.
Wig cap styles matter more than most cosplayers realize. Choose a nylon cap for thicker hair to compress and flatten fibers effectively, or opt for a mesh cap if comfort is your priority.
For exceptionally thick hair, layer multiple caps to achieve a truly flat surface. Secure every cap with bobby pins along the bottom and sides to eliminate shifting before the wig even touches your head.
Secure Your Cosplay Wig So It Stays All Convention
Once your hair’s properly flattened and capped, place your wig along your natural hairline and drive extra-long bobby pins through the wig and cap at the hairline and nape for a grip that’ll survive a full day of convention activity.
For wigs requiring a stronger hold — particularly lace fronts — apply wig glue or double-sided tape along the hairline before pressing the wig firmly into place.
These two securing methods work together to keep your cosplay wig locked through crowded halls, photo shoots, and anything else the convention throws at you.
Preparing Hair Underneath
Getting your natural hair flat and secure beneath a wig is the foundation of a successful cosplay look that holds up all convention long. Mastering hair flattening techniques and wig cap types guarantees a seamless base.
- Braid or wrap your hair using cornrows or cross-braids pinned flat against your head.
- Choose wig cap types strategically—nylon caps compress thick hair effectively, while mesh caps prioritize breathability.
- Layer multiple caps over thick or voluminous hair to achieve maximum flatness.
- Execute precise wig pin placement by securing bobby pins along the cap’s bottom edge and sides for locked-in stability.
These securing methods eliminate unwanted shifting, giving your wig a natural, polished foundation that withstands extended wear throughout demanding convention environments.
Securing With Bobby Pins
Securing your cosplay wig with bobby pins is the most reliable method for keeping it locked in place throughout a full convention day. Master these wig pinning techniques by placing pins strategically along your hairline and nape, threading them through both the wig cap and your natural hair underneath.
For maximum wig stability tips, opt for extra-long bobby pins specifically designed for anime conventions, as they grip more fiber and distribute tension evenly. Cross each pin at a 45-degree angle to prevent slippage during active movement.
If you’re wearing a lace front wig, concentrate your pinning along the sides and back rather than the delicate front edge. Pair pinning with wig tape along the hairline for an absolutely foolproof hold.
Applying Wig Adhesive
Secure Your Cosplay Wig So It Stays All Convention
Bobby pins give you a strong mechanical hold, but wig adhesive takes that security to another level — especially for high-movement cosplays or outdoor conventions where heat and sweat can loosen even the best pinning job.
Master these application techniques across key wig adhesive types:
- Wig tape — press strips along the hairline perimeter before positioning the wig.
- Liquid glue — apply thin layers to the lace front, letting each coat tack before pressing down.
- Adhesive spray — mist lightly onto skin, wait 30 seconds, then set the wig firmly.
- Ghost bond — ideal for extended wear; apply sparingly to avoid product buildup.
Always patch-test adhesives beforehand to prevent skin reactions.
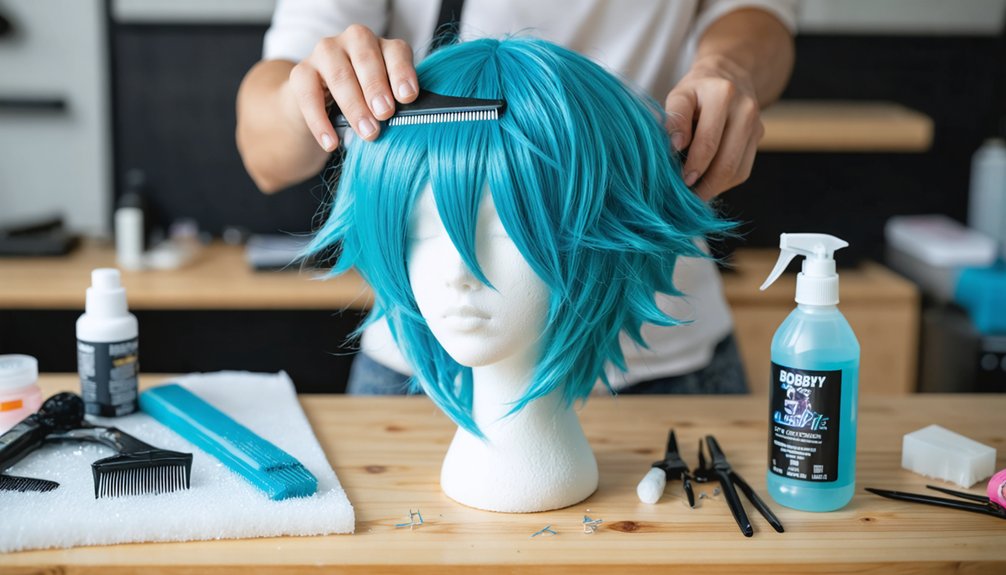
Steam and Crimp Your Anime Wig for the Perfect Styling Base
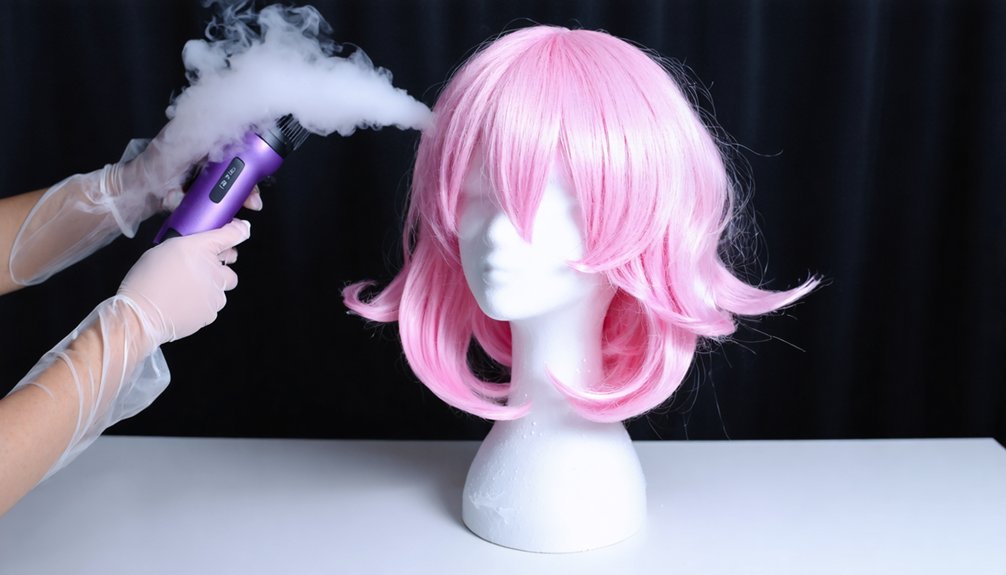
Steam your wig first to remove any factory bends or packaging creases, giving you a clean, workable base before you touch a crimping iron. Hold a garment steamer several inches from the fibers, working in downward strokes to relax the synthetic strands without melting them.
Once steamed, you’ve got a blank canvas ready for anime texture techniques. Mount your wig securely on a wig head, then crimp horizontally starting at the crown, working downward in sections.
These structured waves create foundational volume that holds sculpted spikes effectively. Consider crimping among your core wig styling essentials — it dramatically improves product adhesion when you apply Got2b Glued gel afterward.
Consistent sectioning guarantees uniform texture distribution throughout the entire wig.
How to Create Sharp Anime Spikes That Actually Hold
To build clean anime spikes, start by sectioning out the sides, sideburns, and front of the wig first, isolating each segment with alligator clips to maintain control over every spike’s direction and base.
Once you’ve defined your sections, coat each one thoroughly with Got2b Glued gel, working it into the fibers to establish a firm, moldable foundation.
The gel acts as both a shaping agent and a locking mechanism, so don’t skimp—full saturation is what separates spikes that hold all day from ones that collapse within an hour.
Sectioning For Spike Base
Creating sharp anime spikes starts with three foundational sections: the sides, the sideburns, and the front. Mastering these sectioning methods establishes your spike techniques on solid structural groundwork.
Follow this precise sequence:
- Separate the sides — isolate each panel cleanly using alligator clips to prevent fiber interference.
- Define the sideburns — section these independently, as they anchor front-facing spikes directionally.
- Isolate the front — this section determines your character’s signature spike placement and angle.
- Apply Got2b Glued gel throughout every sectioned area before shaping begins, creating a workable adhesive base.
Working section-by-section prevents overlap and maintains clean separation between spikes. Each division you establish now directly controls the final spike direction, ensuring precision that holds through extended convention wear.
Locking Spikes With Gel
Gel is the backbone of every spike that survives a full convention day. Once you’ve sectioned your base, saturate each section completely with Got2b Glued gel before shaping.
Don’t skim the surface—work the product from root to tip, ensuring full fiber coverage for maximum spike durability.
Pinch each spike firmly between your fingers, twisting slightly while pulling upward to establish direction. Hold the shape until the gel begins setting, then hit it with your hairdryer on medium heat to lock the structure instantly.
Repeat your gel application in thin layers rather than one heavy coat; this builds rigid, stackable hold without weighing fibers down. Once dry, your spikes should feel solid and resist movement throughout the entire event.
Which Products Actually Hold Anime Wig Spikes in Place?
When it comes to holding anime wig spikes in place, Got2b Glued gel is the go-to product most cosplayers swear by.
For superior spike techniques, you’ll need reliable wig adhesives and texture products that won’t compromise fiber care. Here’s a focused breakdown of product recommendations based on hold comparisons:
- Got2b Glued Styling Gel – Maximum hold for dramatic spikes
- Freeze Hairspray – Locks styling gels after shaping
- Heat-Resistant Styling Sprays – Protects fibers during flat iron work
- Silicone Spray – Lubricates fibers for smoother wig layering
Apply gel generously before shaping each spike, then seal with freeze spray.
These maintenance tips guarantee your spikes survive long convention days without drooping or losing definition.
Cut Your Cosplay Wig Without Ruining the Fibers
Before you make a single cut, detangle the wig thoroughly from the ends upward, using a wide-tooth comb to work out knots without stressing the fibers.
Once the wig is smooth, trim in small increments rather than cutting large sections at once, since synthetic fibers don’t grow back and mistakes are difficult to reverse.
Check your progress frequently by stepping back from the wig head, comparing both sides, and evaluating the overall shape before committing to any additional cuts.
Detangle Before Cutting
Detangling your cosplay wig before cutting is a critical step that prevents fiber damage and guarantees clean, even cuts. Implement these wig detangling techniques systematically:
- Start detangling from the ends, gradually working upward toward the roots to avoid stressing synthetic fibers.
- Use a wide-tooth comb for initial passes, then shift to a fine-tooth comb for precision detangling.
- Apply a light silicone spray to lubricate stubborn tangles without saturating the fibers.
- Establish a maintenance schedule, detangling before every styling session to preserve fiber integrity long-term.
Never yank or force the comb through knots—you’ll permanently stretch or break individual strands.
Work methodically through small sections, ensuring each area is completely smooth before you pick up your shears.
Trim Gradually, Check Progress
Once your wig is fully detangled and smooth, you’re ready to cut—but resist the urge to remove large chunks of fiber at once. Gradual cutting methods protect the wig’s integrity and prevent irreversible mistakes.
Start with small, deliberate snips using sharp shears, then pause to assess the shape before continuing.
Wig trimming techniques work best when you’re constantly cross-checking both sides for symmetry and balance. Work in sections, alternating between areas to maintain an even silhouette.
After each cut, step back and evaluate the overall form against your character reference.
How to Combine Multiple Wigs for Complex Anime Hairstyles
Some of the most iconic anime hairstyles demand more than a single wig can offer, so combining multiple wigs lets you achieve complex layering and multi-tonal color blending that would otherwise be impossible.
Mastering wig layering techniques and color blending strategies requires methodical execution:
- Base layer first — secure your primary wig completely before attaching secondary pieces.
- Match fiber types — blend synthetic grades consistently to prevent texture mismatches under lighting.
- Trim attachment points — cut lace or wefts precisely where layers intersect for seamless integration.
- Pin strategically — anchor secondary wigs through the base wig’s cap using long bobby pins.
Use Got2b Glued gel at connection points to unify layers, then freeze-spray the entire construction for maximum structural integrity.
Frequently Asked Questions
How Do You Store an Anime Cosplay Wig Between Conventions?
Store your wig on a wig head to maintain its shape. You’ll extend its life using these wig storage techniques and wig maintenance tips: keep it dust-free, avoid heat, and detangle fibers carefully before storing.
Can Synthetic Anime Wigs Be Safely Dyed a Different Color?
Like medieval alchemists transforming base metals, you can’t safely dye synthetic wigs with standard dye types. Instead, you’ll use alcohol-based ink coloring techniques, which bond effectively to synthetic fibers without damaging them.
How Do You Remove Wig Glue Residue From Your Skin?
Use an oil-based remover or rubbing alcohol for effective wig adhesive removal. Apply gently, let it dissolve the residue, then cleanse thoroughly for proper skin care. You’ll maintain healthy skin while keeping your cosplay prep seamless.
What Is the Average Lifespan of a Cosplay Wig?
With proper wig maintenance tips and wig styling techniques, you’ll extend your cosplay wig’s lifespan to 2-5 years. Store it carefully, detangle gently, and avoid excessive heat to maximize durability and performance.
Are There Specific Wig Brands Recommended for Beginners Starting Cosplay?
Like a blank canvas awaiting a masterpiece, brands like Arda and EpicCosplay are your best starting points. They’re perfect for beginner wig care and wig styling techniques, offering quality fibers you’ll easily manipulate for stunning anime transformations.
References
- https://www.youtube.com/watch?v=I3Pn3aOdgtE
- https://www.youtube.com/watch?v=XgMyqx_KQ1w
- https://morojowig.com/blogs/news/mastering-the-art-of-cosplay-wig-styling-your-ultimate-guide
- https://www.thepopverse.com/cosplay-wig-wigs-cheap-tips-tricks
- https://www.youtube.com/watch?v=VmkpILwW7xA
- https://www.epiccosplay.com/pages/wigs
- https://wigs101.com/10-tips-for-wig-noobs