To build DIY centaur hooves that actually work, you’ll need a half-inch PVC skeleton with flattened, drilled ends at each joint. Wrap chicken wire around the frame, apply aerosol insulation foam, then carve it into muscle contours. Heat-form larger PVC sections for hoof shells, adding rubber grip strips underneath. Connect rear leg motion with fishing line for natural movement. Stretch faux fur over quilt batting to finish the look. There’s much more to each step that’ll transform your build entirely.
Key Takeaways
- Build a rigid skeleton using half-inch PVC pipe with flattened ends for swing joints at the knee and ankle.
- Wrap chicken wire around the PVC skeleton, apply aerosol foam, then carve muscle contours with a serrated blade.
- Bolt knee and ankle joints loosely with 10-24 machine screws and nylock nuts to allow natural hoof movement.
- Heat-form large PVC pipe sections for hoof curvature, adding rubber grip strips underneath for traction and stability.
- Stretch faux fur over quilt batting, securing edges with contact cement, and trim clearance zones around hinges to prevent stalls.
Build the Centaur Hoof Skeleton With PVC and Bolts
Half-inch PVC pipe forms the backbone of your centaur hoof build, giving you a rigid yet workable skeleton to shape around your leg. Your PVC pipe selection determines how well the structure holds alignment under repeated motion stress.
Cut and flatten PVC ends before drilling them together to create functional swing joints at the knee and ankle positions.
Use 5-inch by 1/4-inch carriage bolts to anchor lawnmower-wheel tires as hoof bases, drilling precise entry points to maintain symmetry.
For moving joints, install 10-24 by 1½ machine screws with nylock nuts, keeping bolt tension adjustment loose enough to allow natural hoof swing without producing wobble.
This skeleton-first approach locks in your geometry before any bulk or fur gets added.
Build Out the Leg Shape With Foam and Chicken Wire
Wrap chicken wire around your PVC skeleton to rough out the leg’s three-dimensional volume before any foam touches the frame. Bend and crimp the wire tightly against each bone segment, shaping the thigh’s bulge and the lower leg’s taper with your hands.
Once the armature feels structurally accurate, apply spray-on expansion foam types—specifically closed-cell aerosol insulation—in controlled bursts over the chicken wire surface. Let each layer cure fully before adding the next.
After curing, carve the hardened foam with a serrated blade, refining organic muscle contours and smoothing transitions between joints. Position thicker foam on the outer lower leg and thinner foam along inner joint areas to maintain clearance.
Finish with a quilt batting layer to soften any remaining irregularities before applying faux fur.
Add Centaur Hoof Joints That Bend and Move Naturally
Drill flattened PVC ends at each joint location—knee and ankle—then bolt them together loosely with a 10-24 × 1½ machine screw and a nylock nut, leaving just enough tension to let the hoof segment swing freely without flopping.
This calibrated joint flexibility mimics genuine equine mechanics without overcomplicating the build.
For the rear legs, thread fishing line from your wearer’s calf through a guide point on the frame, connecting it to the opposite rear leg. As your real leg lifts, the linked leg mirrors that motion, producing natural motion that reads convincingly from any viewing angle.
Add accordion-cut foam around each hinge point to prevent segment collision during compression.
Keep fasteners accessible so you can fine-tune tension mid-build rather than dismantling the entire structure later.
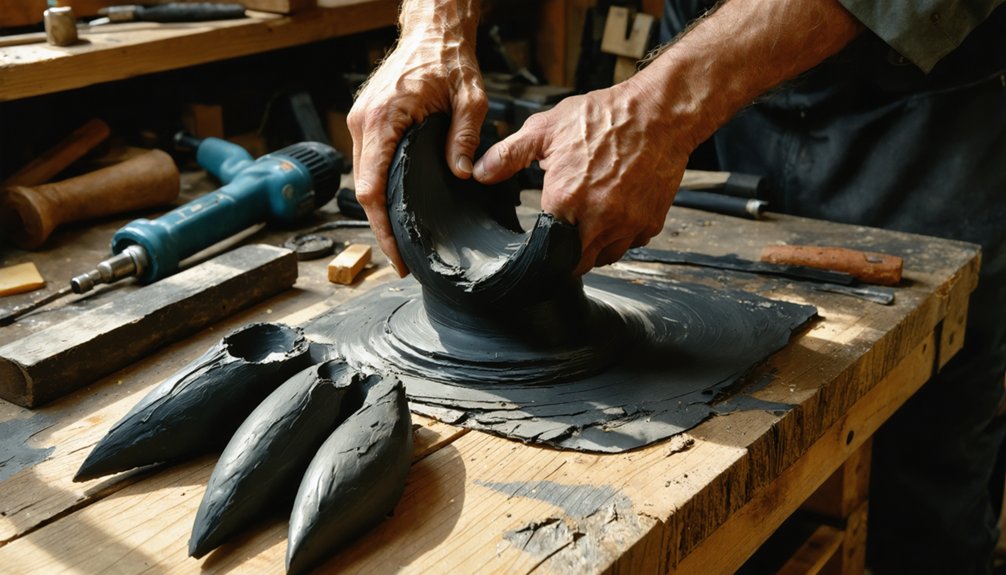
Build a Hoof Shell With the Right Shape, Sound, and Grip
The hoof shell is where your build shifts from mechanical skeleton to convincing equine silhouette, so material and method both matter here.
Heat-form large PVC pipe sections into realistic curvature that mimics natural hoof angles. Once shaped, sand and prime the surface finishes for clean hoof aesthetics that photograph and perform well under stage lighting.
Heat-formed PVC captures authentic hoof curvature, while sanding and priming deliver polished aesthetics built for stage and camera.
For sound amplification, mount a wood insert inside the base — hollow space resonates satisfyingly against hard floors. Apply rubber grip strips or textured traction materials to the underside, balancing floor contact with authentic clopping acoustics.
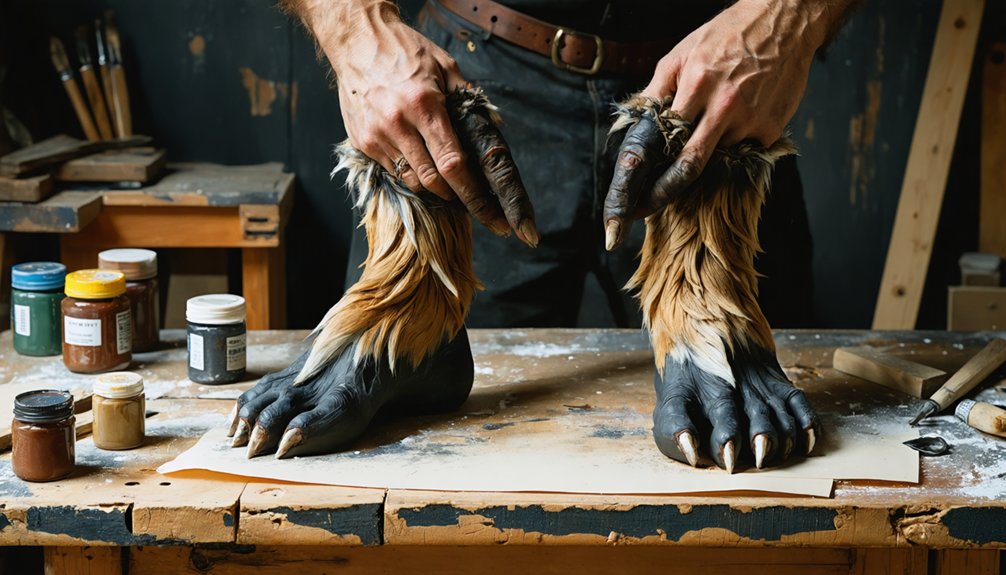
Consider weight distribution carefully; rear hooves benefit from slight ballast to prevent dragging and sliding. Layer faux fur over seams last, unifying your mechanical framework into a seamless, performance-ready hoof.
Cover the Frame With Faux Fur and Fix Common Movement Problems
Once your hoof shell holds its shape, grips the floor, and clanks with satisfying resonance, it’s time to hide every bolt, seam, and foam edge beneath faux fur. Stretch the fur over quilt batting first, letting the batting absorb irregular foam surfaces before the outer layer commits.
Use contact cement along structural edges and hand-stitch seams where glue alone would crack under repeated flexion.
For movement troubleshooting, test each joint through a full walking cycle before final faux fur attachment. Friction between compressing foam segments causes the most common stall points, so trim clearance zones around every hinge.
If the rear leg drags instead of lifting, re-tension your fishing line linkage. Tight hardware kills swing, so back off nylock nuts until each segment moves freely but without wobble.
Frequently Asked Questions
How Long Does a Complete DIY Centaur Hoof Build Typically Take?
You’ll typically spend 20–40 hours mastering construction techniques across your full build. Sourcing hoof materials, shaping PVC, carving foam, and finishing fur layers each demand focused time, so you’re investing serious creative and technical effort.
What Is the Approximate Total Cost of Building Centaur Hooves?
Costs vary, but you’ll typically spend $50–$150. Your cost breakdown hinges on material selection—PVC, foam, faux fur, and hardware drive most expenses. Sourcing secondhand or bulk materials can slash your total considerably.
Can Centaur Hooves Be Safely Worn Outdoors on Uneven Terrain?
You can wear centaur hooves outdoors, but you’ll need careful terrain considerations and safety precautions. Add rubber grips, weighted bases, and test mobility on uneven surfaces before committing to challenging outdoor environments.
How Do You Store or Transport Finished Centaur Hooves Without Damage?
Store your finished hooves using padded bags as storage solutions, wrapping joints individually to prevent stress fractures. For transport methods, you’ll want rigid containers with foam inserts that cradle PVC structures securely without compressing articulated hinge points.
Are Centaur Hooves Adjustable if Your Shoe Size Changes or Varies?
You can engineer size adjustments into your hoof base using loosened nylock nuts and slotted PVC joints, letting you tackle fitting challenges creatively whenever your shoe size shifts without rebuilding the entire structure.
References
- https://www.instructables.com/Creating-a-Walking-Centaur/
- https://www.youtube.com/watch?v=z9bUUg89-Kc
- http://blog.trilemma.com/2010/08/centaur-details.html
- https://www.tiktok.com/discover/centaur-hooves-diy
- https://www.facebook.com/groups/leonardoaigroup/posts/2111132089272603/
- https://www.lemon8-app.com/@katezade/7462389661185458731?region=us
- https://www.tiktok.com/@lightningcosplay/video/7609717094615207190
- https://www.tiktok.com/@katezade/video/7150346948724182318
- https://www.reddit.com/r/CosplayHelp/comments/vdy8ab/how_to_make_a_centaur_body_possible_centaurworld/
- https://www.pinterest.com/ideas/centaur-cosplay-diy/898464734400/