To build an Iron Man cosplay suit, you’ll start by choosing your core material—EVA foam, resin, or 3D-printed components—then map precise body measurements across each armor zone. Cut or print every piece to fit, seal and sand surfaces smooth, then layer metallic paints for that signature finish. You can wire in LED eyes and an arc reactor for full effect. Stick around and you’ll uncover every technical step in detail.
Key Takeaways
- Choose your material—EVA foam for beginners, resin for detail, or 3D printing for full customization—based on skill level and budget.
- Take precise body measurements in millimeters and divide the suit into modular zones: helmet, chest, back, arms, legs, and hands.
- Use cardboard mockups for test fitting before cutting final materials, ensuring full range of motion and proper alignment.
- Seal foam with Plasti-Dip, sand progressively up to 2000 grit, then apply layered metallic paint and UV-resistant clear coat.
- Wire LED eyes and an arc reactor using a 5V USB power bank, then weatherize with rust tones and matte sealant.
Choose Your Iron Man Suit Materials: Foam, Resin, or 3D Prints
Before you cut a single piece or fire up a print job, you’ll need to decide which material best suits your build goals, budget, and skill level. Each option carries distinct trade-offs across weight comparison, cost efficiency, and customization potential.
EVA foam offers excellent foam durability, flexibility options, and beginner-friendly assembly techniques. It’s lightweight, affordable, and shapeable with basic heat tools. However, texture differences limit its fine-detail reproduction.
EVA foam is beginner-friendly, lightweight, and affordable — but fine-detail reproduction remains its biggest limitation.
Resin advantages shine in precision work. Cast urethane delivers flexible joint sections, while resin-printed components preserve intricate surface detail beautifully.
3D printing reveals the broadest material selection, letting you dial in wall thickness, infill, and structural integrity per segment. ABS and resin each serve distinct armor zones, giving your build engineering-level customization potential without sacrificing visual accuracy.
Map Your Iron Man Suit Segments to Your Body Before Building
Before cutting a single piece of foam or queuing a print, you’ll need accurate body measurements across your chest, shoulders, arms, waist, hips, and legs to establish a reliable sizing baseline.
Divide your body into distinct armor zones—helmet, chest, back plate, pauldrons, gauntlets, abdominals, thighs, shins, and boots—treating each segment as an independent structural unit with its own fit requirements.
Once you’ve prototyped a rough segment from inexpensive foam or cardboard, test-fit it against your actual body to catch clearance issues, range-of-motion restrictions, and proportion mismatches before committing to final materials.
Measure Your Body First
Taking accurate body measurements is the single most important step you’ll complete before cutting a single piece of foam or queuing your first print. Your custom measurements directly determine how well each segment honors your body proportions while maintaining screen-accurate silhouette.
Measure these three critical reference points:
- Chest circumference — captures your broadest point, anchoring the entire torso assembly’s scale.
- Shoulder-to-hip length — defines vertical armor distribution, preventing that awkward floating breastplate effect.
- Limb segment lengths — locks in arm and leg panel sizing so joints actually bend where your joints bend.
Record everything in millimeters for precision. Transfer measurements onto a scaled body diagram before touching any material.
Skipping this step guarantees ill-fitting armor that no amount of strapping or padding will ever fully correct.
Divide Into Armor Zones
Mapping your suit across 6 distinct armor zones transforms a chaotic pile of panels into a structured build system you can tackle methodically.
Define each zone — helmet, chest, back, arms, legs, and hands — as an independent module with its own attachment logic and design aesthetics. This segmentation enables precise armor zone customization, letting you prioritize high-visibility areas like the chest reactor and helmet faceplate while scaling complexity elsewhere.
Assign materials per zone based on flexibility needs. Use rigid 3D-printed ABS for the chest and back, EVA foam for limbs requiring movement, and cast urethane for glove sections.
Mark boundary points on your body measurements from the previous step, ensuring each zone boundary aligns with natural joint articulation. Modular thinking now prevents structural conflicts during final assembly.
Test Fit Each Segment
Every segment you’ve defined across your 6 armor zones needs a physical test fit against your body before a single layer of foam gets cut or a print job gets queued.
Use masking tape and cardboard mockups as your test fit techniques to simulate each segment’s volume, curvature, and clearance.
Mark pressure points immediately. Make fitting adjustments at joint boundaries where mobility suffers most — shoulders, elbows, and knees demand precision tolerance.
Here’s what accurate test fitting protects:
- Your build timeline — catching misalignment early eliminates costly reprints and wasted foam sheets.
- Your range of motion — segments that bind kill the illusion instantly.
- Your structural integrity — improperly fitted pieces shift under stress, compromising the entire suit’s cohesion.
Fit first. Build second. No exceptions.
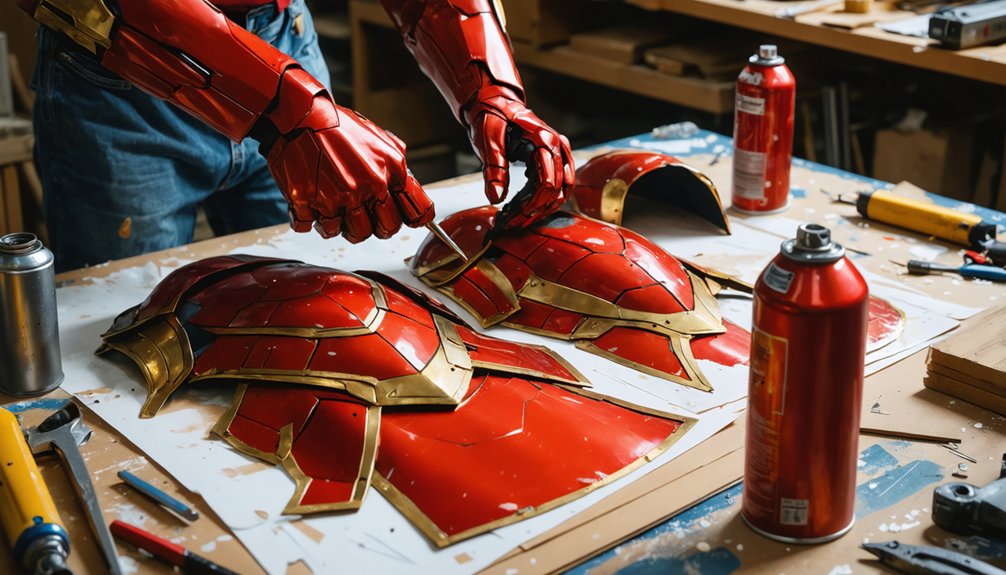
Cut and Print Every Iron Man Armor Piece to Your Measurements
With your body measurements locked in, you’re ready to transfer those dimensions onto EVA foam sheets and begin cutting each armor segment with precision.
Score your foam using a sharp utility knife guided by printed paper templates, keeping cuts clean and edges flush so pieces align seamlessly during assembly.
For complex structural components like the chest plate or helmet, export your measurements into STL files and configure wall thickness at 3–4 layers with an infill between 5% and 50% before sending them to your 3D printer.
Measuring Your Body Accurately
Accurate body measurements are the foundation of a well-fitted Iron Man suit, so grab a flexible tailor’s tape and start with your chest circumference, waist, hips, shoulder width, and limb lengths.
Precise body measurement techniques eliminate costly reprints and uncomfortable fits.
Apply these accurate sizing methods strategically:
- Measure twice, cut once — document every dimension in a spreadsheet to cross-reference against your armor templates before committing to materials.
- Add 5–10mm clearance — account for compression suit thickness and internal padding when scaling STL files or foam templates.
- Test with a mannequin — transfer your measurements onto a dress form to simulate real-world fit before final fabrication begins.
Every millimeter matters when you’re building a legendary suit of armor.
Cutting Foam Armor Pieces
Once your measurements are locked in, it’s time to translate those numbers into physical armor by cutting foam with precision and intent. Transfer your scaled templates onto EVA foam using a marker, then cut along traced lines with a sharp utility knife held perpendicular to the surface.
Consistent blade angle is critical — wandering cuts compromise edge alignment during assembly.
Apply these foam cutting techniques methodically: score deep channels before separating pieces, and use a heat gun to shape curves across chest and shoulder segments. These armor design tips prevent cracking and improve surface conformity to your body contours.
Label every piece immediately after cutting. Cross-reference each segment against your measurement chart before moving forward, ensuring dimensional accuracy carries through into the assembly phase.
Printing Custom 3D Components
Custom 3D components let you push Iron Man’s accuracy beyond what foam alone can achieve. Applying smart 3D Printing Techniques and careful Material Selection transforms raw digital files into wearable precision hardware.
Source STL files from repositories like Wireframe, then calibrate your printer settings before committing to full-scale prints:
- Wall thickness — Set 3–4 perimeter layers so chest and back panels survive real-world stress without cracking.
- Infill density — Run 15–50% infill depending on structural demand; arc reactors need resin for translucent clarity.
- Post-processing — Sand progressively from 80 to 2000 grit, prime, and coat every surface for hardness that holds paint flawlessly.
These decisions directly determine whether your suit looks like a prop or a masterpiece.
Build an Iron Man Helmet With a Working Hinged Faceplate
The helmet is the crown jewel of any Iron Man build, and getting the hinged faceplate right sets the tone for the entire suit.
Start with a low-profile mechanical hinge system mounted at the cheekbone line, allowing smooth upward rotation that mirrors the film’s motion. Use free online templates to cut foam or print rigid ABS components for a precise shell fit.
For eye illumination, mount low-voltage LEDs behind fogged acrylic diffusers, which scatter light evenly for that signature glow. Secure wiring internally through channels routed along the helmet’s inner walls.
Test your hinged mechanics repeatedly before sealing. The faceplate should snap cleanly into both open and closed positions without binding.
Final sealing with hot glue eliminates gaps and keeps every edge sharp.
Seal and Sand Your Iron Man Suit to a Paint-Ready Finish
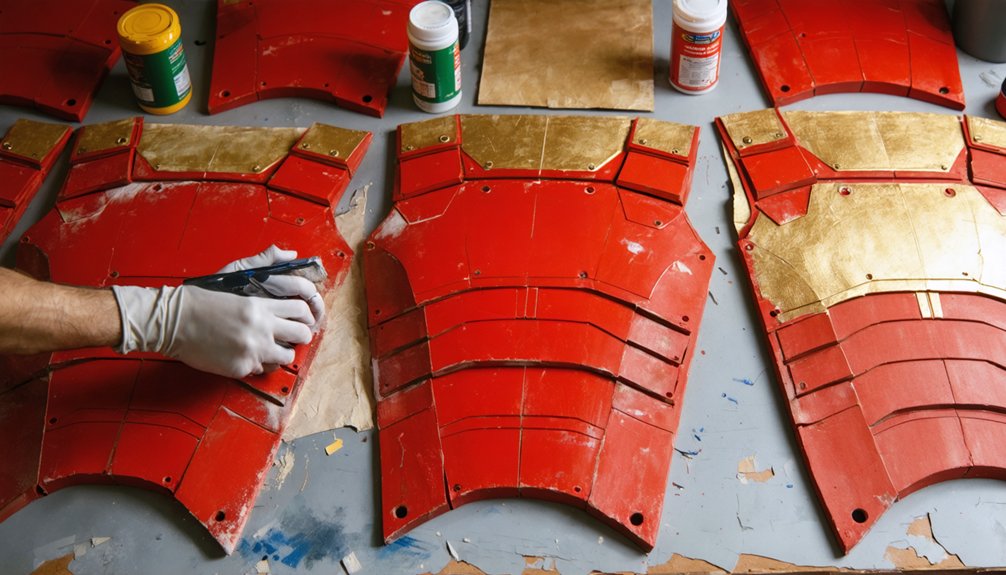
Before you touch a drop of paint, seal every foam surface with a brush-on or spray-on contact cement, Plasti-Dip, or Mod Podge layer to close the porous cells and prevent paint absorption.
Once sealed, work through progressive sanding grits—starting at 80 to knock down rough texture, stepping through 220, 400, and 800, then finishing at 1500–2000 for a glassy surface ready for primer.
For a true mirror finish on 3D-printed sections, alternate between filler primer coats and wet sanding at 2000 grit until all layer lines disappear and the surface reflects light evenly.
Sealing Foam Before Priming
Sealing foam before priming is one of those steps that separates a polished Iron Man suit from a rough, paint-absorbing mess.
Without proper foam sealing techniques, your primer soaks straight in, wasting material and killing surface clarity.
Follow this sequence precisely:
- Apply 2–3 thin coats of Plasti-Dip or white glue — let each layer cure fully before adding the next.
- Sand lightly between coats using 220-grit to eliminate raised texture and micro-bubbles.
- Finish with a dedicated surface primer — primer application methods like airbrushing deliver smoother, more uniform adhesion than rattle cans.
You’re not just sealing foam — you’re engineering a foundation.
Every coat builds structural integrity, ensuring your metallic red and gold layers bond flawlessly to every contoured surface.
Progressive Sanding Grits Explained
Progressive sanding transforms a sealed foam or 3D-printed surface from rough and uneven to mirror-smooth, and skipping grits is where most builders quietly ruin their finish.
Your sanding techniques determine whether paint adheres flawlessly or peels under stress.
Start with 80-grit to flatten high spots and remove print lines aggressively. Move to 120-grit to erase those deep scratches, then step through 220, 400, and 800 progressively.
Each stage refines what the previous grit left behind.
Smart grit selection means never jumping from 80 straight to 400 — you’ll trap micro-scratches under your primer layers.
Wet sanding from 1000 to 2000-grit delivers that paint-ready surface where metallic red and gold truly bond.
Patience here directly determines your final finish quality.
Achieving A Mirror Finish
A mirror finish isn’t luck — it’s a sequence you execute correctly. After sealing your foam or printed surface, work through your polishing materials with intention.
- Wet-sand at 1500 grit — eliminate every visible scratch line before moving forward.
- Step to 2000 grit — refine the surface until light reflects uniformly across each panel.
- Apply polishing compound — use circular pressure with a microfiber cloth until the armor gleams.
These mirror finish techniques demand patience, but the payoff transforms flat paint into liquid metal.
You’re not just cosplaying Iron Man — you’re engineering a wearable sculpture.
Don’t rush the compound stage. Let the chemistry work. Each buffed panel should reflect your face back at you with near-perfect clarity.
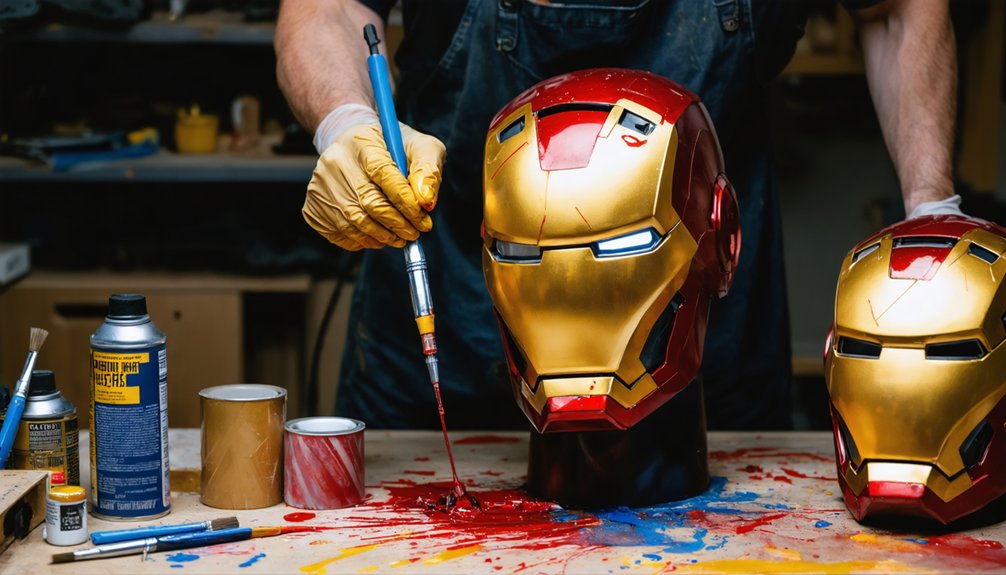
Paint the Red and Gold Finish on Your Iron Man Suit Like a Pro
Before you pick up a single paintbrush, prep your foam or 3D-printed surfaces by sealing them with a quality primer — skipping this step causes paint to crack and peel within hours.
Apply metallic red using layered paint techniques, building depth through color blending from dark crimson base coats to vibrant mid-tones. Use additive effects like chrome powder or metallic flakes to enhance surface textures and maximize light reflections across curved panels.
Gold sections demand thin, even coats — rushing creates streaks that kill the illusion. Once satisfied with your finishing touches, lock everything in with UV-resistant protective coatings that dramatically extend paint durability through convention wear and transport.
Two clear coat layers minimum guarantees your suit survives repeated handling without compromising that hard-earned, professional-grade finish.
Weather Your Iron Man Suit for a Battle-Worn Look
Weathering transforms your Iron Man suit from a pristine prop into a credible piece of battle-hardened technology, and it’s where your build gains real character.
Weathering is where your Iron Man build stops looking like a prop and starts feeling like a weapon.
Apply these battle damage techniques strategically:
- Paint wear simulation and surface scuffing methods — Drag sandpaper across raised edges, then use a chrome pen to expose raw metal beneath chipped paint layers.
- Weathering wash techniques and grime application tips — Thin dark brown acrylic heavily, flood panel recesses, then wipe back with a dry cloth to simulate accumulated combat grime.
- Rust effects application and color fading methods — Stipple orange-brown tones near joints while distressing foam armor with heat tools, creating oxidized surface tension and UV-faded color gradients across broader panels.
Seal everything with a matte clear coat to lock in your battle-worn authenticity.
Wire the Arc Reactor and LED Eyes Into Your Iron Man Suit

Lighting transforms your Iron Man suit from painted plastic into something that feels genuinely powered, and wiring the arc reactor and LED eyes is where that shift happens.
Use a 5V USB power bank tucked inside the chest cavity to drive both systems cleanly.
For LED placement, mount low-voltage LEDs behind frosted acrylic diffusers inside the helmet’s eye cavities to achieve that signature glowing effect.
Resin-printed arc reactors preserve translucent clarity, so position your LEDs centrally behind them for even light distribution.
Your wiring techniques matter here — run thin gauge wire through drilled channels inside the armor segments to keep everything hidden and tangle-free.
Secure connections with heat shrink tubing, test every circuit before final assembly, and use a simple toggle switch for easy on/off control.
Strap and Fit Every Iron Man Armor Piece So It Stays Put
Once your armor looks the part, keeping it locked to your body during movement is what separates a functional suit from a frustrating one. Use adjustable nylon straps, Velcro, and hidden magnets strategically across every segment for maximum strap comfort without bulk.
Follow these critical fit adjustments before finalizing your suit:
- Test every piece on your body, not a dummy — dynamic movement reveals pressure points static fitting misses entirely.
- Layer internal foam padding inside chest and back plates to eliminate painful shifting during extended wear.
- Seal all strap anchor points with reinforced hot glue to prevent catastrophic detachment mid-convention.
A compression suit worn underneath unifies every segment, concealing gaps while reducing friction.
Modular fastening guarantees quick disassembly without compromising structural integrity during transport or emergency removal.
Pack and Transport Your Iron Man Suit Without Damage
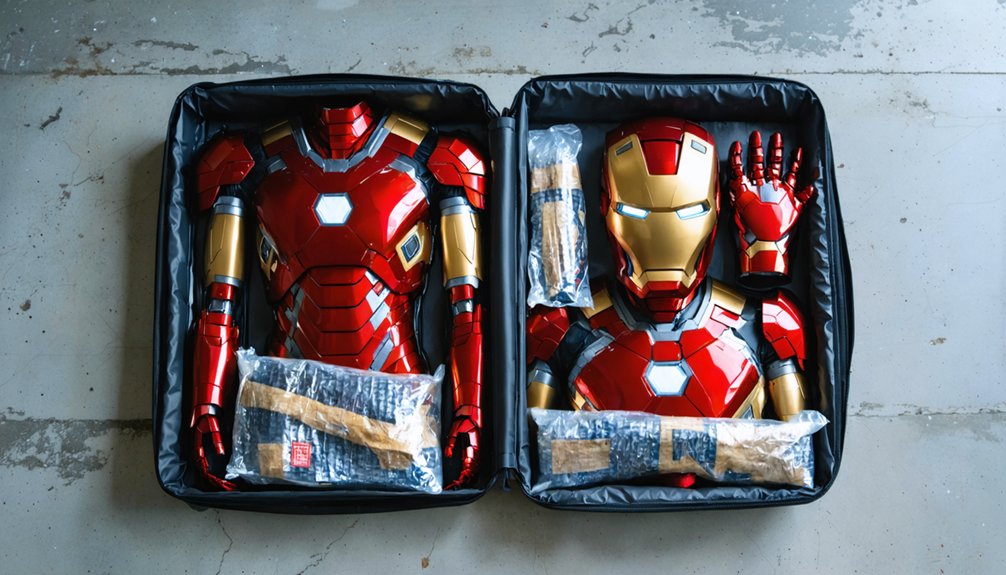
Getting your suit to the convention in one piece demands the same attention you gave strapping it to your body. Your modular design already works in your favor — disassemble each segment systematically and catalog every piece before packing.
Disassemble systematically, catalog every piece — your modular design makes safe transport as disciplined as suiting up.
Use foam-lined cases or custom-cut polyethylene inserts as your primary storage solutions, ensuring zero contact between painted surfaces. Wrap delicate components like the arc reactor and faceplate individually in anti-scratch microfiber cloth.
Stack heavier chest and back plates flat, never upright, to prevent warping.
For transport methods, hard-shell rolling cases outperform duffel bags every time. Label compartments clearly for fast reassembly on-site.
Consistent suit maintenance starts here — proper packing techniques and disciplined damage prevention protocols protect your build long after the convention ends.
Frequently Asked Questions
How Long Does It Take to Build a Full Iron Man Suit?
Time flies when you’re building, but expect 3–6 months to complete your suit. Your suit materials and design techniques—from 3D printing to foam crafting—directly impact the timeline, so plan meticulously for stunning results.
How Much Does Building an Iron Man Cosplay Suit Typically Cost?
You’ll typically spend $300–$1,500, depending on your materials sourcing strategy and budget breakdown. EVA foam keeps costs low, while 3D printing, resins, LEDs, and premium paints push your investment toward professional-grade innovation.
Can Beginners Build an Iron Man Suit Without Prior Crafting Experience?
You can absolutely start building with zero experience! Use beginner tips like foam templates and free STL files as crafting resources. You’ll develop skills progressively through sketching, test-fitting, and experimenting with EVA foam and basic painting techniques.
What Tools Are Absolutely Essential Before Starting an Iron Man Suit?
Like a knight before battle, you’ll need a foam cutter, 3D printing setup, soldering iron for LED lighting, sandpaper for paint techniques, strong adhesives for armor materials, and precision tools for assembly tips.
Are There Any Safety Concerns When Wearing an Iron Man Suit?
You’ll face real safety concerns: poor suit ventilation causes overheating, weight distribution strains your body, mobility restrictions limit movement, and visibility issues impair sightlines. Address each systematically using internal padding, modular segments, and strategic LED placement.
References
- https://www.instructables.com/Iron-Man/
- https://www.youtube.com/watch?v=WeA1-G8nrpI
- https://www.youtube.com/watch?v=PanFbHleM-s
- https://www.youtube.com/watch?v=q_oGDY5_n8Y
- https://www.youtube.com/watch?v=xAY7kCuOSvI
- https://www.youtube.com/watch?v=BsScbDG2Tqo
- https://www.youtube.com/watch?v=NQqjLEZouHs
- https://www.youtube.com/watch?v=ijoaidw6f2Q
- https://www.youtube.com/watch?v=uD4XGMB3oNs
- https://www.youtube.com/watch?v=wQJgdjZWy_k