Your cosplay glam starts long before anyone sees your costume—it begins with strategic undergarments, intentional fabric choices, and a clean, pressed base. You’ll want to weather your props for authenticity, layer textures for visual depth, and use makeup to sharpen your character’s defining features. Reactive fabrics and LED lighting make you pulse with energy under convention lights. Every deliberate detail you add transforms a costume into a truly unforgettable character, and there’s so much more to uncover.
Key Takeaways
- Strategic undergarment selection, including shapewear and dance tights, smooths your silhouette and builds confidence before any costume styling begins.
- Choosing the right build materials, like EVA foam, Worbla, or 3D printing, ensures durable, precise, and visually impressive costume props.
- Weathering techniques such as dry brushing, dark washes, and edge highlighting transform polished props into authentic, battle-worn masterpieces.
- Mixing contrasting fabrics with sheer overlays, frayed edges, and texture pastes adds compelling visual depth and dimension to costumes.
- Embedding LED strips, motion sensors, and reactive fabrics creates dynamic, eye-catching lighting effects that bring cosplay characters dramatically to life.
Shape Your Cosplay Silhouette With the Right Undergarments
Beneath every polished cosplay is a foundation that most people never see but always feel in the final result.
Strategic undergarment selection transforms how fabric drapes, moves, and reads from across a convention floor. Shapewear smooths uneven lines under fitted pieces, giving your silhouette enhancement the clean architecture that expensive materials alone can’t deliver.
Dance tights reduce friction during long event days while visually refining leg appearance beneath shorter hemlines. Height-boosting insoles subtly shift your proportions closer to a taller character’s frame without sacrificing mobility.
Each invisible layer works quietly beneath your costume’s surface, reinforcing structure and confidence simultaneously.
Before you add a single accessory or style one wig fiber, build your foundation deliberately — because a strong silhouette starts long before anyone sees the costume itself.
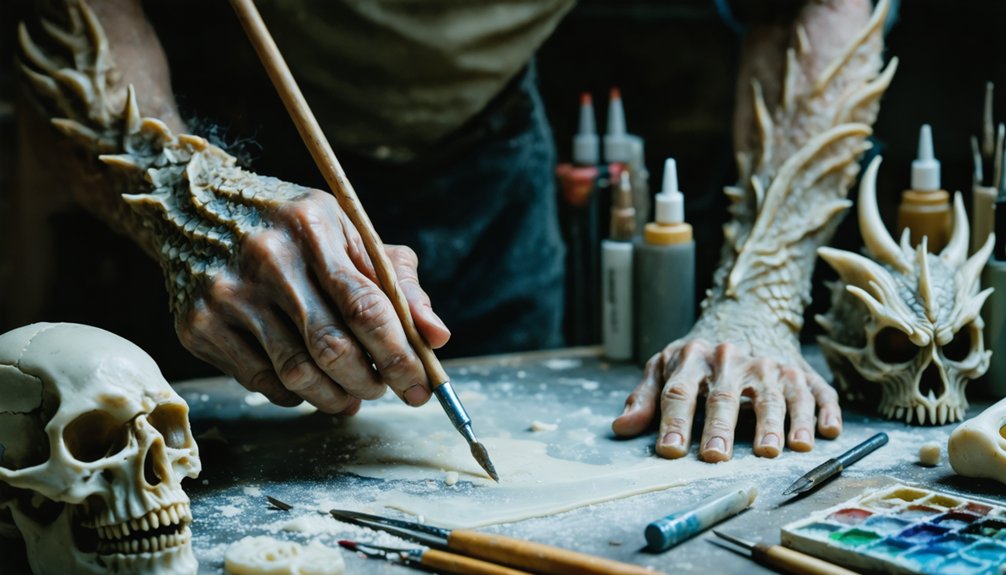
Build Cosplay Props That Look Worn and Real
Your props transform from costume-shop afterthoughts into scene-stealing statements the moment you commit to durable materials like EVA foam, Worbla, or 3D-printed components that hold their shape through a full convention day.
Once you’ve built a solid foundation, weathering techniques—dry brushing, sanding, and strategic paint layering—breathe life into surfaces that would otherwise look factory-fresh and unconvincing.
Push the illusion further by adding battle wear details like dents, scratches, and scorch marks that tell a story of hard-fought conflict before you’ve even struck a pose.
Choose Durable Build Materials
Three materials stand out as the go-to choices for cosplay prop building: EVA foam, Worbla, and 3D-printed components. Each offers distinct advantages depending on your construction methods and design goals.
Smart material selection directly impacts prop longevity, keeping your builds convention-ready season after season.
- EVA foam — lightweight, carvable, and ideal for large armor pieces requiring flexible durable materials
- Worbla — thermoplastic that bonds easily, self-adhesive when heated, perfect for intricate surface detailing
- 3D printing — delivers precision geometry and repeatable parts, elevating complex build techniques considerably
- Material layering — combining foam cores with Worbla skins creates rigid yet lightweight structures that withstand heavy convention use
Choosing intentionally means your props survive transport, photoshoots, and long wear without sacrificing visual impact.
Add Weathering And Texture
Once your props are built, weathering transforms them from polished craft projects into battle-worn relics that feel genuinely lived in. Strategic weathering techniques — dry brushing, sponge dabbing, and deliberate scratching — introduce visual storytelling that no clean finish can replicate.
You’re fundamentally writing your character’s history directly onto the surface.
Texture application takes this further. Layering acrylic paints, applying metallic rubs, or stippling with sea sponges creates dimensional depth that catches convention lighting dramatically.
Dings, rust streaks, and chipped edges signal authentic use rather than fresh-from-the-workshop perfection.
Don’t overlook subtle gradient shifts either. Darker tones pooled in recesses and lighter highlights along edges simulate real wear patterns, giving props a cinematic, museum-quality presence that genuinely elevates your entire cosplay presentation.
Layer Battle Wear Details
Four distinct layers of battle wear detail separate a convincing prop from one that simply looks painted — and building those layers intentionally is what makes the difference between cosplay and craftsmanship.
Texture contrast, realistic effects, and thoughtful fabric layering transform armor details into genuine visual storytelling.
Build character authenticity through these four intentional layers:
- Base Damage — Scratch, dent, and gouge surfaces to simulate battle damage before painting begins.
- Tonal Depth — Apply dark washes inside recesses to push layered armor details into dramatic shadow.
- Edge Highlighting — Dry-brush metallic tones along raised edges to suggest worn, exposed metal.
- Fabric Integration — Layer torn, distressed textiles beneath rigid pieces to unify costume elements through shared wear patterns.
Weather Your Armor for a Battle-Ready Finish
Pristine armor might look fresh out of the forge, but a few weathering techniques can transform it into something that tells a real story.
Start with material distressing—sand edges, dent surfaces, and scratch raised areas to suggest years of use. Layered paint effects like dry brushing with silver over dark base coats create convincing metal wear.
Add battle scarring using a heat gun or craft tools to press realistic gouges into EVA foam. Seal everything with matte finishes to kill that plastic sheen and elevate armor finishes into something cinematic.
These techniques dramatically boost prop realism and deepen character authenticity, because your hero’s armor shouldn’t look untouched. Let visual storytelling speak through every scratch, dent, and darkened edge.
Add Fabric Texture and Layering for Depth
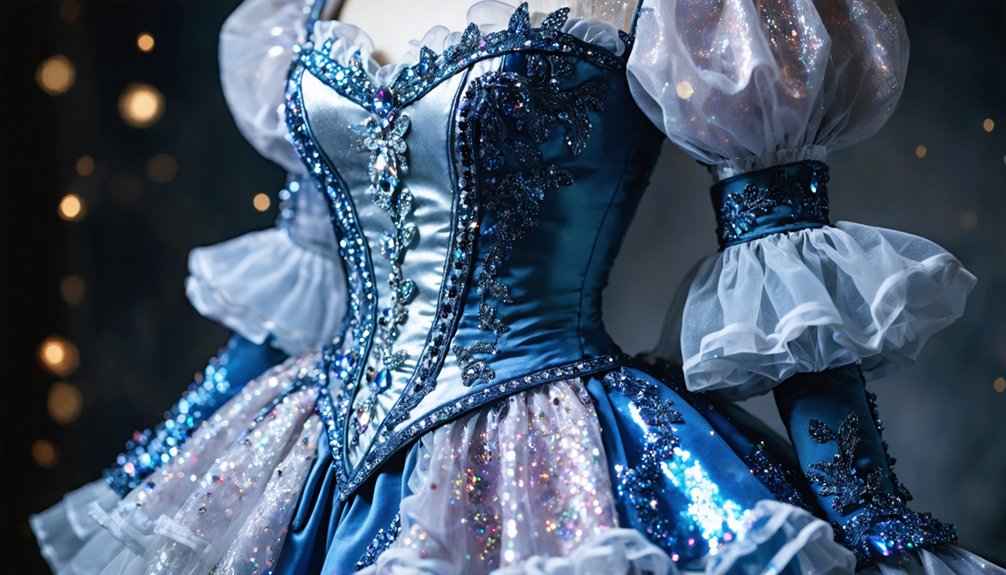
Mixing contrasting fabric types—like pairing matte cotton with glossy satin or rough burlap with smooth velvet—instantly breaks the visual monotony that makes costumes look flat and unconvincing.
You can layer materials strategically, adding sheer overlays, frayed edges, or stitched panels to build dimension that rewards close inspection and photographs beautifully.
Surface treatments like fabric paint, gel medium, or dry-brushed acrylics push the effect even further, giving your costume the kind of tactile richness that separates a polished build from a basic one.
Mix Contrasting Fabric Types
When you layer contrasting fabrics together, a costume transforms from flat and forgettable into something richly textured and visually compelling.
Strategic fabric combinations create dimension that catches light differently across surfaces, making every angle photogenic. Contrasting textures signal craftsmanship before anyone examines the details closely.
Try these powerful pairings:
- Matte velvet against glossy satin — deepens shadows while highlighting curves
- Rigid brocade beside flowing chiffon — balances structure with organic movement
- Rough burlap beneath smooth leather — creates layered, battle-worn authenticity
- Metallic mesh over solid knit — adds shimmer without sacrificing comfort or flexibility
Each combination tells a visual story.
You’re not just wearing a costume — you’re engineering an experience that rewards every closer look.
Layer Materials for Dimension
Layering materials transforms a costume from a single flat surface into something with genuine visual weight and complexity. By applying thoughtful layering techniques, you’re building aesthetic depth that rewards every glance.
Stack material combinations like structured organza over matte cotton, or sheer mesh over brocade, to generate dimensional effects that feel alive under convention lighting.
Fabric contrasts create instant visual interest — rough against smooth, opaque against translucent, rigid against fluid. These texture principles aren’t accidental; they’re deliberate layering strategies that communicate craftsmanship.
Focus your contrast details around focal points like collars, cuffs, or armor edges for maximum depth enhancement.
Each additional layer you add tells a richer story, transforming even modest designs into costumes that genuinely command attention.
Treat Surfaces for Texture
Surface treatments take your costume’s visual storytelling a step further by introducing tactile depth that no single fabric can achieve alone.
Combining texture techniques transforms flat material finishes into layered textures bursting with character and detailed craftsmanship.
- Dry-brush acrylic paint across foam or fabric to reveal raised edges and create instant visual depth.
- Apply fabric gels or texture pastes for interactive surfaces that catch light and command attention.
- Layer sheer fabrics over base materials to build tactile effects with subtle dimension and movement.
- Sand, score, or stipple surfaces on armor pieces to simulate worn, battle-tested material finishes.
These surface treatments don’t just decorate your costume—they animate it, giving every panel and seam a story worth noticing.
Start With a Clean, Pressed Costume
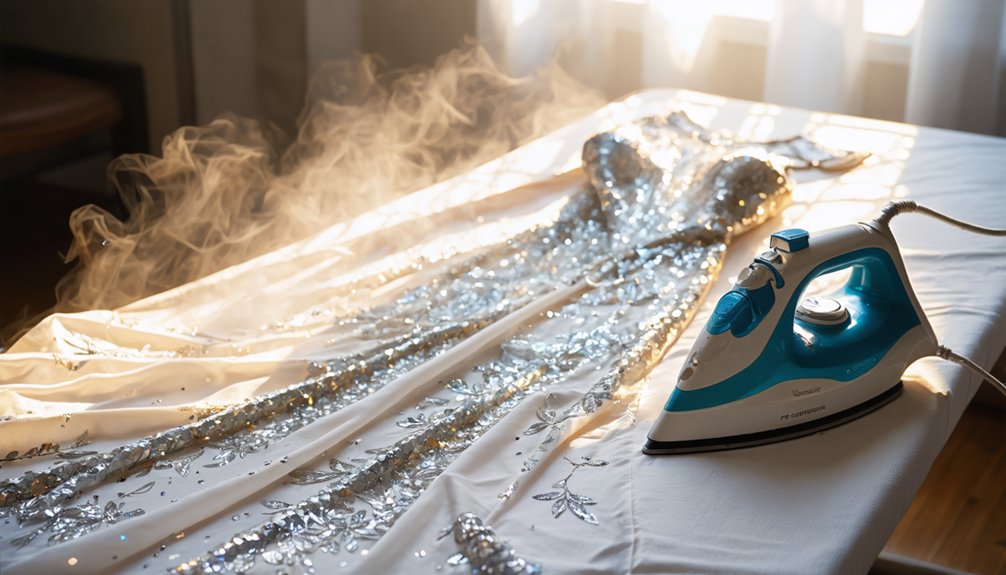
Before anything else lands on your body — no wig, no armor, no prop — your costume itself needs to look intentional. Wrinkled fabric betrays even the most ambitious character accuracy, signaling rushed preparation rather than deliberate costume care. Iron every panel, steam resistant fabrics carefully, and treat each seam like a finishing touch worth noticing.
Your fabric choices directly influence how light reads your silhouette under convention lighting, so color matching matters beyond basic coordination — it shapes character evolution on your body. Pressed costumes photograph sharper, move cleaner, and command attention effortlessly.
These styling techniques sound simple, yet they’re transformative. Convention tips rarely highlight this foundational step, but experienced cosplayers understand — a flawlessly maintained base elevates everything layered above it into something genuinely extraordinary.
Style Your Cosplay Wig to Match the Character
Once the costume itself is polished and pressed, your wig becomes the next defining factor in how convincingly you inhabit a character.
Precise wig styling techniques transform a generic hairpiece into a signature look when you reference accurate character hair references and apply smart color matching tips.
- Shape intentionally — use volume adjustment methods like teasing, pinning, and heat styling to match character silhouette alignment exactly.
- Enhance texture — explore texture enhancement options including fabric stiffeners, serums, and layered cutting.
- Integrate accessories — apply accessory integration ideas such as clips, pins, and decorative ties that strengthen design accuracy.
- Maintain consistently — build maintenance routines using gentle brushing and proper storage to preserve shape between wears.
Your wig shouldn’t just sit there — it should *perform*.
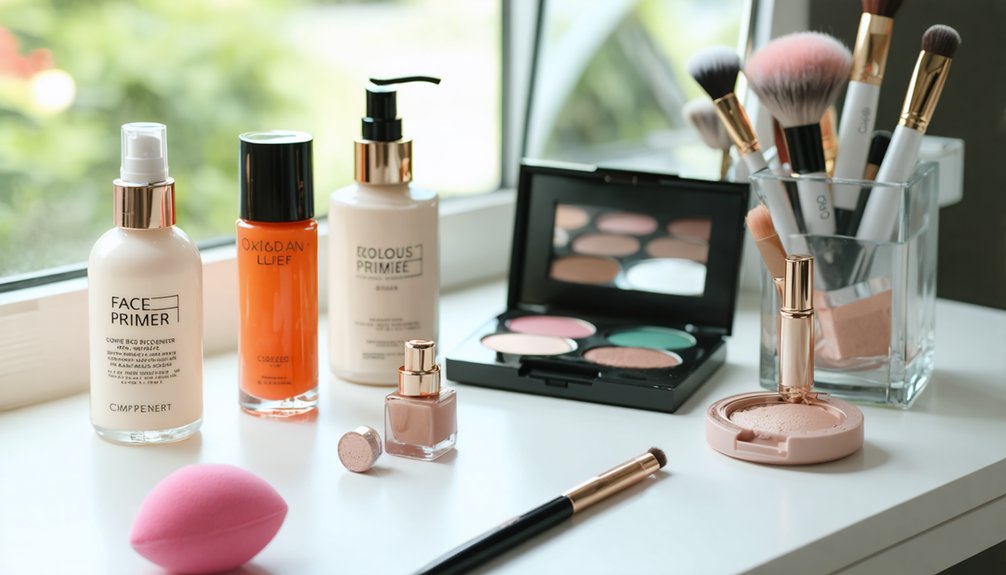
Use Makeup to Sharpen Your Cosplay Character Look
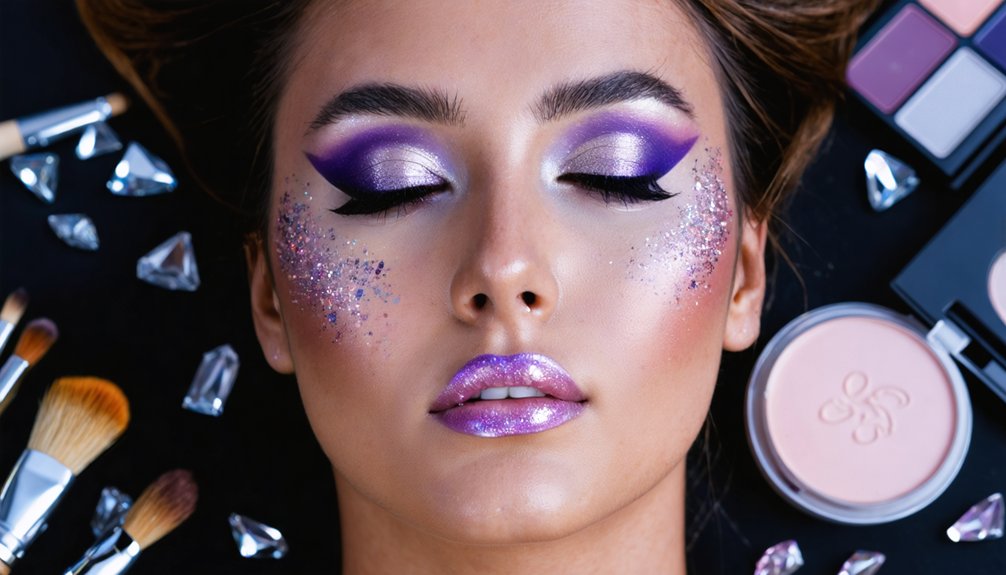
Makeup doesn’t just cover — it *constructs*. With makeup precision, you’re sculpting character likeness directly onto your face, transforming your natural features into something unmistakably cinematic.
Master contour techniques to redefine bone structure, sharpen jawlines, and reshape your nose for stronger feature enhancement. Skin smoothing creates a flawless canvas that photographs beautifully, maximizing photo visibility under harsh convention lighting.
Don’t shy away from bold colors — vibrant pigments push fantasy designs into vivid, jaw-dropping territory. Highlighting key facial points improves light reflection, making your look pop in every frame.
For warriors and combat-driven characters, lean into special effects like realistic battle details — scarring, bruising, and weathered skin textures that tell a story before you say a word.
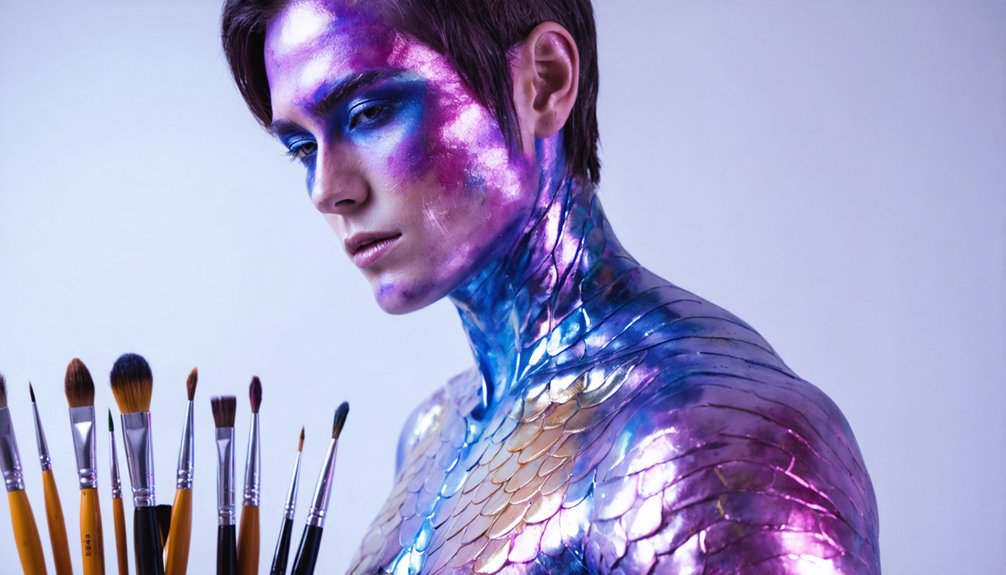
Use LED and Reactive Lighting to Stand Out on the Floor
When convention lighting hits your costume just right, the entire room notices — and with LED effects and reactive elements, you’re engineering that moment instead of leaving it to chance.
Strategic light placement transforms glowing accents from novelty into narrative, giving your character a dynamic display that breathes with movement.
Strategic light placement turns glowing accents into storytelling, giving your costume a living, breathing presence that moves with you.
- Weave reactive fabrics into panels that shift color under ambient lighting or blacklight exposure.
- Embed motion sensors into armor so color changes trigger with your gestures, creating interactive lighting that rewards onlookers.
- Layer LED strips behind translucent materials for glowing accents with genuine depth and visual impact.
- Program dynamic displays using microcontrollers that cycle through sequences, keeping your costume visually alive across every photo opportunity.
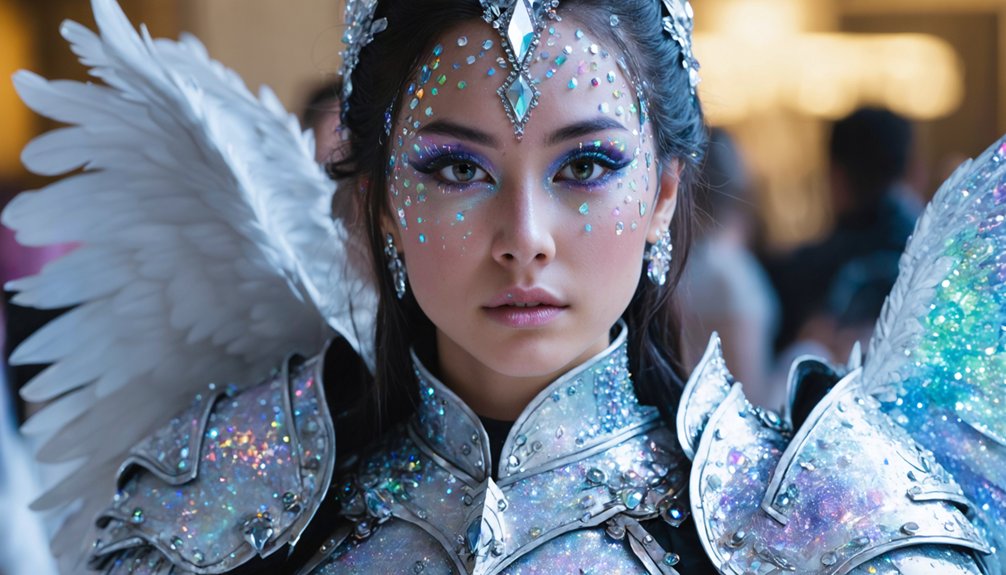
Complete Your Cosplay With Jewelry and Fine Details
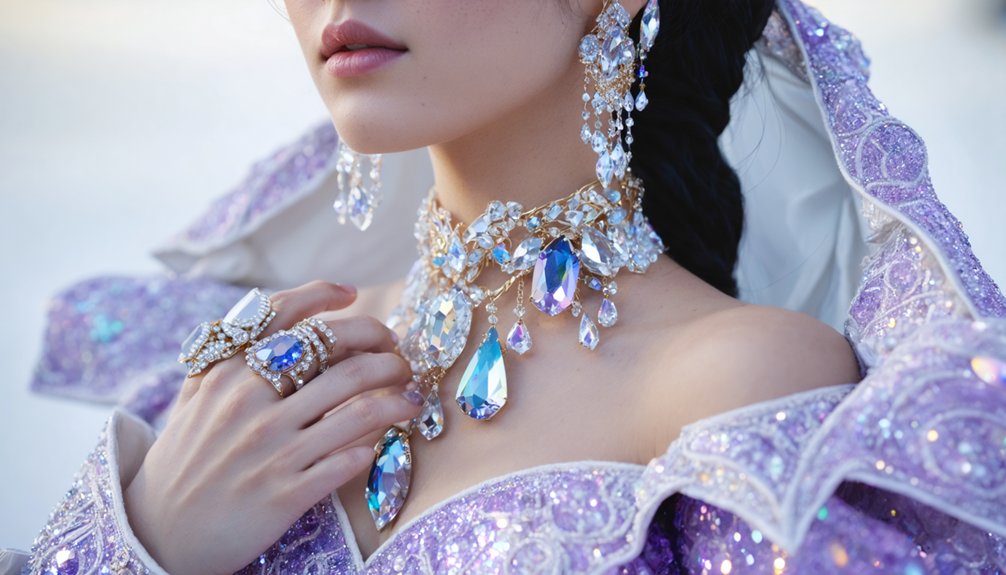
Lighting commands attention from across the room, but jewelry and fine details are what reward the eyes that come in close.
Your jewelry selection should echo your character’s world — delicate filigree for nobles, oxidized metal for warriors, iridescent beads for fantasy royalty.
Don’t underestimate detail placement; a brooch positioned at the collar or embroidered trim along a hem transforms a decent costume into something deliberate and story-rich.
Layer textures through lace overlays, beaded accents, and fine chain work to create visual depth that flat fabric simply can’t achieve.
Tiny additions — buttons, ribbon knots, painted insignias — signal that you’ve studied the source material carefully.
These finishing touches aren’t afterthoughts; they’re the proof of your craft that separates a cosplay from a costume.
Use Posture and Presence to Photograph Like a Pro
- Align your costume by standing tall — costume alignment sharpens your silhouette instantly.
- Study character embodiment through reference images, mimicking expressive poses unique to your character.
- Experiment with photo angles — slight tilts and three-quarter turns reveal powerful confidence boosters you didn’t know existed.
- Command presence techniques by controlling your facial expressions to match your character’s emotional core.
These posture tips transform static wearing into magnetic storytelling, making every frame feel cinematic rather than coincidental.
Frequently Asked Questions
How Do I Protect My Cosplay From Damage During Long Convention Days?
prioritize fabric protection by ironing, using wrinkle-resistant sprays, and packing repair kits. Stay ahead of costume maintenance by checking seams, revitalizing your wig, and maintaining good posture throughout long convention days.
What Is the Best Way to Store a Finished Cosplay After an Event?
Store your cosplay using smart cosplay preservation techniques: hang garments on padded hangers, box props in acid-free tissue, and explore creative storage solutions like climate-controlled spaces to keep every stunning detail convention-ready for your next glorious appearance!
Can Beginners Compete in Cosplay Contests Without Professional Crafting Experience?
Yes, you can absolutely compete! Embrace your cosplay confidence by focusing on beginner tips like clean presentation, polished details, and expressive character energy — judges celebrate creativity and passion over perfection, so you’ve already got what it takes!
How Do I Budget Effectively When Building a Detailed Cosplay From Scratch?
Start with smart fabric sourcing—scout thrift stores, sales, and online remnants. These cost-saving tips let you stretch every dollar, prioritizing standout materials like textured foams and light-reactive fabrics that’ll make your detailed cosplay genuinely unforgettable.
What Conventions Are Most Welcoming for First-Time Cosplay Participants?
Like a warm embrace, friendly conventions such as Comic-Con and Anime Expo offer supportive environments for you. Their cosplay communities thrive on encouragement, making these perfect spaces where you’ll discover invaluable first-time tips and innovative inspiration effortlessly.
References
- https://www.crazecosplay.com/blogs/questions/how-to-make-your-cosplay-look-better
- https://www.reddit.com/r/CosplayHelp/comments/1m06bxe/how_do_you_spice_up_cosplay/
- https://cosplayadvice.com/expert-tips-to-improve-your-cosplay/
- https://gailrae.com/article/20-expert-tips-to-improve-your-cosplay-and-stand-out-in-the-crowd
- https://inthastyle.com/cosplay/costume/creative-cosplay-hacks-boost-presence-show-floor/
- https://rogersenpai.com/cosplay-makeup-tips/
- https://www.youtube.com/watch?v=0gO1E6c8aVg
- https://www.reddit.com/r/CosplayHelp/comments/wqc40f/cosplay_101_answers_to_a_lot_of_basics/
- https://www.meidilight.com/cosplay-costume-stand-out/
- https://www.youtube.com/watch?v=_fvqI2axGiY